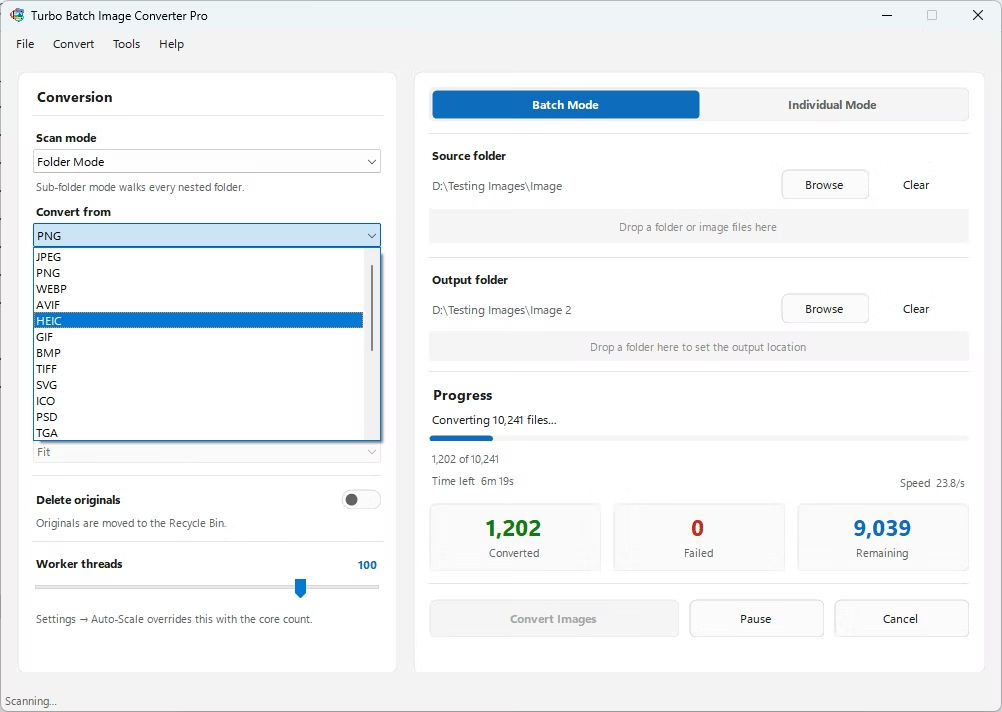
Supported Input Formats
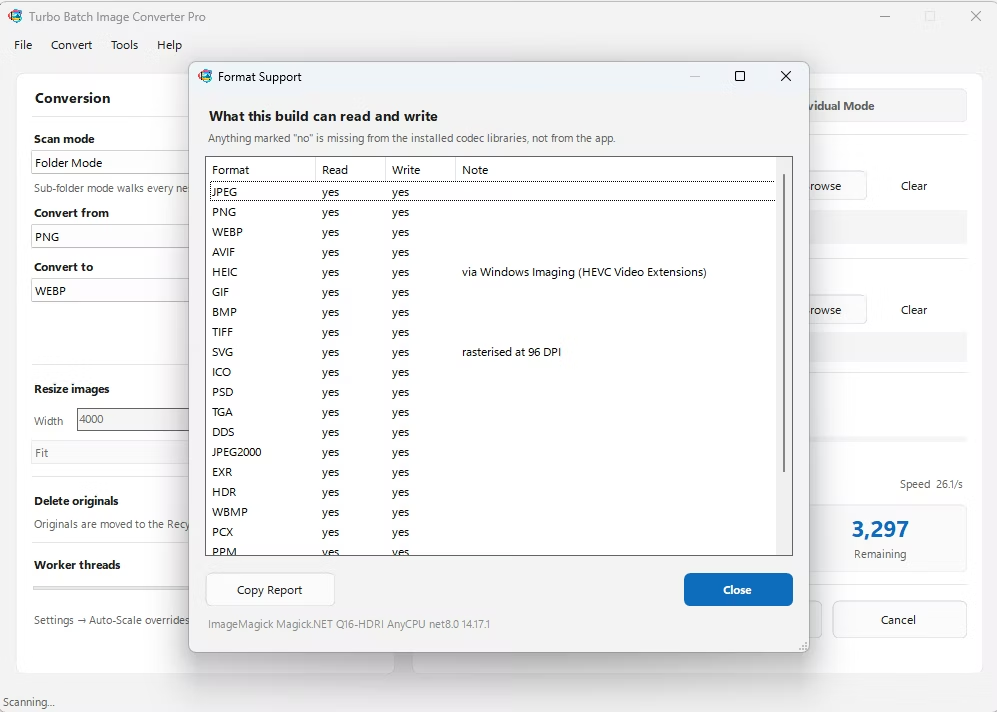
The "From" dropdown groups these into 22 input format families (for example JPEG covers both .jpg and .jpeg, HEIC covers .heic and .heif, and TIFF covers .tif and .tiff). Selecting the RAW family unlocks all 47 camera formats listed below.
Supported RAW Input Formats (47 Camera Formats)
Turbo Batch Image Converter Pro reads RAW files from every major camera brand and demosaics them into full-color images before saving to your chosen output format — no separate RAW editor required. This covers common types like CR2, CR3, NEF, ARW and DNG alongside less common professional and cinema formats.
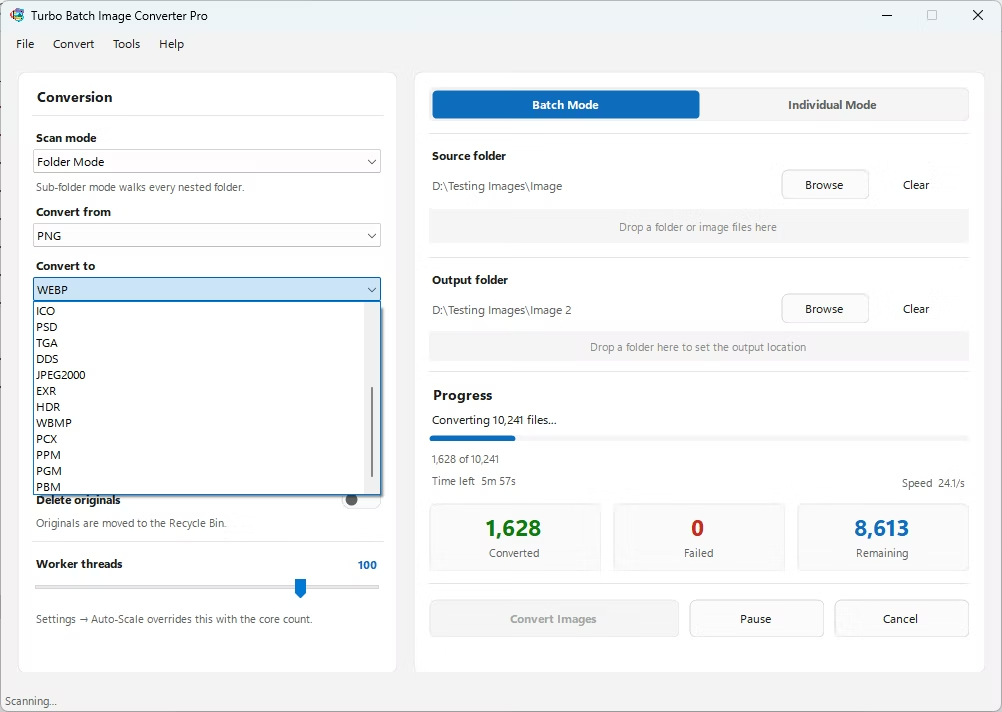
Supported Output Formats (21 Formats)
Key Features
▶ Single Mode
Convert a single image file to any supported output format in one click. Browse or drag-and-drop any image file directly into the app. The input format is detected automatically - no manual "From" selection needed. Resize options, quality settings, and delete-original are all available. Progress is shown live with a status bar and filename. Ideal for quick one-off conversions without setting up a full batch job.
▶ Batch Mode
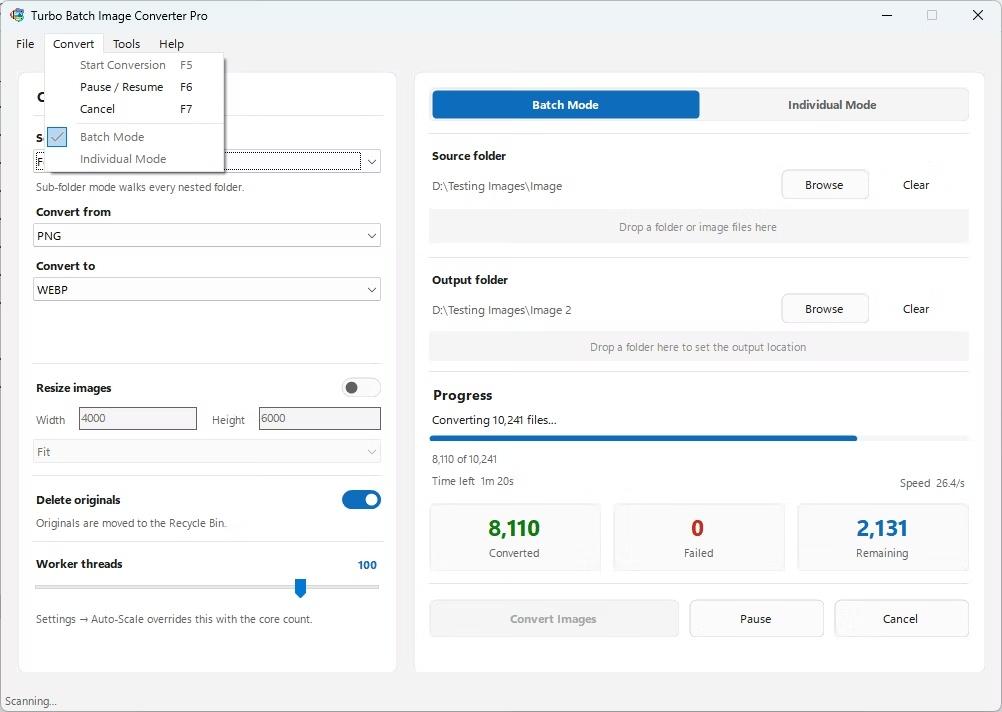
Convert an entire folder (or folder tree) of images in a single run. Select a source folder, choose your input and output formats, set an optional output folder, and click Convert. The app scans all matching files and processes them across multiple parallel workers simultaneously. Real-time progress shows files converted, speed, failures, and estimated time remaining. Supports Pause, Resume, and Cancel at any point. Handles 1,000 to 100,000+ files stably in a single session.
Convert JPG Images in Bulk
Point the app at a folder and convert JPG images by the thousand in one run, with quality, resize, and delete-original options applied consistently across every file. Whether you need to convert JPG images to PNG, WebP, or AVIF, batch mode handles the whole folder tree automatically.
Convert JPEG Images Instantly
Need to convert a JPEG image quickly? Use Single Mode to drop in a photo, select your preferred output format, and instantly convert it to PNG, WebP, AVIF, or any of the 21 supported formats.
Free Image Converter Software Download
This image converter software download installs in minutes and runs 100% offline on Windows 10 and Windows 11 — no subscription, no cloud uploads, and no per-file limits once you complete the image converter software download and license activation.
Batch Image Resizing
Set custom width and height (up to 8,000 px). Choose Fit, Fill, or Stretch mode. Resize hundreds of images across nested sub-folders in one pass. Convert and resize simultaneously.
Nested Sub-Folder Recursive Conversion
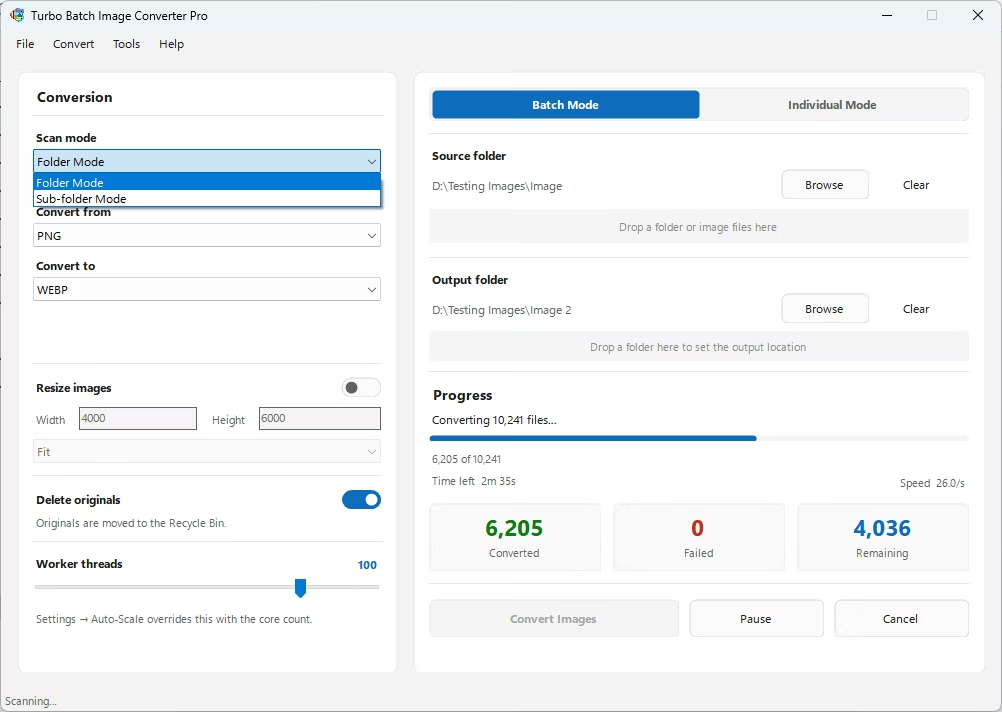
Enable Sub-Folder Mode to recursively process all nested folders. No manual selection needed — the app scans entire directory trees automatically and mirrors the folder structure in the output.
Safe Delete Original Files After Conversion
Original files are moved to the Recycle Bin — not permanently deleted. Safe for cleanup after conversion. Perfect for replacing PNG files with WebP in bulk.
Scalable Parallel Workers
Scale the thread slider anywhere from 1 to 128 concurrent workers to maximize throughput on large batches. The slider defaults to your CPU's core count, and an optional Auto-Scale Workers mode assigns the worker count automatically. The more cores your machine has, the more files it converts at once.
High-Speed Batch Processing Engine
Multi-threaded engine handles 1,000 to 100,000+ files with consistent speed and stability. Smart worker management keeps the engine running fast throughout the entire session.
Advanced Batch Image Resizer
Professional resize modes built-in: Fit (aspect-safe), Fill (smart crop), and Stretch (forced exact dimensions). All three modes work seamlessly with batch conversion in one pass.
Real-Time Conversion Dashboard
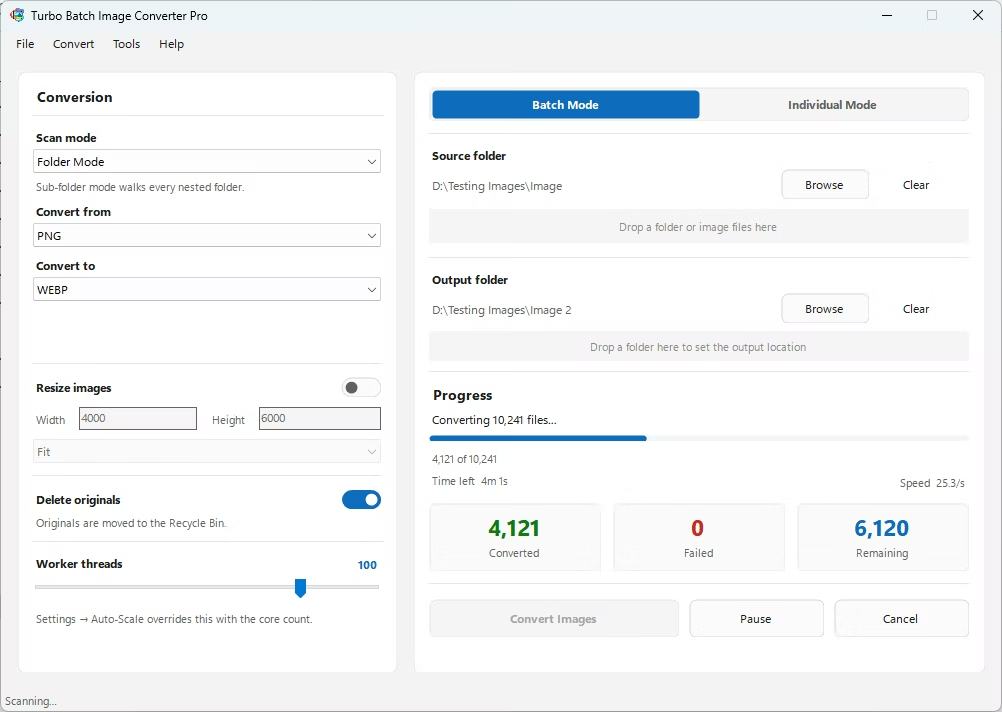
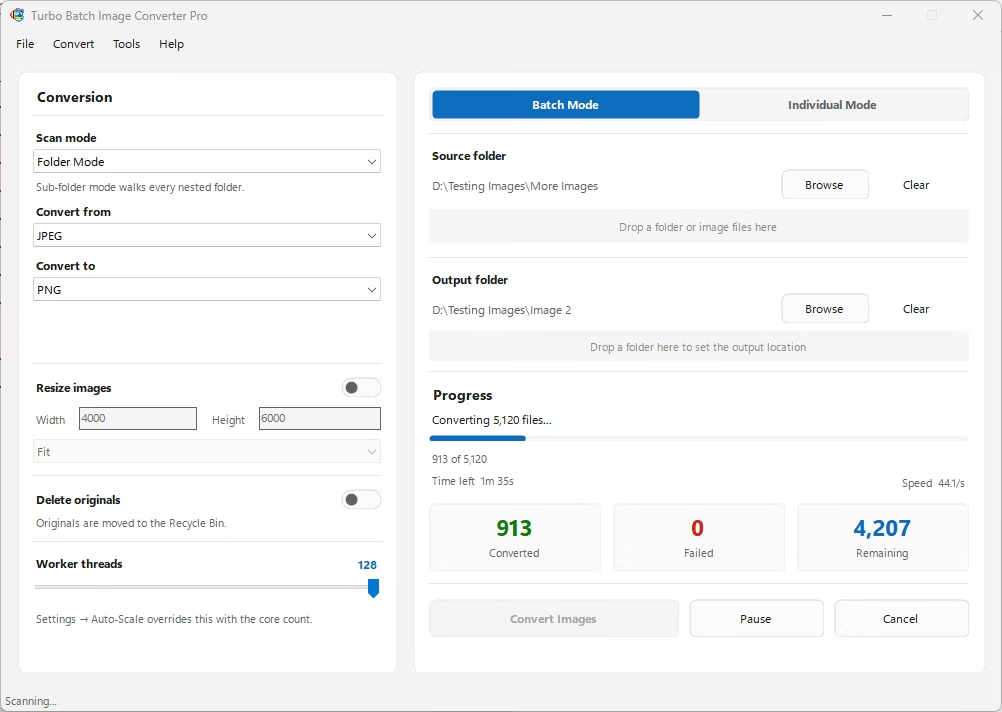
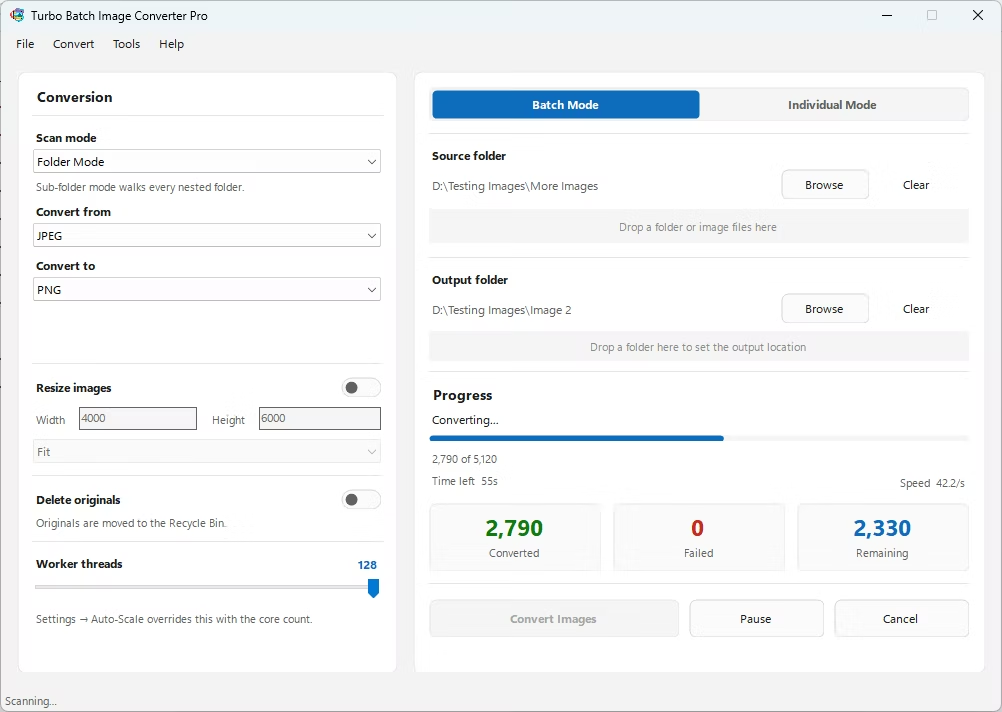
Live display of files processed, success and failure counts, real-time speed in files per second, estimated time remaining, and the current file name — updated every 250 ms.
High-Volume Batch Stability
Engineered for 10,000–100,000+ image workloads. Memory is managed automatically throughout the session to maintain consistent speed without slowdown.
Drag and Drop Input / Output
Drop folders directly into the app window or browse manually. The app automatically scans all supported image formats in the selected folder.
100% Offline — No Internet Required
All conversion happens locally on your PC. No cloud uploads, no file size limits, no internet connection needed during conversion. Unlimited batch size.
Convert Images in Bulk
A fast and dependable bulk image converter for large-scale format conversion. No cloud uploads, no waiting queues, no online tool limitations.
Bulk Image Resizer
Apply custom dimensions to complete folders at once. Ideal for e-commerce catalogs, websites, photography archives, design libraries, and content teams.
Technical Notes
Why RAW to HEIC Conversion Is Slower
RAW to HEIC is the slowest combination in the app and can take 3–10× longer than RAW to JPEG. Both sides of the pipeline are CPU-intensive at the same time: decoding a RAW file requires a full demosaicing pass to reconstruct the image from the camera sensor's raw data, while HEIC encoding applies multi-pass compression. To prevent system overload under this double load, the app automatically limits the number of parallel workers to half your CPU's core count when RAW to HEIC is selected. A visible warning is shown so you can plan accordingly.
Naming Conflict Resolution During Parallel Conversion
When two or more source files share the same base name (for example, photo.cr2 and photo.nef in the same folder), the app detects the conflict before converting and appends the original extension to each output filename — producing photo_cr2.jpg and photo_nef.jpg rather than overwriting one another. If the output path still collides with an existing file, a numeric suffix is added incrementally (photo_cr2_1.jpg, photo_cr2_2.jpg, …) until a free filename is found.
How Parallel Processing Works
Batch conversion dispatches queued files across a thread pool sized by the worker slider (1–128). Each worker independently loads, optionally resizes, and saves a single image — workers never share image data with each other, ensuring safe parallel operation. The live progress counter is updated as each file completes, and the dashboard refreshes about four times a second to show speed and ETA. When Auto-Scale Workers is enabled, the worker count is set from your CPU's core count. Heavy format combinations like RAW to HEIC or RAW to AVIF receive a reduced worker cap automatically to prevent the system from thrashing under a double CPU load.
Input Format Auto-Detection in Single Mode
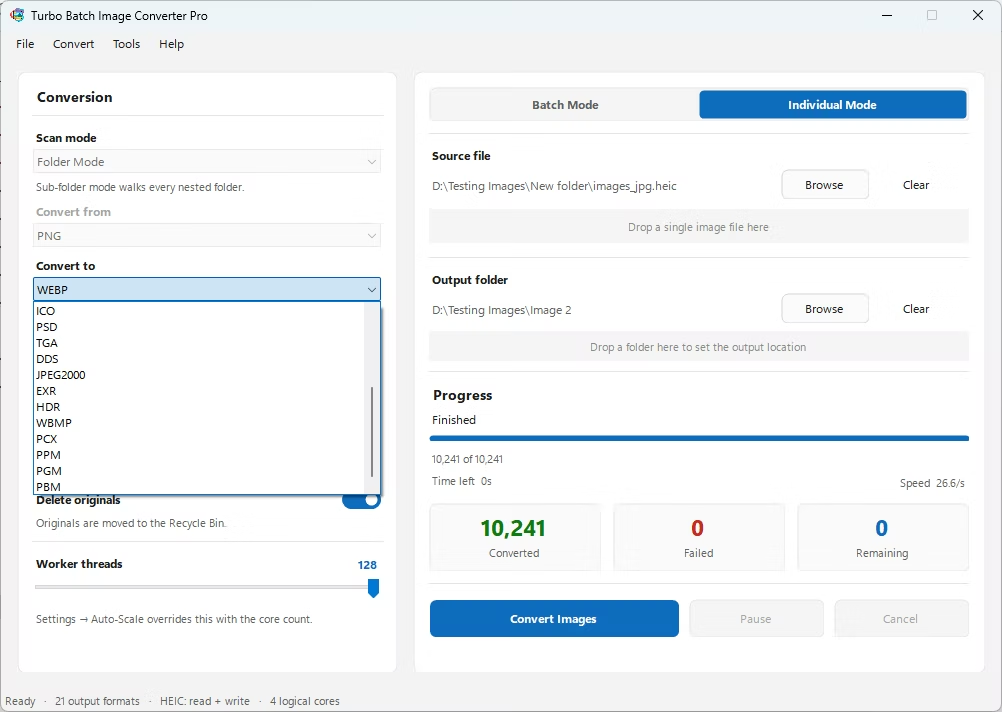
In Individual Mode the "From" format selector is greyed out because the app reads the file's extension from the selected path and picks the correct decoder itself. This removes a common source of user error and lets any of the 22 input format families — including all 47 RAW camera formats — load without a manual "From" selection. The same unified image loader used in Batch Mode applies here, so every format-specific step (HEIC/HEIF decoding, RAW demosaicing, SVG rasterization, multi-variant TIFF) behaves identically whether you convert one file or ten thousand.
How Turbo Batch Image Converter Pro Works
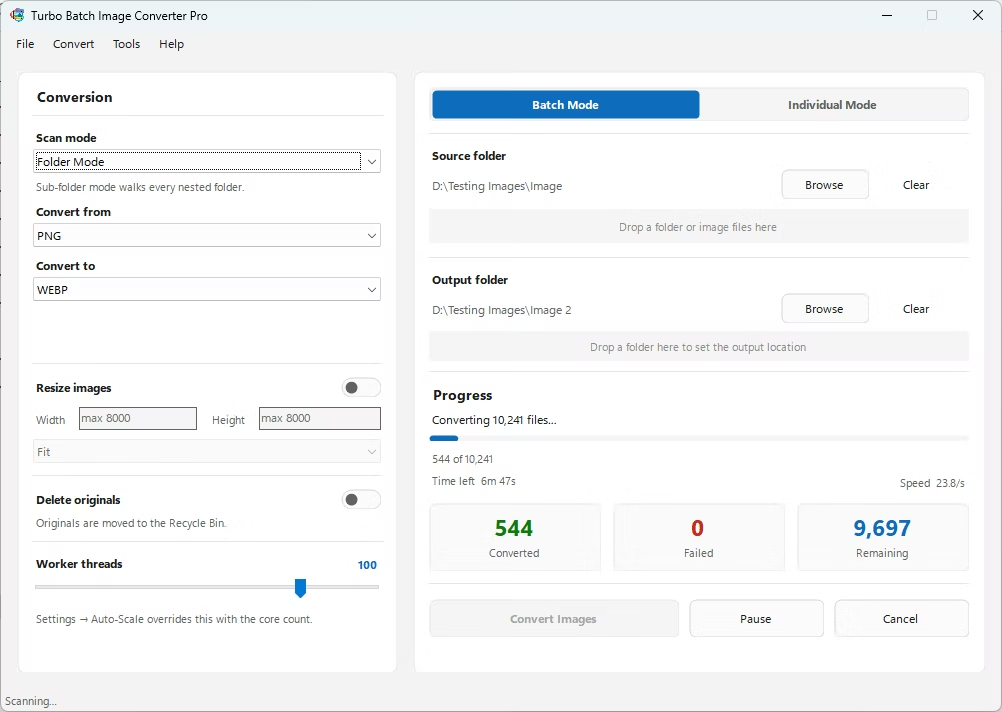
The app opens on a single window split into two panels. The left panel holds every setting that controls how files are converted — scan mode, input and output format, resizing, delete-original, and the thread count. The right panel controls what gets converted — the Batch/Individual toggle, the source folder or file, the live progress dashboard, and the action buttons. You set the options on the left, point the app at your files on the right, and press Convert. There is no project setup, no queue file to save, and no account to create.
Batch Mode Workflow
1. Choose a Scan Mode
Pick Folder Mode to convert only the images sitting directly inside the folder you select, or Sub-folder Mode to walk the entire directory tree recursively. Sub-folder Mode mirrors the original folder structure in the output so nested albums stay organized.
2. Select From and To Formats
Use the "From" dropdown to tell the app which input type to scan for (for example JPEG, HEIC, or RAW) and the "To" dropdown to choose the output format. Both dropdowns are scrollable and cover all supported formats. Only files that match the chosen input type are picked up, so mixed folders are handled cleanly.
3. Point the App at Your Files
Click Browse to pick a source folder, or drag and drop a folder or image files straight onto the window. A separate output folder can be chosen, or the app writes converted files next to the originals. A Clear button resets the selection instantly.
4. Set Resize, Delete and Threads
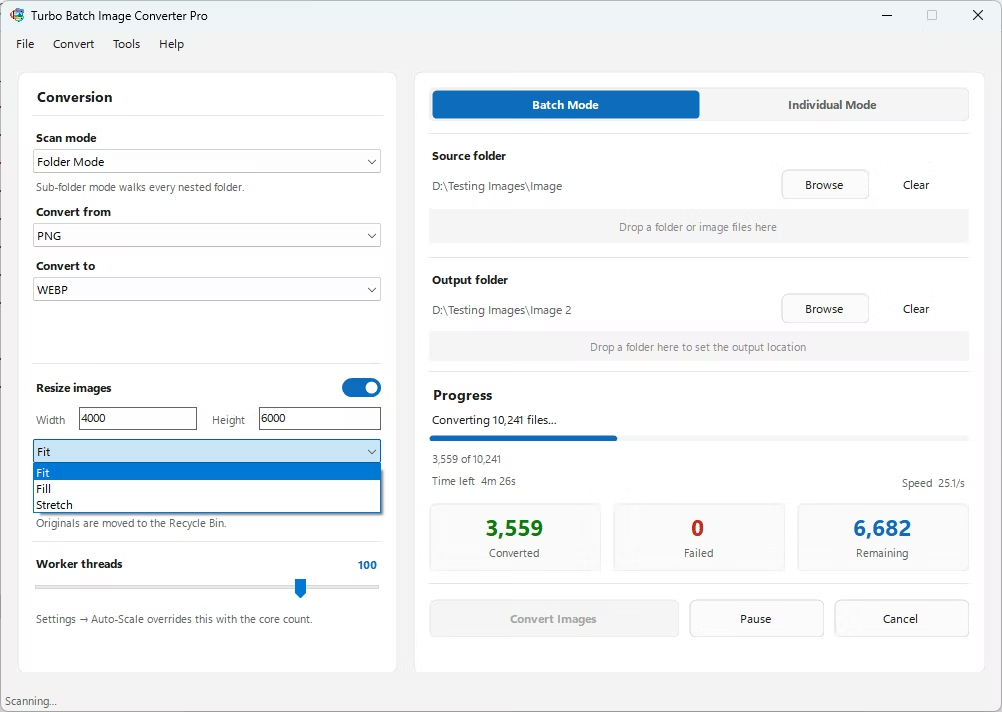
Optionally enable Resize and enter a width and height with a Fit, Fill, or Stretch mode. Optionally tick Delete Originals After Conversion. Drag the Threads slider to choose how many files convert in parallel. Fine-tune per-format quality in Settings if you want.
5. Convert and Monitor
Press Convert Images. The dashboard shows a progress bar, a "Processed X / Total (Converted / Failed)" counter, live conversion speed, and an ETA. You can Pause, Resume, or Cancel at any moment without corrupting output.
6. Review the Result
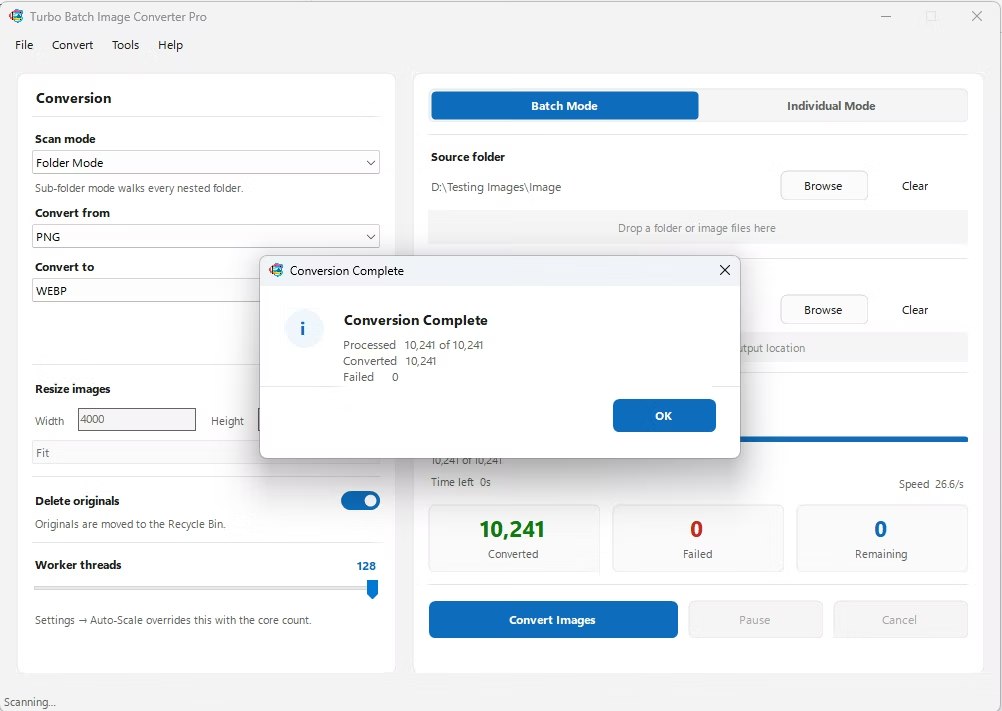
When the run finishes, a summary reports how many files converted and how many failed. Failed files (corrupt, locked, or unsupported) are counted separately and never stop the rest of the batch. If Delete Originals was on, sources are sent to the Recycle Bin.
Individual Mode Workflow
Flip the prominent toggle in the top-right of the app from BATCH MODE to INDIVIDUAL MODE when you only need to convert one file. In this mode the "From" selector is disabled because the input format is detected automatically from the file you choose. Select a single image by browsing to it, pick your output format, set any resize or quality options, and click Convert. It's the fastest path for a one-off conversion — no folder scanning, no queue, just one file in and one file out. Because single-file work completes almost instantly, the Pause and Cancel buttons are disabled in this mode.
Per-Format Quality and Compression Settings
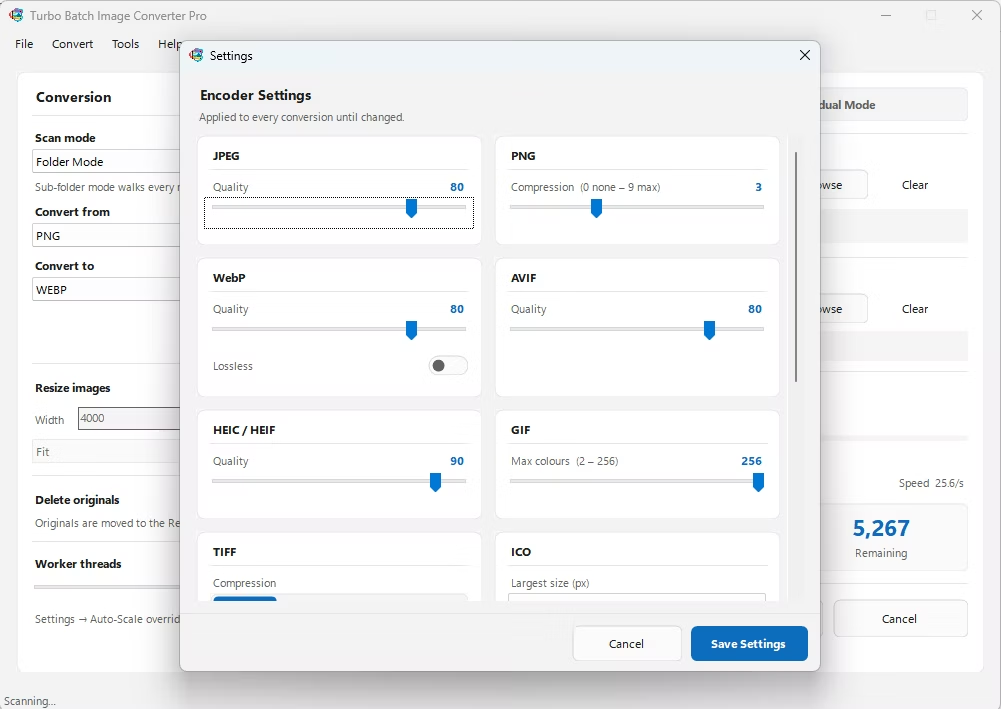
A dedicated Settings window gives each output format its own quality or compression control, so you are never forced into a single global quality slider. Set your preferences once and they apply to every file in the batch. The controls below are exactly what the app exposes.
JPEG Quality
A quality slider from 1 to 100 (default 80). The encoder uses full-quality chroma subsampling for cleaner color, and original EXIF metadata is preserved and written into the JPEG output when present.
PNG Compression
A compression-level slider from 0 to 9 (default 3), where 0 is no compression and 9 is maximum. PNG output stays fully lossless at every level; higher values trade encode time for smaller files.
WebP Quality and Lossless
A quality slider from 1 to 100 (default 80) plus a dedicated Lossless checkbox. Turn Lossless on for perfect-fidelity WebP, or leave it off for smaller lossy files at your chosen quality.
AVIF Quality
Its own quality slider from 1 to 100 (default 80), independent of WebP. AVIF encoding is tuned for a strong balance of speed and quality so large libraries stay practical to convert.
HEIC Quality
A quality slider from 1 to 100 (default 90) for HEIC/HEIF output. HEIC uses multi-pass HEVC encoding, so it produces very compact files at high visual quality.
GIF Max Colors
A palette control from 2 to 256 colors (default 256). Lower the color count for smaller GIFs or simple graphics; keep it high for photographic content.
TIFF Compression
Choose between LZW (default), ZIP, JPEG, or None. LZW and ZIP are lossless and ideal for archives and scanned documents; JPEG compression yields smaller TIFFs where some loss is acceptable.
ICO Max Size
Select the largest icon size in the multi-resolution pyramid (16, 32, 48, 64, 128, or 256 px, default 256). The app builds a proper multi-size ICO so your icon looks sharp at every scale.
JPEG 2000 Quality
A slider from 0 to 100 (default 80). Setting the value to 0 produces fully lossless JPEG 2000; values from 1 to 100 apply increasing lossy compression.
TGA RLE Compression
An optional Run-Length Encoding checkbox for TGA output (off by default). RLE keeps TGA files lossless while shrinking flat-color and game-texture images.
EXR Compression
For high-dynamic-range OpenEXR output, choose from NONE, RLE, ZIP (default), PIZ, PXR24, B44, or DWAA. This lets VFX and rendering workflows match their pipeline's preferred EXR codec.
HDR (Radiance RGBE)
HDR output is always written as 32-bit Radiance RGBE, the standard for high-dynamic-range imaging, so no extra settings are needed — it simply works.
Processing Controls
Thread Slider (1–128)
The Settings window and the main panel both expose the worker count. The slider runs from 1 to 128 and defaults to your CPU's core count, letting you dial performance up for big jobs or down to keep the machine responsive for other work.
Auto-Scale Workers
Tick "Auto-Scale Workers (use all available CPU cores automatically)" and the app picks the worker count from your processor's core count, so you don't have to think about tuning it yourself.
Batch Resize Engine: Fit, Fill and Stretch
Resizing runs in the same pass as conversion — there is no separate step. Enable Resize, type a target width and height (each up to 8,000 px), and choose one of three modes. High-quality Lanczos resampling is used throughout for crisp results, and an overall ceiling of 64 megapixels protects memory on extreme dimensions.
Fit (Aspect-Safe)
Scales each image to fit inside your width and height while keeping its original aspect ratio. Nothing is cropped or distorted — the image is made as large as it can be without exceeding either dimension. Ideal for thumbnails, previews, and web galleries where proportions must stay correct.
Fill (Smart Crop)
Scales the image to completely cover the target box, then center-crops the overflow so the output exactly matches your dimensions. Perfect for uniform product grids, avatars, and card layouts that demand identical image sizes with no letterboxing.
Stretch (Exact Dimensions)
Forces the image to your exact width and height, ignoring the original aspect ratio. Use it when a downstream system requires a precise pixel size and mild distortion is acceptable, such as fixed-size banners or texture atlases.
Who Uses It and Why
Photographers
Convert entire RAW shoots (CR2, CR3, NEF, ARW, DNG and more) to JPG, PNG, or WebP for delivery and proofing without opening a full editor. Resize to client-ready dimensions in the same pass and optionally send the originals to the Recycle Bin after export.
iPhone and Mobile Users
Batch-convert HEIC and HEIF photo exports to JPG or PNG so they open everywhere, on any device or older software. Point the app at a whole export folder, including sub-folders, and let it run.
E-commerce and Catalog Teams
Standardize thousands of product photos to one format and one exact size using Fill mode's smart crop, producing clean, uniform grids for storefronts and marketplaces.
Web and Content Teams
Replace heavy PNG and JPG assets with modern WebP or AVIF in bulk to cut page weight, then delete the originals safely to finish the migration in a single run.
Designers and Game Developers
Move between production formats like PSD, TGA, DDS, EXR, and HDR, build multi-resolution ICO icons, and export texture-ready assets with optional RLE compression.
Offices, Legal and Medical
Convert scanned TIFF archives to compact JPG or lossless formats entirely offline. Because nothing is uploaded, the app suits air-gapped networks and confidential document workflows.
EXIF, File Naming, and Collision-Safe Output
Getting a picture into a new container is only half the job. What happens to the embedded camera data, and how the resulting files are named, matters just as much when you are moving thousands of items at once.
Camera Data Carried Over
For the standard containers that support it, the original EXIF block is read from the source and written into the result, so shooting date, camera model, and exposure details survive the transformation instead of being stripped away.
Clean, Predictable Names
Each result keeps its original base name with the new extension. When two sources would collide on the same name, a short suffix is added so nothing is silently clobbered.
Never Overwrites Silently
If a target name already exists on disk, the engine keeps probing for a free variant rather than replacing your existing work, which protects earlier runs saved to the same destination.
Folder Structure Mirrored
When you process a tree and point output at a separate destination, the original sub-folder layout is recreated there, so a deep source hierarchy comes out organized exactly the same way.
Optional Source Cleanup
Turn on delete-original and each source is sent to the Recycle Bin only after its result is written successfully, so a failed item never loses its source. Nothing is hard-deleted.
Choose Your Destination
Leave output blank to write next to each source, or pick a dedicated folder to keep results separate from originals — handy for review before you commit.
Picking the Right Target Type
With twenty-one destination types on offer, the practical question is which one fits the job. Here is a plain-language guide to the ones people reach for most, based on what each is genuinely good at.
JPG
The universal choice for photographs headed to email, the web, or general sharing. A tunable quality dial trades a little fidelity for much smaller files. Choose JPG as your output whenever you need to convert images to JPG format for maximum compatibility.
PNG
Lossless with alpha transparency, ideal for screenshots, logos, diagrams, and anything with crisp edges or a transparent background.
WebP
A modern container that squeezes photographs smaller than JPG at similar quality, with an optional lossless switch — a strong pick for websites.
AVIF
Newer still, often beating WebP on size for the same visual result, with its own quality control for fine-tuning the balance.
HEIC
The efficient container Apple devices favor, useful when you need modern compression and your destination apps can read it.
TIFF
An archival mainstay with a choice of LZW compression, suited to print handoff and long-term storage where fidelity is paramount.
ICO
Builds a proper multi-resolution icon, packing sizes from 256 down to 16 pixels into one file, capped to your source dimensions.
PSD, TGA, DDS
Specialist containers for design and game pipelines — a layered-friendly document, a classic uncompressed option with optional run-length encoding, and a texture format for real-time engines.
EXR, HDR
High-dynamic-range options for VFX and rendering work, storing far more tonal range than an 8-bit picture ever could.
The Netpbm Family
PPM, PGM, and PBM cover simple, portable pixel maps still used in scientific and programming contexts, alongside legacy WBMP and PCX.
A Practical Guide to Image Formats
Choosing an output format is the single decision that most affects your file sizes, your image quality, and whether the results open cleanly on the other end. The sections below explain what actually separates these formats, so the choice you make in the To dropdown is a deliberate one rather than a guess.
Lossy and Lossless: The Fundamental Split
Every format in the app falls into one of two families. Lossless formats — PNG, TIFF with LZW or ZIP, BMP, TGA, and the Netpbm family — reconstruct the original pixels exactly. Nothing is discarded, so you can convert between them repeatedly without any accumulated degradation. The trade-off is size: a lossless photograph is routinely five to ten times larger than a lossy version that most people cannot visually distinguish from it.
Lossy formats — JPEG, WebP at default settings, AVIF, and HEIC — achieve their compression by discarding image information the human eye is least sensitive to. The saving is dramatic, but the loss is permanent. This matters most when you re-encode: converting a JPEG to another JPEG applies a second round of loss on top of the first. Where you expect a file to be edited and re-saved several times, keep the working copy lossless and produce the lossy version only as the final export.
Two formats sit in both camps. WebP has a dedicated Lossless checkbox in the Settings window, and JPEG 2000 becomes fully lossless when you set its quality slider to zero. Both are useful when you want modern compression without committing to permanent loss.
Transparency and Color Depth
If any part of your image needs to be see-through, the format must carry an alpha channel. PNG, WebP, AVIF, TIFF, ICO, TGA, DDS and PSD all do. JPEG does not, and this is the most common surprise in bulk conversion work: convert a folder of transparent PNG logos to JPEG and every transparent region will be filled with a solid background. Nothing is broken, but the result is rarely what was intended. When transparency matters, target PNG for maximum compatibility or WebP when file size is also a concern.
Color depth is the second constraint. Most everyday formats store eight bits per channel, giving 256 levels of red, green and blue. GIF goes further down, holding a palette of at most 256 total colors — which is why the GIF Max Colors setting exists, and why photographic content converted to GIF can show visible banding. At the opposite end, EXR and HDR store floating-point values well beyond the 0–255 range, preserving highlight and shadow detail that an eight-bit format would clip away permanently.
The Modern Formats: WebP, AVIF and HEIC
These three represent the current generation of image compression, and all three are supported as both input and output. WebP is the safe modern choice: it typically produces files 25–35% smaller than an equivalent-quality JPEG, and it is supported by every current browser. For a website migration, WebP is usually the right target because compatibility is no longer a practical concern.
AVIF compresses harder still, often beating WebP by a further 20% at matched visual quality, and it handles gradients and flat color noticeably better. The cost is encoding time: AVIF is computationally expensive, which is why a large AVIF batch takes meaningfully longer than the same batch targeted at WebP. Where you are converting an asset library once and serving it many times, that one-off cost is usually worth paying.
HEIC is the format Apple devices produce by default, and it is where most iPhone photo libraries now live. As an output format it is efficient and high quality, with the quality slider defaulting to 90 rather than 80 because HEIC's multi-pass HEVC encoding rewards the extra headroom. As an input format it is what most users of this app reach for first, because HEIC files still do not open reliably across older Windows software, Android devices, or many web upload forms.
RAW Is Not an Image Format
This distinction trips up a lot of people, and it explains why RAW conversion behaves differently from everything else in the app. A RAW file is not a picture — it is an unprocessed dump of what the camera's sensor recorded, stored in a manufacturer-specific container. Before it can become a viewable image, the sensor data must be demosaiced: an algorithm reconstructs full color for every pixel from a sensor grid where each photosite recorded only one color channel.
That reconstruction is expensive, and it is the reason a RAW batch runs slower than a JPEG batch of the same file count. It is also why the app supports 47 separate RAW formats rather than one: CR2, CR3, NEF, ARW, DNG, RAF, ORF, RW2 and the rest are genuinely different container designs from different manufacturers, each needing its own handling. Selecting the RAW family in the From dropdown unlocks all 47 at once, so a folder containing files from several different camera bodies converts in one pass.
Specialist and Archival Formats
TIFF remains the archival standard for scanned documents and print handoff, with four compression choices exposed in Settings. LZW and ZIP are both lossless and interchangeable in practice; ZIP tends to win on photographic content while LZW is more widely supported by older software. JPEG compression inside a TIFF container shrinks files considerably at the cost of the lossless guarantee, and None produces very large but maximally compatible files.
PSD, TGA and DDS serve design and game pipelines. TGA is a straightforward uncompressed format with an optional Run-Length Encoding pass that shrinks flat-color artwork without any quality loss, which makes it a good fit for sprite sheets and UI elements. DDS is the texture container real-time engines expect. ICO is a special case: rather than storing one image, the app builds a proper multi-resolution pyramid packing 256, 128, 64, 48, 32 and 16-pixel versions into a single file, capped so it never upscales beyond your source dimensions.
The Netpbm family — PPM, PGM and PBM — alongside legacy WBMP and PCX, exists for scientific tooling, embedded systems and programming contexts where a trivially parseable file matters more than efficiency. They are rarely a first choice, but when a downstream tool demands one, having it in the same batch pipeline as everything else saves a conversion detour.
A quick rule of thumb: photographs headed for the web go to WebP or AVIF; photographs headed for email, print labs or unknown recipients go to JPG; anything with transparency or crisp edges goes to PNG; anything destined for long-term storage goes to TIFF with LZW; and anything that will be edited again should stay lossless until the final export.
Choosing Quality Settings That Match the Job
The Settings window exposes a separate control for each output format rather than one global slider, which means the defaults are sensible but rarely optimal for a specific job. Understanding what the numbers represent takes the guesswork out of tuning them.
What the JPEG Quality Number Actually Means
The JPEG slider runs from 1 to 100 and defaults to 80. It is not a percentage of retained quality — it is an index into the encoder's quantization tables, and the relationship between the number and the resulting file size is steeply non-linear. Moving from 80 to 90 can add 60% to file size for a difference most viewers will never notice on a screen. Moving from 80 down to 60 often halves the file size while remaining perfectly acceptable for web thumbnails and email attachments.
In practice, three settings cover almost everything. Use 90–95 for print work, client deliverables and archival exports where the file will not be re-encoded. Use 75–85 for general web and sharing use, which is where the default of 80 sits. Use 55–70 for thumbnails, previews and contact sheets where size dominates. Values above 95 rarely justify their size, and values below 45 begin showing visible blocking artifacts around high-contrast edges.
PNG Compression Is a Time Dial, Not a Quality Dial
The PNG slider runs from 0 to 9 and defaults to 3. This is the single most misread control in any image tool, so it is worth being explicit: PNG output is lossless at every level. A level 0 PNG and a level 9 PNG contain identical pixels. The slider trades encoding time for file size, nothing else. Level 9 typically produces files only 5–15% smaller than level 3 while taking substantially longer per file — a trade that matters a great deal when you are processing fifty thousand images. The default of 3 is deliberately chosen as the point where the curve flattens.
Setting Quality for the Modern Formats
WebP and AVIF both default to 80, and both behave more forgivingly than JPEG at the low end — a WebP at quality 60 generally looks better than a JPEG at quality 60, because the underlying compression handles fine detail more gracefully. If you are migrating a website and want an aggressive size reduction, WebP at 70–75 is a defensible starting point that would look noticeably worse in JPEG.
HEIC defaults to 90 for a reason worth understanding. Its multi-pass HEVC encoding is efficient enough that even at 90 the files remain compact, so there is little to gain by lowering it and real quality to lose. JPEG 2000 inverts the usual convention entirely: setting its slider to 0 produces fully lossless output, while values from 1 to 100 apply increasing lossy compression. Reading that control as "higher is better" produces exactly the opposite of what you intended.
Settings Apply to the Whole Batch
Whatever you configure in the Settings window applies uniformly to every file in the run. This is a deliberate design choice — consistency across a batch is almost always what you want, and it is what makes the results predictable. If a single job genuinely needs two different quality levels, the practical approach is to run it twice against different output folders rather than trying to vary settings mid-run.
Common Jobs, Start to Finish
Freeing an iPhone Photo Dump
A folder full of HEIC snaps from a phone will not open everywhere. Point the tool at that folder, choose JPG as the destination, set quality to taste, and run it. Thousands of pictures come out in a universally readable form, with shooting metadata intact, ready to hand off or upload. It is the simplest way to convert images to JPG format straight from an iPhone export folder.
Delivering a Camera Shoot
A card of NEF or CR3 captures needs to become client-ready proofs. Select the RAW family as the source, JPG as the target, optionally cap the long edge with Fit resizing, and let the multi-core engine work through the demosaic-and-encode pipeline. A visible caution appears for the heaviest pairings so you can plan the run.
Modernizing a Website's Assets
Legacy PNGs and JPGs weigh a site down. Sweep an assets tree, target WebP or AVIF, and mirror the sub-folder layout into a fresh output directory. You get lighter, faster-loading pictures without disturbing the originals, and the folder structure lines up for a clean deploy.
Producing Icons and Textures
A single source graphic can become a multi-resolution ICO for an application, or a DDS texture for a game engine, in one pass. Because sizing is capped to the source, you never upscale beyond what the artwork actually contains.
System Tray and Background Operation
A Minimize To Tray button tucks the app into the Windows system tray so a long batch can keep running quietly in the background while you work on other things. The tray icon lets you restore the window or quit the app, keeping large overnight or multi-hour conversions out of your way without interrupting them. Combined with Pause and Resume, this makes it easy to fit big jobs around the rest of your day.
Safety and Reliability
- Safe Multi-Threaded Architecture - Designed for concurrent processing. Each file task runs independently, preventing conflicts during high-speed batch operations.
- File Integrity Protection - Prevents output corruption during simultaneous multi-file conversions.
- Safe Delete to Recycle Bin - Original files are moved to the Recycle Bin rather than permanently deleted (optional).
- Conversion Continuity - A single failed file does not stop the entire batch. Skipped files are reported in the dashboard.
- Pause / Resume Safety - Jobs can be paused and resumed at any point without restarting the entire queue.
- Stable Under Heavy Loads - Continues operating reliably during extended high-volume sessions without performance degradation.
- Ideal for Sensitive Environments - Corporate offices, legal firms, medical records teams, and air-gapped networks.
- Privacy First - No image uploads · No remote scanning · No cloud transfer · No third-party access.
Demo Videos
Short walkthroughs recorded on a standard Windows desktop, showing the interface and a full batch run at real speed rather than a sped-up capture.
High-speed batch conversion
A full folder run from selection to completion, with the live dashboard showing throughput, processed counts and estimated time remaining as workers process files in parallel.
Format selection and settings
Working through the From and To dropdowns, the per-format quality controls in the Settings window, and how resize options are combined with a conversion in the same pass.
Sub-folder scanning in practice
Recursive conversion across a nested directory tree, showing how the original folder structure is mirrored into a separate output destination.
Performance and Speed
Multi-Core Optimized Engine
Scales from entry-level laptops to multi-core workstations. Runs well on dual-core systems and 32-core processors alike.
High Concurrency
Supports up to 128 workers for maximum throughput on powerful processors. The thread slider defaults to your core count, and Auto-Scale Workers detection assigns a worker count automatically for your hardware.
Failure Isolation
If one file is corrupted, unsupported, or locked — only that task fails. All remaining conversions continue uninterrupted.
Massive Batch Capability
Suitable for e-commerce catalogs, photography archives, design libraries, scanned document repositories, and enterprise media folders.
Real-Time ETA Calculation
Remaining time is predicted dynamically based on current throughput and updated live during processing.
Low-Overhead Architecture
Optimized memory and thread management for sustained long-duration conversions. No slowdown, no memory leaks, no crashes.
Matching Worker Count to Your Hardware
The Threads slider runs from 1 to 128 and defaults to your CPU's core count. For most users that default is the right answer and needs no attention. The guidance below is for the cases where it is worth overriding — very large jobs, very heavy format pairings, or a machine you need to keep usable while a batch runs.
| Your hardware | Suggested setting | Why |
|---|---|---|
| Dual-core laptop | 2 to 4 workers | Beyond a small multiple of your core count, workers compete for the same CPU time and total throughput stops improving. |
| 4 to 8 core desktop | Auto-Scale, or core count | The default is well matched here. This is the configuration most users have, and it needs no tuning. |
| 12 to 32 core workstation | Core count, up to 2× for light formats | Light pairings such as JPEG to PNG spend time waiting on disk, so extra workers keep the CPU fed. |
| Any machine, RAW input | Core count or lower | Demosaicing is CPU-bound and memory-hungry. More workers means more full-resolution images held in RAM at once. |
| Any machine, still in use | Half your core count | Leaves headroom so the rest of Windows stays responsive while the batch runs in the background. |
Why More Workers Is Not Always Faster
Conversion throughput is limited by whichever resource saturates first, and that is not always the CPU. On a fast NVMe drive with light format pairings, the processor is the bottleneck and raising the worker count helps. On a mechanical drive, or across a network share, the storage saturates long before the CPU does — and adding workers at that point simply produces more competing read requests, which on a spinning disk can make the run measurably slower rather than faster.
Memory is the other ceiling. Each active worker holds a decoded, full-resolution image in RAM while it works. Forty-megapixel RAW files decode to several hundred megabytes each, so a high worker count on a memory-constrained machine can push the system into swapping, which costs far more time than the parallelism gains. This is precisely why the app automatically reduces the effective worker count for RAW to HEIC and RAW to AVIF, where both the decode and the encode side are simultaneously expensive.
Reading the Dashboard to Find Your Ceiling
The live dashboard refreshes roughly four times a second and reports conversion speed in files per second. That figure is the practical tool for tuning: run a few hundred files at your core count, note the steady-state speed, then try again with the slider raised. If the speed does not improve, you have found the ceiling for that combination of hardware, source format and target format, and further increases only add memory pressure. Because the setting is per-run rather than permanent, experimenting costs nothing.
Security and Privacy
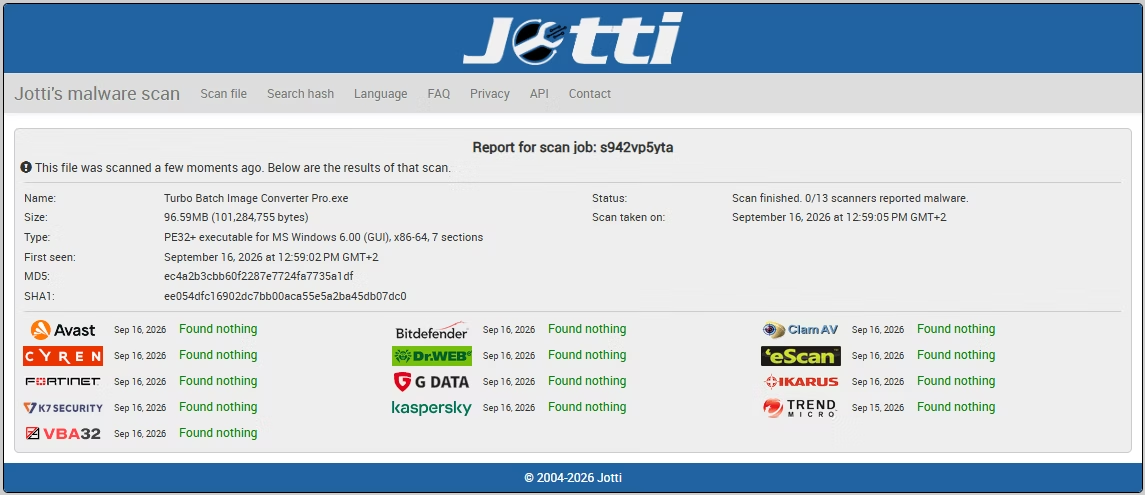
Turbo Batch Image Converter Pro is a fully local desktop application. All image conversion, resizing, and compression tasks are completed on your own computer. No files are uploaded, scanned remotely, or shared with third parties. It is a trusted offline image converter for personal, commercial, and enterprise use.
- Does not log, analyze, track, or store your image data
- No integration with third-party analytics, advertising trackers, or background telemetry
- Internet is used only for license validation — the request contains no personal data, file names, or image content
- Ideal for photographers, businesses, designers, medical institutions, and enterprise teams
- Complete confidentiality for personal, professional, and commercial workflows
Minimum System Requirements
| Operating System | Windows 10 (64-bit) |
| Processor | Dual-core 64-bit CPU |
| Memory | 2 GB RAM |
| Storage | 500 MB free disk space |
Recommended System Requirements
| Operating System | Windows 10 or later (64-bit) |
| Processor | 4 or more CPU cores |
| Memory | 8 GB RAM or more |
| Storage Type | SSD recommended for best batch performance |
| Free Disk Space | 2 GB or more |
App Info
| App Name | Turbo Batch Image Converter Pro |
| Version | 6.2 |
| Platform | Windows (64-bit) |
| Category | Image Tools |
| Output Formats | 21 raster formats |
| Input Formats | 22 format families, including 47 RAW camera types |
| Max Parallel Workers | 128 |
| Max Resize Dimension | 8,000 px (64 MP ceiling) |
| Processing | 100% offline / local |
| License Management | Gumroad |
Installation, Activation and Licensing
Turbo Batch Image Converter Pro is a conventional Windows desktop application, distributed as a standard installer and licensed with a one-time purchase through Gumroad. There is no subscription, no account to maintain, and no ongoing connection requirement.
Getting Set Up
- Complete the purchase. Checkout runs through Gumroad, which issues your license key and a download link immediately. The key is also emailed to you, so keep that message for future reference — it is what you will need if you ever move to a new machine.
- Run the installer. The installer is a standard signed Windows package. Because it is an independent software product rather than a Microsoft Store listing, Windows SmartScreen may show a warning on first launch; choose More info and then Run anyway to proceed.
- Activate with your key. On first launch the app asks for your license key. This is the one moment an internet connection is required: the key is verified once against Gumroad's licensing service. The request carries no file names, no image data and no personal information beyond the key itself.
- Work offline from then on. Once verified, the activation is cached locally. Every subsequent launch and every conversion runs entirely on your machine with no network access, which is what makes the app viable on isolated and air-gapped systems.
What the License Covers
The purchase is a perpetual license for the version you buy, at a one-time price of $29.99. There is no per-file cap, no monthly conversion allowance and no batch-size limit — the constraints on a run are your own disk space and memory, not a commercial quota. Because processing is entirely local, output produced with the app carries no watermark and no attribution requirement, and is yours to use commercially.
If you are unsure whether Pro is the right tier, the comparison table further down this page sets it against Turbo Batch Image Converter Lite and Turbo RAW Image Converter. Step-by-step activation instructions for every TurboSoft application are available on the activation guide, and licensing questions can be raised through support.
Troubleshooting Common Issues
Most problems in batch conversion work come down to a handful of recurring causes. The scenarios below cover what users encounter most often, along with what is actually happening underneath.
The Scan Found No Files
Almost always a mismatch between the From format and what is actually in the folder. The scan deliberately picks up only files matching the selected input family, so pointing it at a folder of PNGs with JPEG selected returns nothing. Check the extension of the files you expect to convert, and if they are nested inside subdirectories, switch from Folder Mode to Sub-folder Mode so the scan walks the whole tree.
A Handful of Files Failed
Failures are counted separately and never halt the batch, so the rest of the run completes normally. The usual causes are a truncated or corrupt source file, a file locked by another application, or a file whose extension does not match its actual contents — a PNG renamed to .jpg, for example. Close any program holding the files open and re-run just the failures.
Transparency Turned Into a Solid Background
Expected behavior rather than a fault. JPEG has no alpha channel, so transparent regions must be filled with something when converting to it. If the transparency matters, target PNG, WebP, AVIF or TIFF instead, all of which carry alpha through the conversion intact.
The Run Is Slower Than Expected
Check the format pairing first. RAW to HEIC and RAW to AVIF are the heaviest combinations in the app and can take three to ten times longer than RAW to JPEG, because both the decode and encode sides are CPU-intensive simultaneously. The app caps workers automatically for these pairings and displays a warning. Source files on a network share or an external drive are the other common cause — copying them locally first is often faster overall than converting in place.
Output Files Have Unexpected Suffixes
This is the collision-safety logic doing its job. When two sources share a base name, the original extension is appended so photo.cr2 and photo.nef become photo_cr2.jpg and photo_nef.jpg rather than one silently overwriting the other. If the name still collides with a file already on disk, a numeric suffix is added until a free name is found.
Output Files Are Larger Than the Originals
Normal when converting from a lossy format to a lossless one — a JPEG expanded into PNG or TIFF will grow substantially, because the lossless container has to store every pixel the JPEG had already approximated. It also happens converting small images to ICO, since a multi-resolution icon stores several sizes in one file. If size reduction is the goal, target WebP or AVIF rather than a lossless format.
The Resize Did Not Apply
Confirm the Resize checkbox is actually enabled — entering dimensions alone does not activate it. Also note the 64-megapixel ceiling: extreme width and height combinations are capped to protect memory. In Fit mode the output will frequently be smaller than the numbers you entered, because Fit scales the image to sit inside your box while preserving its aspect ratio. Use Fill or Stretch when the output must match your dimensions exactly.
Originals Are Missing After a Run
Check the Recycle Bin. When Delete Originals After Conversion is enabled, each source is moved there — never hard-deleted — and only after its output has been written successfully, so a failed conversion never costs you its source. Everything is recoverable through the standard Windows restore.
Before any large run: test your settings on a folder of a dozen files first. Thirty seconds of verification confirms the target format, quality level and resize behavior are what you intended, and it is far cheaper than discovering a wrong setting fifty thousand files later. Leave Delete Originals off until that sample has been checked.
Supported Conversions
Every pairing below is supported directly, with no intermediate step and no separate plug-in. Select the source type in the From dropdown and the destination type in the To dropdown, and the matching decoder and encoder are loaded automatically.
Browse all image conversion guides →
| JPG | → | PNG, AVIF, HEIC, BMP, TIFF, SVG, GIF, WEBP, ICO, PSD, TGA, DDS, JPEG2000, EXR, HDR, WBMP, PCX, PPM, PGM, PBM |
| JPEG | → | PNG, AVIF, HEIC, BMP, TIFF, SVG, GIF, WEBP, ICO, PSD, TGA, DDS, JPEG2000, EXR, HDR, WBMP, PCX, PPM, PGM, PBM |
| PNG | → | JPG, AVIF, HEIC, BMP, TIFF, SVG, GIF, WEBP, ICO, PSD, TGA, DDS, JPEG2000, EXR, HDR, WBMP, PCX, PPM, PGM, PBM |
| HEIC | → | JPG, PNG, AVIF, BMP, TIFF, SVG, GIF, WEBP, ICO, PSD, TGA, DDS, JPEG2000, EXR, HDR, WBMP, PCX, PPM, PGM, PBM |
| HEIF | → | JPG, PNG, AVIF, BMP, TIFF, SVG, GIF, WEBP, ICO, PSD, TGA, DDS, JPEG2000, EXR, HDR, WBMP, PCX, PPM, PGM, PBM |
| RAW | → | JPG, PNG, AVIF, HEIC, BMP, TIFF, SVG, GIF, WEBP, ICO, PSD, TGA, DDS, JPEG2000, EXR, HDR, WBMP, PCX, PPM, PGM, PBM |
| AVIF | → | JPG, PNG, HEIC, BMP, TIFF, SVG, GIF, WEBP, ICO, PSD, TGA, DDS, JPEG2000, EXR, HDR, WBMP, PCX, PPM, PGM, PBM |
| BMP | → | JPG, PNG, AVIF, HEIC, TIFF, SVG, GIF, WEBP, ICO, PSD, TGA, DDS, JPEG2000, EXR, HDR, WBMP, PCX, PPM, PGM, PBM |
| TIFF | → | JPG, PNG, AVIF, HEIC, BMP, SVG, GIF, WEBP, ICO, PSD, TGA, DDS, JPEG2000, EXR, HDR, WBMP, PCX, PPM, PGM, PBM |
| TIF | → | JPG, PNG, AVIF, HEIC, BMP, SVG, GIF, WEBP, ICO, PSD, TGA, DDS, JPEG2000, EXR, HDR, WBMP, PCX, PPM, PGM, PBM |
| GIF | → | JPG, PNG, AVIF, HEIC, BMP, TIFF, SVG, WEBP, ICO, PSD, TGA, DDS, JPEG2000, EXR, HDR, WBMP, PCX, PPM, PGM, PBM |
| WEBP | → | JPG, PNG, AVIF, HEIC, BMP, TIFF, SVG, GIF, ICO, PSD, TGA, DDS, JPEG2000, EXR, HDR, WBMP, PCX, PPM, PGM, PBM |
| ICO | → | JPG, PNG, AVIF, HEIC, BMP, TIFF, SVG, GIF, WEBP, PSD, TGA, DDS, JPEG2000, EXR, HDR, WBMP, PCX, PPM, PGM, PBM |
| PSD | → | JPG, PNG, AVIF, HEIC, BMP, TIFF, SVG, GIF, WEBP, ICO, TGA, DDS, JPEG2000, EXR, HDR, WBMP, PCX, PPM, PGM, PBM |
| TGA | → | JPG, PNG, AVIF, HEIC, BMP, TIFF, SVG, GIF, WEBP, ICO, PSD, DDS, JPEG2000, EXR, HDR, WBMP, PCX, PPM, PGM, PBM |
| JPEG2000 | → | JPG, PNG, AVIF, HEIC, BMP, TIFF, SVG, GIF, WEBP, ICO, PSD, TGA, DDS, EXR, HDR, WBMP, PCX, PPM, PGM, PBM |
| EXR | → | JPG, PNG, AVIF, HEIC, BMP, TIFF, SVG, GIF, WEBP, ICO, PSD, TGA, DDS, JPEG2000, HDR, WBMP, PCX, PPM, PGM, PBM |
| HDR | → | JPG, PNG, AVIF, HEIC, BMP, TIFF, SVG, GIF, WEBP, ICO, PSD, TGA, DDS, JPEG2000, EXR, WBMP, PCX, PPM, PGM, PBM |
| DDS | → | JPG, JPEG, PNG, AVIF, HEIC, HEIF, BMP, TIFF, TIF, SVG, GIF, WEBP, ICO, PSD, TGA, JPEG2000, EXR, HDR, WBMP, PCX, PPM, PGM, PBM |
| WBMP | → | JPG, JPEG, PNG, AVIF, HEIC, HEIF, BMP, TIFF, TIF, SVG, GIF, WEBP, ICO, PSD, TGA, DDS, JPEG2000, EXR, HDR, PCX, PPM, PGM, PBM |
| PCX | → | JPG, JPEG, PNG, AVIF, HEIC, HEIF, BMP, TIFF, TIF, SVG, GIF, WEBP, ICO, PSD, TGA, DDS, JPEG2000, EXR, HDR, WBMP, PPM, PGM, PBM |
| PPM | → | JPG, JPEG, PNG, AVIF, HEIC, HEIF, BMP, TIFF, TIF, SVG, GIF, WEBP, ICO, PSD, TGA, DDS, JPEG2000, EXR, HDR, WBMP, PCX, PGM, PBM |
| PGM | → | JPG, JPEG, PNG, AVIF, HEIC, HEIF, BMP, TIFF, TIF, SVG, GIF, WEBP, ICO, PSD, TGA, DDS, JPEG2000, EXR, HDR, WBMP, PCX, PPM, PBM |
| PBM | → | JPG, JPEG, PNG, AVIF, HEIC, HEIF, BMP, TIFF, TIF, SVG, GIF, WEBP, ICO, PSD, TGA, DDS, JPEG2000, EXR, HDR, WBMP, PCX, PPM, PGM |
Fast and Reliable Bulk Image Converter and Bulk Image Resizer for Windows
This is a professional-grade desktop tool for photographers, agencies, e-commerce teams, content creators, and anyone who values keeping their pictures on their own machine. Every job runs locally — no uploads, no cloud services, no size ceilings, and no waiting in a queue. On Windows 11 and Windows 10 it reads every mainstream picture type plus 47 RAW camera formats, so it comfortably handles jobs like turning a Canon or Nikon shoot into deliverable JPGs, moving a website's assets to WebP, or flattening an iPhone HEIC export into something universally shareable. A multi-threaded core with up to 128 parallel workers keeps large runs fast, while Fit, Fill, and Stretch modes with dimensions up to 8,000 px let you reshape pictures in the same pass. It all ships as one lightweight install — no plugins, companion utilities, or web services required.
Looking for something simpler? Check out Turbo Batch Image Converter Lite, which covers the most common formats — JPEG, PNG, WEBP, GIF, BMP, TIFF, SVG, and ICO. If you only need RAW conversion, Turbo RAW Image Converter takes RAW camera files as input and converts them to those same everyday formats at high speed. And for cleaning up filenames in bulk, there's the Batch File Renaming Tool, also from TurboSoft.
Doing It by Hand vs. Letting the Engine Run
It is worth being honest about the alternatives. You can absolutely reshape pictures one at a time in an editor, or lean on a web page that promises the same result. Both work for a handful of items. Neither holds up once the count climbs.
| Situation | Manual editor / online page | This desktop engine |
|---|---|---|
| Reshaping 5,000 photos | Open, export, repeat — hours of clicking | One folder, one target, one run |
| Sensitive material | A web page means uploading your files | Stays entirely on your own hardware |
| RAW captures | Often unsupported or needs extra software | 47 camera types decoded natively |
| Resize plus reshape | Two separate steps in most tools | Both in a single pass |
| Nested folders | Handle each directory yourself | Recursive sweep, layout preserved |
| Interrupting a job | Start over if you stop | Pause and resume the queue |
| Cost over time | Subscriptions or per-file limits online | A single purchase, used offline |
The manual route also invites small, compounding mistakes — a wrong export setting here, an accidental overwrite there. A repeatable, settings-driven run removes that variability, which is the real reason large jobs belong in an automated pipeline rather than a mouse-driven one.
Getting the Best Results
Test on a Small Sample First
Run a dozen items with your chosen settings before committing a whole tree. It takes a moment and confirms the target type and quality are exactly what you want.
Write to a Separate Folder
Sending results somewhere distinct from the sources lets you review before you delete anything, and keeps a clean before-and-after separation.
Match Quality to Purpose
Push quality high for print or archival work; ease it down for web and email where smaller files matter more than pixel-perfect fidelity.
Let Auto-Scale Handle Threads
Unless you are deliberately keeping the machine free for other work, letting the thread count set itself from your CPU is the simplest path to good speed.
Mind the Heavy Pairings
When a caution appears for a demanding source-and-target combination, expect a longer run and a trimmed worker count — that is the engine protecting system stability.
Keep Originals Until You Verify
Leave delete-original off until you have confirmed a sample looks right, then enable it for the full run to tidy up as you go.
Glossary of Batch Conversion Terms
Image conversion carries a fair amount of jargon, and much of it appears in the app's own interface. These are the terms worth knowing, defined in the sense they are used here.
- Alpha channel
- An extra channel stored alongside red, green and blue that records how transparent each pixel is. Formats carrying alpha include PNG, WebP, AVIF, TIFF, ICO, TGA, DDS and PSD. JPEG does not, which is why transparency is filled with a solid color when converting to it.
- Aspect ratio
- The proportional relationship between an image's width and its height. Fit mode preserves it, Fill mode preserves it and crops the overflow, and Stretch mode overrides it to hit exact dimensions.
- Batch mode
- The operating mode in which a whole folder, or a whole folder tree, is processed in one run with a single set of settings applied to every file. Its counterpart is Individual mode, which converts one selected file.
- Chroma subsampling
- A JPEG compression technique that stores color information at lower resolution than brightness, exploiting the eye's greater sensitivity to luminance. The app's JPEG encoder uses full-quality subsampling, which keeps color edges cleaner than the more aggressive default many tools apply.
- Demosaicing
- The reconstruction step that turns raw sensor data into a full-color image. Each photosite on a camera sensor records only one color, so the other two must be interpolated from neighbors. This is the computationally expensive stage that makes RAW conversion slower than converting an already-rendered image.
- ETA
- The estimated time remaining shown on the dashboard, calculated dynamically from throughput observed so far rather than from a fixed per-file assumption. It becomes more accurate as a run progresses and the average settles.
- EXIF
- The metadata block cameras and phones embed in image files, recording capture date, camera model, lens, exposure settings and often GPS coordinates. For output containers that support it, the original EXIF block is copied into the result so this information survives conversion.
- Fit, Fill and Stretch
- The three resize modes. Fit scales the image to sit entirely inside your target box without cropping or distortion. Fill scales it to cover the box completely and center-crops the overflow, producing exact dimensions. Stretch forces exact dimensions by distorting the aspect ratio.
- Lanczos resampling
- The resampling algorithm used when resizing. It weighs a wider neighborhood of surrounding pixels than simpler methods, which preserves fine detail and edge sharpness noticeably better when scaling images down — the direction most batch resizing goes.
- Lossless
- Compression that reconstructs the original pixels exactly. PNG, BMP, TIFF with LZW or ZIP, and WebP with the Lossless option enabled all qualify. Repeated conversion between lossless formats causes no cumulative degradation.
- Lossy
- Compression that permanently discards image information to achieve much smaller files. JPEG, HEIC, AVIF and default-setting WebP are lossy. Each re-encode applies fresh loss, so lossy files should be produced once as a final export rather than used as a working format.
- LZW
- Lempel–Ziv–Welch, a lossless compression scheme and the default choice for TIFF output. Widely supported by older software, which makes it the safe option for archives that must remain readable for a long time.
- Megapixel ceiling
- The 64-megapixel cap the app applies to resize targets. It prevents an accidentally extreme width and height combination from allocating enough memory to destabilize the system.
- Parallel worker
- One independent conversion task running at the same time as others. Each worker loads, optionally resizes and saves a single image without sharing image data with any other worker, which is what makes parallel operation safe. The count is adjustable from 1 to 128.
- Quantization
- The step in lossy compression where precise values are rounded into coarser buckets. Quality sliders effectively control how aggressive that rounding is, which is why the relationship between a quality number and the resulting file size is steeply non-linear rather than proportional.
- RAW
- Unprocessed sensor data in a manufacturer-specific container rather than a finished image. Because each manufacturer designs its own, the app supports 47 distinct RAW formats including CR2, CR3, NEF, ARW, DNG, RAF, ORF and RW2.
- Recursive scan
- Sub-folder Mode's behavior of walking every directory beneath the folder you select, at any depth. When output is sent to a separate destination, the original nested structure is recreated there.
- RGBE
- The 32-bit encoding used by Radiance HDR files, storing a shared exponent alongside red, green and blue to represent a far wider range of brightness than an eight-bit format can. HDR output is always written this way, so it needs no quality setting.
- RLE
- Run-Length Encoding, a lossless scheme that stores repeated identical pixels as a count rather than individually. Available as an option for TGA output, where it shrinks flat-color artwork and game textures considerably while leaving photographic content largely unchanged.
- Thread pool
- The managed set of workers across which queued files are dispatched. Sizing it is what the Threads slider controls, and Auto-Scale Workers sets it from your processor's core count automatically.
- Throughput
- The rate at which files complete, reported live on the dashboard in files per second. It is the practical measure for tuning worker count, since it reflects real behavior on your hardware rather than theoretical capacity.
Pro vs Lite vs RAW: Which One Do You Need?
TurboSoft offers three image converters. Pro is the complete tool with the widest format range, per-format quality settings, and RAW support. Lite keeps things simple with the everyday formats, and Turbo RAW Image Converter is focused purely on turning RAW camera files into common formats.
| Capability | Pro | Lite | RAW |
|---|---|---|---|
| Everyday formats (JPEG, PNG, WebP, GIF, BMP, TIFF, SVG, ICO) | Yes | Yes | Output only |
| Modern formats (HEIC, AVIF) | Yes | Limited | Output |
| Professional formats (PSD, TGA, DDS, JPEG 2000, EXR, HDR, WBMP, PCX, PPM, PGM, PBM) | Yes | No | No |
| 47 RAW camera formats as input | Yes | No | Yes |
| Batch and recursive sub-folder conversion | Yes | Yes | Yes |
| Fit / Fill / Stretch resizing | Yes | Yes | Yes |
| Per-format quality and compression settings | Yes | Basic | Basic |
| Up to 128 parallel workers | Yes | Yes | Yes |
| 100% offline processing | Yes | Yes | Yes |
Choose Pro if you work with RAW files, professional or HDR formats, or want fine control over every output. Choose Lite for quick everyday conversions, or the RAW converter if RAW-to-common-format is all you need. Feature availability in Lite and RAW is summarized here for guidance; see each product page for its exact format list.
Frequently Asked Questions
Answers to the questions we are asked most often about Turbo Batch Image Converter Pro, grouped by topic. If something is not covered here, the full FAQ and support page go into more detail.
Formats and Conversions
Is it a good JPG to PNG converter for bulk files?
Yes. As a dedicated JPG to PNG converter, Turbo Batch Image Converter Pro handles thousands of JPG files at once, preserving quality while outputting lossless PNG. You can control PNG compression (0–9) per batch run.
Can it work as an AVIF to JPG converter?
Absolutely. Turbo Batch Image Converter Pro includes a built-in AVIF to JPG converter — just select AVIF as your input format and JPG as the output. Batch-process entire AVIF libraries in minutes, fully offline.
How do I convert HEIC to JPG on Windows?
Converting HEIC format to JPG format on Windows is simple with Turbo Batch Image Converter Pro: drag your HEIC folder into the app, select JPG as the output, and click Convert. The app handles all files in the folder — including sub-folders — automatically. Also great as a HEIC to JPG bulk converter for large iPhone photo exports.
Can it convert RAW files to JPG on Windows 10?
Yes. Turbo Batch Image Converter Pro is a full RAW to JPG converter for Windows 10 and 11. It supports 47 RAW formats including CR2, CR3, NEF, ARW, and DNG. Convert camera RAW files to JPG, PNG, or WebP in bulk — no photo editing software needed.
Can I convert files from several different cameras in one batch?
Yes. Selecting the RAW family in the From dropdown enables all 47 supported RAW formats at once, so a folder mixing CR3 files from a Canon body with NEF files from a Nikon and ARW files from a Sony converts in a single run. If two files share a base name, the original extension is appended to each output to keep them distinct.
Is there a TIFF to JPG converter feature?
Yes. The built-in TIFF to JPG converter handles both TIFF and TIF input files and outputs high-quality JPEGs with adjustable compression. Ideal for scanned document archives and medical imaging workflows.
Can I convert WEBP to JPG?
Yes. Turbo Batch Image Converter Pro handles WEBP to JPG conversion with ease and speed. Thousands of WEBP images can be converted to JPG within minutes, and originals can be sent to the Recycle Bin automatically once each conversion succeeds, removing a separate cleanup step.
Can I convert WEBP to PNG?
Yes. Turbo Batch Image Converter Pro handles WEBP to PNG conversion with ease and speed. Thousands of WEBP images can be converted to PNG within minutes.
How do I convert images to JPG format from another file type?
Drop your file or folder into the app, choose JPG as the output format, and click Convert. Whether it is one photo or an entire library, you can convert images to JPG format from HEIC, PNG, WebP, TIFF, RAW and 17 other input types in a single pass.
Can I convert JPEG files to other formats?
Yes. You can convert JPEG images to PNG, WebP, AVIF, TIFF, ICO and 16 other output formats. Use Individual Mode to convert a JPEG one file at a time, or Batch Mode to process an entire folder in a single run.
Does converting to JPG remove transparency?
Yes, because JPEG has no alpha channel. Any transparent region has to be filled with a solid color when JPEG is the target. If transparency needs to survive the conversion, choose PNG for the widest compatibility, or WebP or AVIF when file size also matters — all three carry the alpha channel through intact.
Batch Processing and Performance
What is the fastest way to convert JPG images in bulk?
Use Batch Mode: point it at a folder, set your target format, and let the multi-threaded engine convert JPG images across up to 128 parallel workers. Most users convert JPG images by the thousand in a single run with resize applied at the same time.
How many images can it convert at once?
There is no built-in limit on batch size. The app is engineered to handle anywhere from a handful of files to 100,000 or more in a single session, using automatic memory management to keep speed consistent throughout. Because everything runs locally, you are only limited by your own disk space, not by any cloud quota or upload cap.
How many parallel threads does it support?
The thread slider runs from 1 to 128 workers and defaults to your CPU's core count. You can raise it for maximum throughput on multi-core workstations or lower it to keep your machine responsive. There is also an Auto-Scale Workers option that sets the count from your processor automatically. For CPU-heavy combinations such as RAW to HEIC or RAW to AVIF, the app automatically reduces the effective worker count to prevent the system from overloading.
What is Auto-Scale Workers?
A one-click option that sets the thread count from your processor automatically, so you get sensible parallelism without tuning the slider by hand.
Why does a RAW-to-HEIC job run slower?
Both halves of that pairing lean hard on the CPU at once — reconstructing the sensor data and then re-encoding. To keep the system stable, the tool trims the active worker count for that combination and warns you first.
Can I pause a large batch and come back to it?
Yes. During any batch run you can Pause and Resume without restarting the queue, or Cancel to stop entirely. You can also press Minimize To Tray to let a long job keep running in the background from the Windows system tray while you use your PC for other tasks.
Can it keep converting in the background?
Yes. The Minimize To Tray button moves the app to the Windows system tray while the batch continues running at full speed. Restore the window at any time from the tray icon to check progress, and combine it with Pause and Resume to fit multi-hour jobs around the rest of your work.
Is there a limit on file size?
There is no artificial size ceiling imposed by the app; practical limits come down to your own machine's memory and storage.
Resizing and Output Quality
Can I resize while converting?
Yes. Enable Resize, enter a width and height up to 8,000 px, and choose Fit (keeps aspect ratio), Fill (scales and center-crops to exact size), or Stretch (forces exact dimensions). Resizing happens in the same pass as conversion using high-quality Lanczos resampling, and a 64-megapixel ceiling protects memory on very large targets.
What is the difference between Fit, Fill, and Stretch?
Fit keeps proportions inside your target box, Fill covers the box and crops the overflow, and Stretch forces the exact dimensions even if that distorts the aspect ratio.
Can I control output quality and compression?
Yes. A Settings window gives each output format its own control: JPEG, WebP, AVIF, HEIC and JPEG 2000 quality sliders (1–100), PNG compression level (0–9), GIF max colors (2–256), TIFF compression (LZW, ZIP, JPEG or None), ICO maximum size, optional TGA RLE, and EXR compression mode. WebP and JPEG 2000 also offer lossless output. Your settings apply to every file in the batch.
Is a higher PNG compression level better quality?
No. PNG output is lossless at every level from 0 to 9, so a level 0 file and a level 9 file contain identical pixels. The slider trades encoding time for file size only. Level 9 typically yields files just 5–15% smaller than level 3 while taking considerably longer per file, which is why the default sits at 3.
Why is my converted file larger than the original?
This is expected when converting from a lossy format to a lossless one. A JPEG expanded into PNG or uncompressed TIFF grows substantially, because the lossless container must store every pixel the JPEG had already approximated away. Converting a small image to ICO has the same effect, since a multi-resolution icon packs several sizes into one file. When reducing file size is the goal, target WebP or AVIF rather than a lossless format.
Files, Folders and Metadata
Does it process sub-folders too?
A recursive scan option walks the entire tree beneath a folder, and when you send results to a separate location the nested layout is recreated there.
Can I convert just one picture quickly?
Individual mode takes a single file, detects its type from the extension, and skips the source-format picker entirely for fast one-off jobs.
What if two files have the same name?
When two source files share a base name (for example photo.cr2 and photo.nef), the app appends the original extension to each output so they become photo_cr2.jpg and photo_nef.jpg instead of overwriting each other. If a name still collides with an existing file, a numeric suffix is added until a free filename is found. Your files are never silently overwritten.
Will it overwrite files I already made?
No. Existing files are protected — the naming logic finds a free variant rather than replacing anything already on disk.
What happens to my original files?
By default your originals are left untouched. If you tick "Delete Originals After Conversion," the source files are moved to the Windows Recycle Bin rather than permanently erased, so you can always restore them. The app asks for confirmation before deleting.
Does it keep my photo's shooting details?
For the standard containers that carry EXIF, the original block is copied into the result, so capture date and camera settings travel with the picture.
Privacy and Offline Use
Does it work fully offline?
Yes. All conversion, resizing, and compression run entirely on your computer. No images are ever uploaded, scanned remotely, or shared. The only time the app touches the internet is a one-time license check, and that request never contains your file names or image data. This makes it well suited to private, corporate, and air-gapped environments.
Do I need an internet connection to use it?
Only once, to confirm your license on first activation. After that every operation runs on your own machine, so day-to-day work needs no connection at all.
Are my pictures ever uploaded anywhere?
No. Every read, transform, and write happens on your own PC. Nothing is sent to a server, which is why it suits confidential or client-sensitive material.
Does the app add a watermark to converted images?
No. Output files carry no watermark, no attribution requirement and no embedded branding of any kind. Because all processing is local and the license is a one-time purchase, the images you produce are entirely yours to use, including commercially.
System Requirements, Install and Licensing
Does it work as a batch image converter on Windows 11?
Yes. The app is fully optimized for Windows 11, runs natively in 64-bit, and takes full advantage of modern multi-core CPUs for maximum throughput.
Which Windows editions are supported?
It targets 64-bit Windows 10 and Windows 11 and takes advantage of multi-core processors for throughput.
Where do I get the image converter software download?
The image converter software download is available directly from the Buy Now button on this page. After the image converter software download completes, install it on Windows 10 or 11, enter your license key, and start converting — no subscription and no ongoing account required.
How is the app licensed?
Through a one-time Gumroad purchase, with no subscription and no recurring fee. Activate once with your key and the app keeps working locally on that machine.