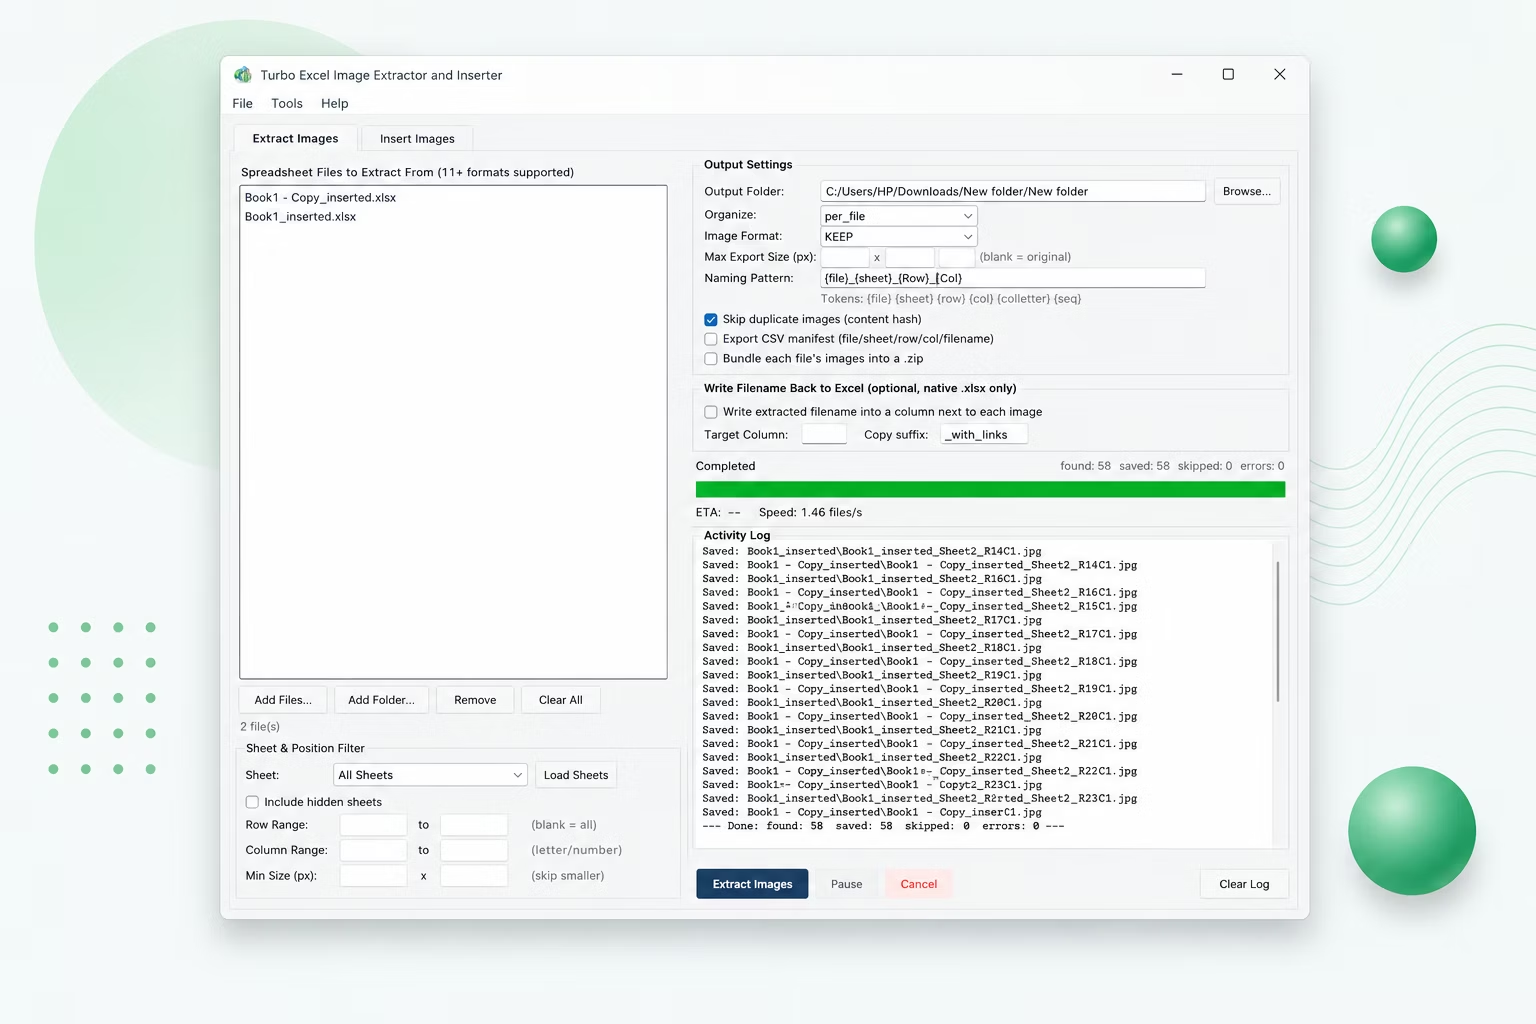
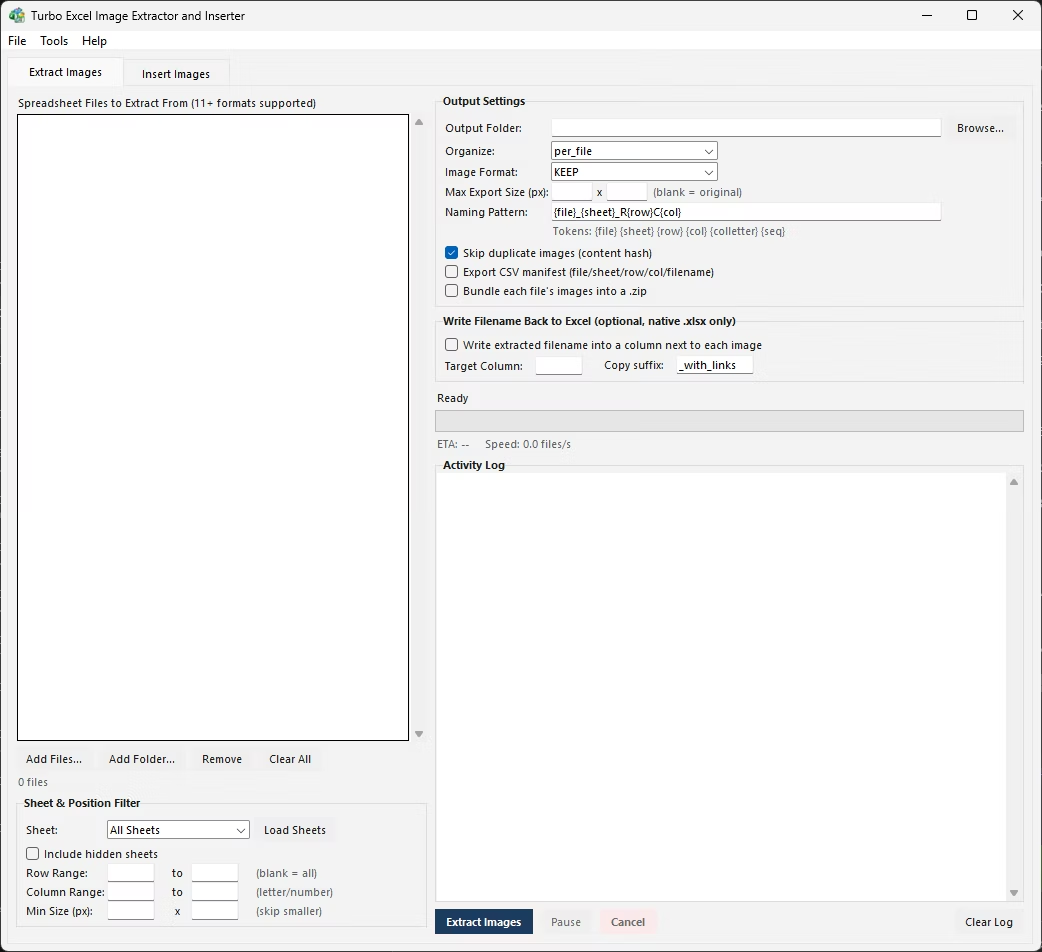
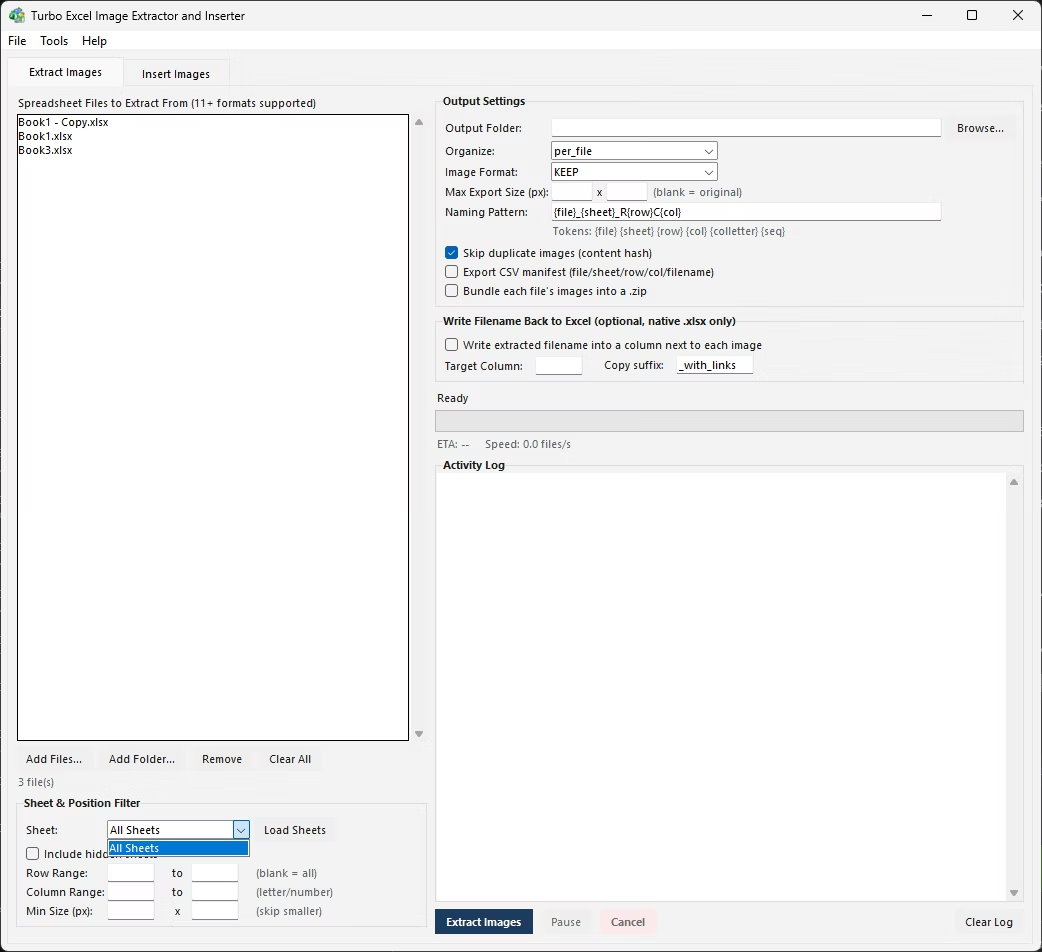
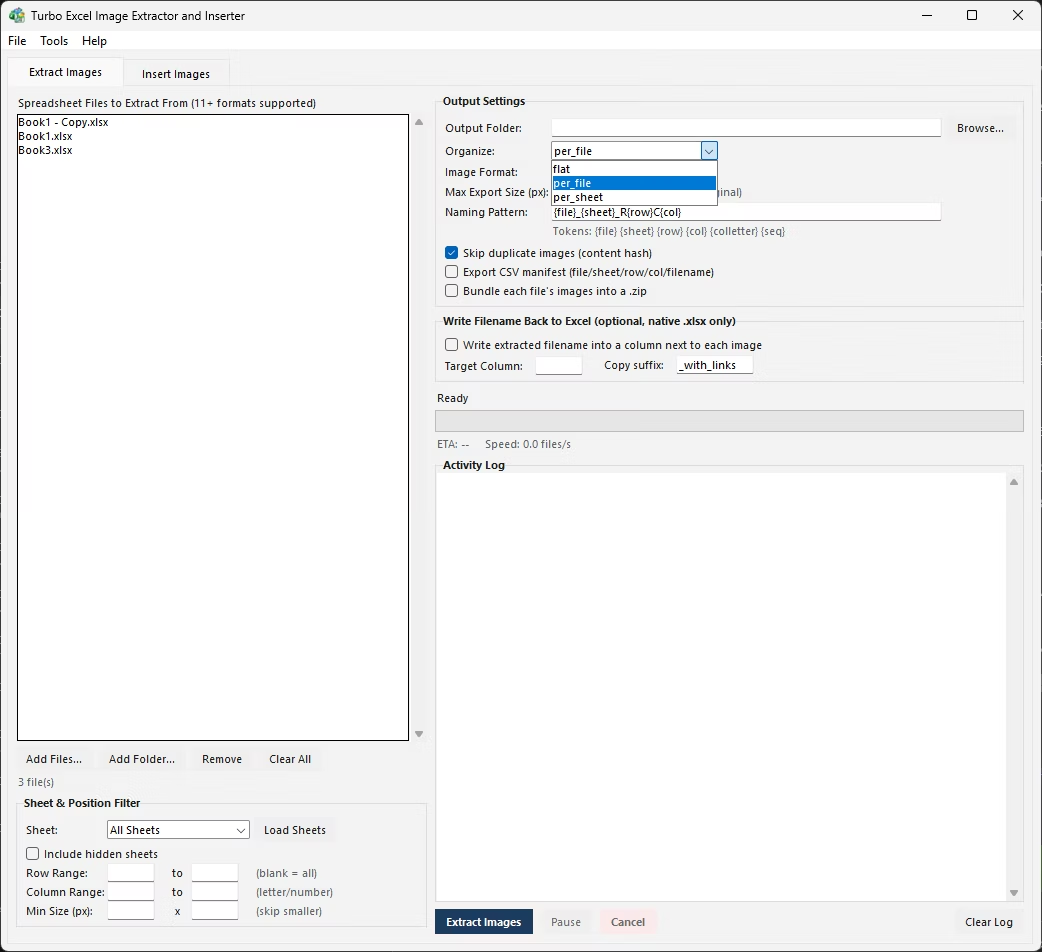
Two Tools in One Window
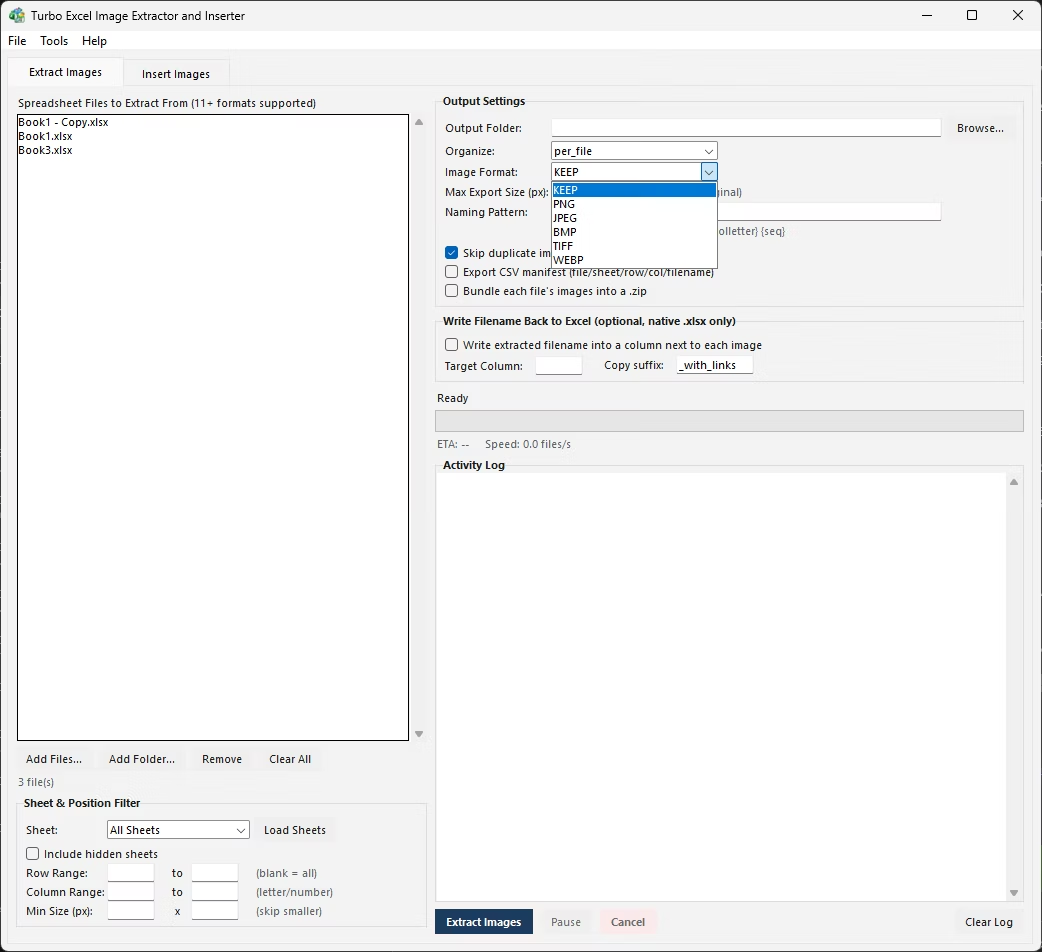
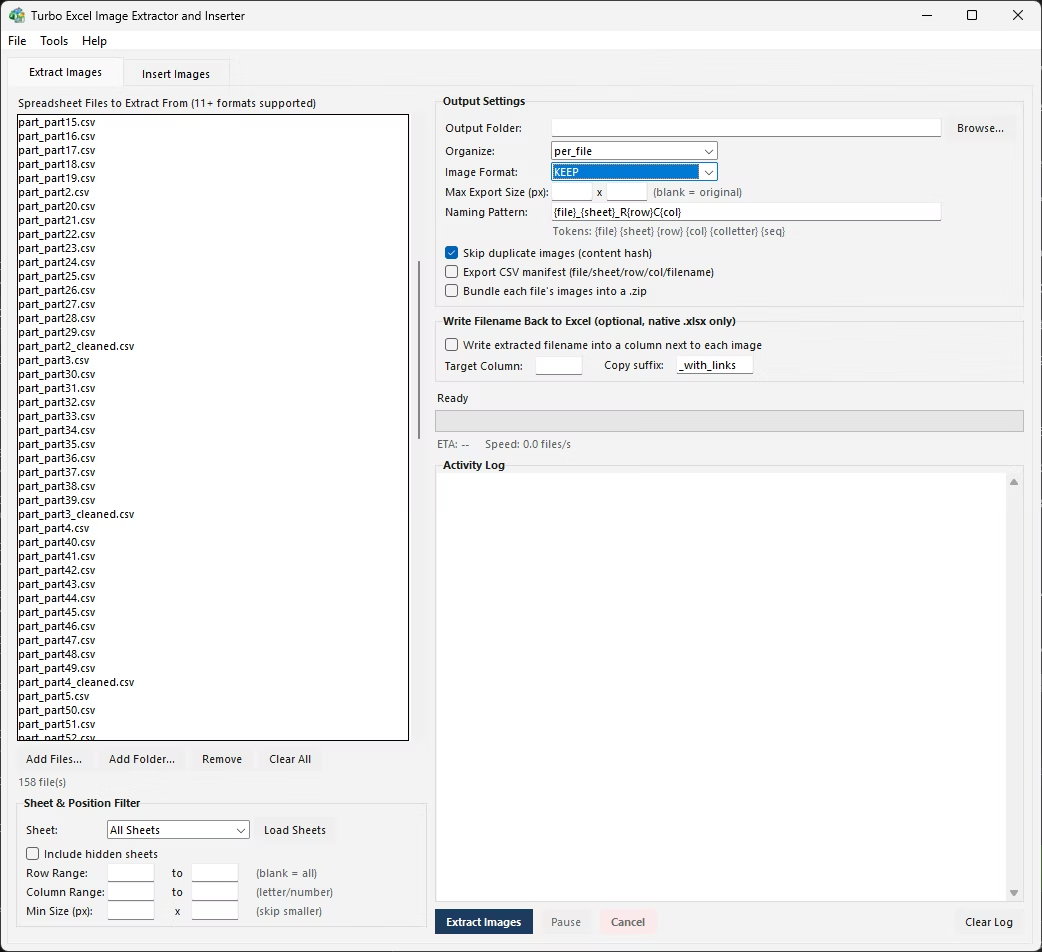
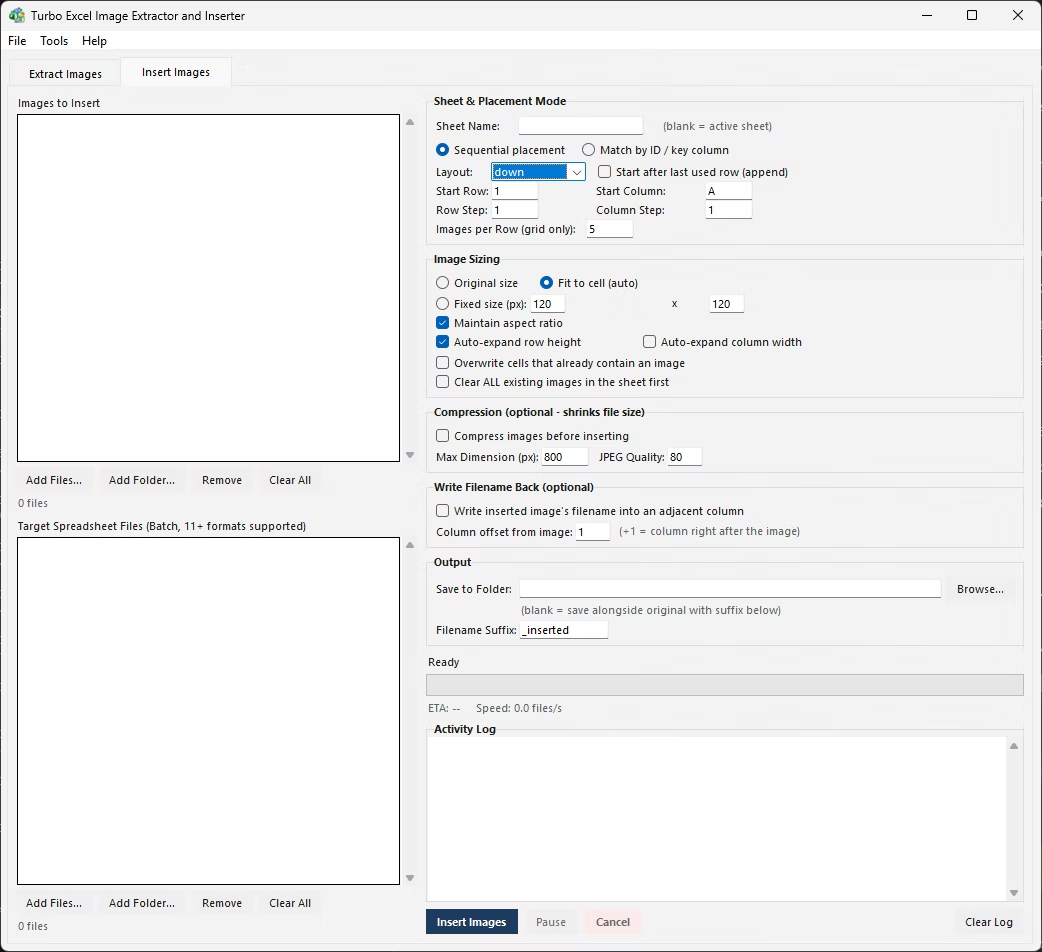
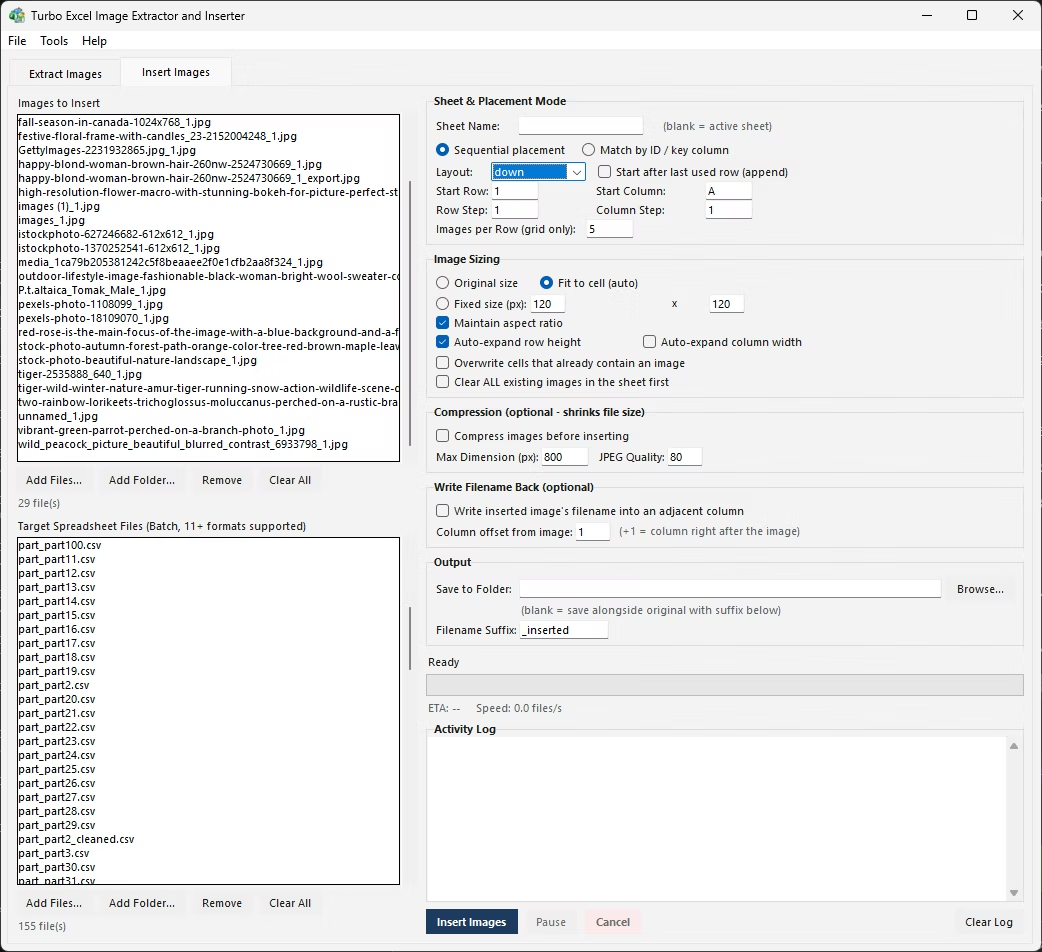
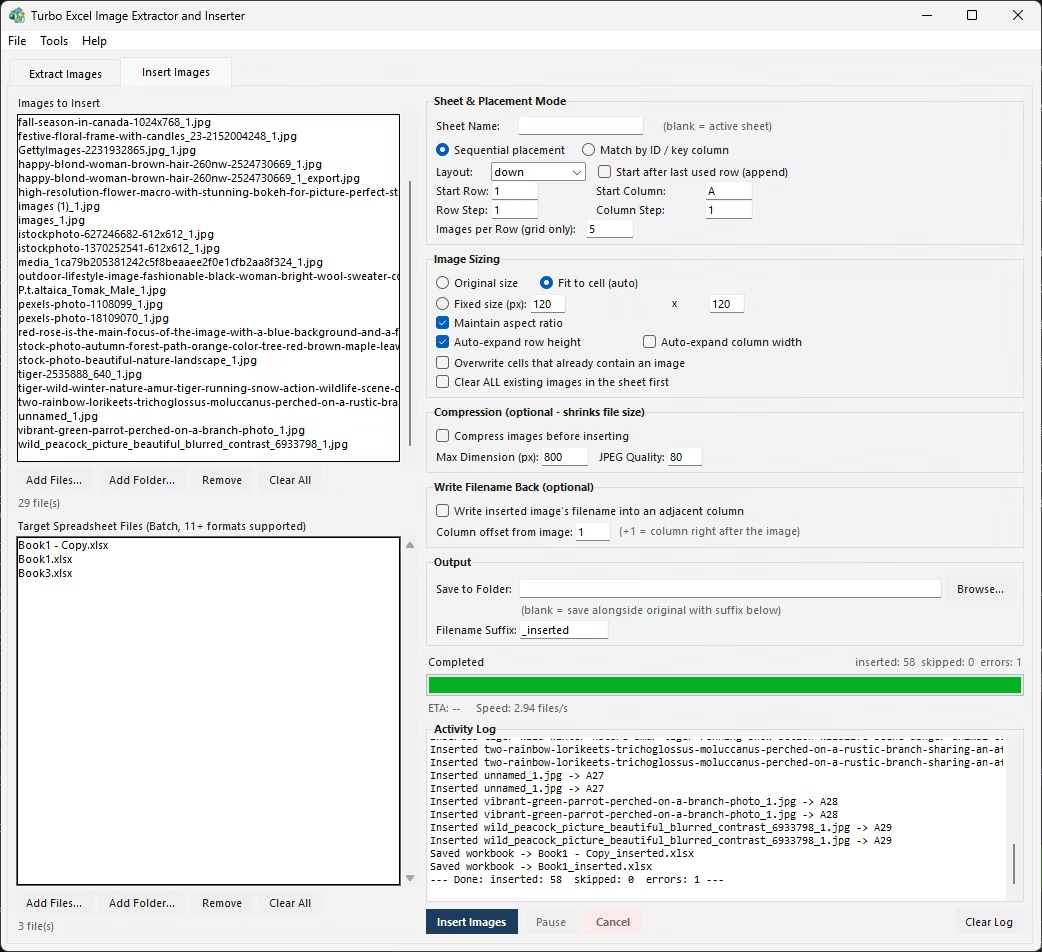
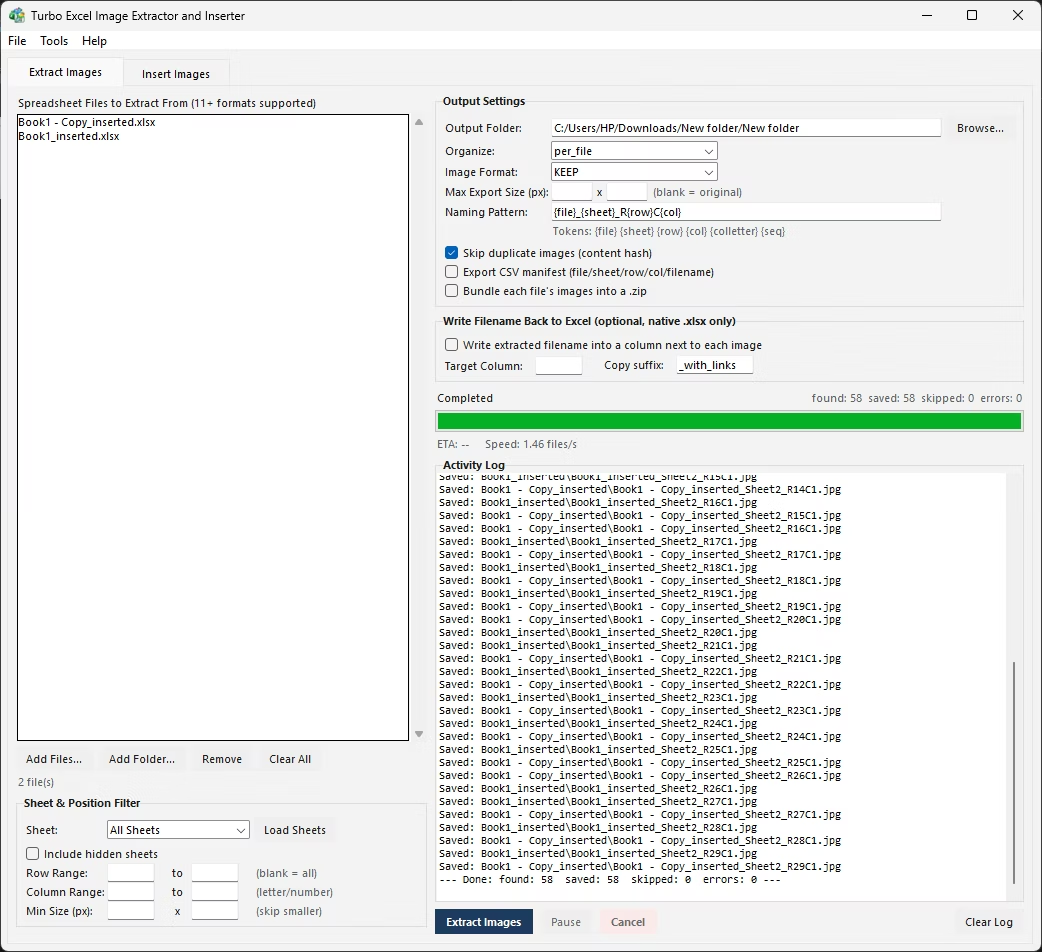
The application opens to a single window with two tabs, and the split between them mirrors the two problems people actually have with images and spreadsheets. The first tab, Extract Images, is for taking pictures that are already trapped inside a workbook and turning them back into files you can use anywhere. The second, Insert Images, is for the reverse: you have a folder of pictures and a spreadsheet, and you need the pictures to end up inside the sheet, in the correct places, at a sensible size.
Both tabs share the same foundations. Both let you queue up a single file, a handful of files, or an entire folder scanned recursively. Both run their work on a parallel batch engine so the window never locks up. Both give you the same live progress bar, files-per-second speed readout, estimated time remaining, and a running activity log. And both support pausing, resuming, and cancelling a job at any moment. What changes between the tabs is only the settings that make sense for the direction you're working in, so once you've learned one tab, the other feels familiar immediately.
Because the two jobs are so often two halves of the same task, having them together in one tool matters. You might extract a supplier's product photos out of a price list on Monday, clean and rename them, and then insert them into your own catalog spreadsheet on Tuesday, all without switching applications or hunting for a separate utility for each direction.
Why This Tool Exists
Excel is a superb place to keep structured data and a frustrating place to manage pictures. If a workbook arrives with fifty embedded product photos and you need them as individual files, your only built-in option is to right-click each one, choose Save As Picture, type a filename, and repeat fifty times. Miss one, mistype a name, and you have a gap or a mislabelled file with no easy way to tell. The reverse is worse. Inserting a folder of photos into the correct rows of a spreadsheet by hand means copying an image, pasting it, dragging it into position, resizing it so it doesn't spill over its neighbours, and doing that once per row. For a few images it's tedious. For a few hundred it's a lost afternoon and a near-certain source of misplaced photos.
Turbo Excel Image Extractor and Inserter was built to erase both of those chores. On the extraction side it reads the pictures a workbook already holds and writes them out as normal image files, keeping a record of exactly which sheet, row, and column each one came from. On the insertion side it reads a folder of images and places them into a spreadsheet automatically, either laid out in a simple sequence or matched precisely to the right row using a shared identifier the images and the data have in common.
The design goal throughout is that the tedious part disappears while you keep full control of the details that matter: which images, at what size, in which cells, named how, saved where, and with what safeguards against overwriting work you've already done. Nothing is uploaded, nothing is guessed at silently, and everything that happens during a run is written to a log you can read.
Supported Spreadsheet Formats (13 Formats)
The tool reads and writes thirteen spreadsheet formats, spanning modern Excel workbooks, legacy binary formats, OpenDocument spreadsheets, and plain-text delimited files. Every one of these can be used as an insertion target, and every one can be browsed for its sheet names and cell values so the matching and positioning options have data to work with.
Extraction is different, and the difference is important to understand up front. Embedded images can only be pulled out of the five native Excel container formats: .xlsx, .xlsm, .xltx, .xltm, and .xlam. These are the formats built on the modern Office Open XML structure, which stores pictures in a way the app can read directly. The other eight formats do not embed images in a readable structure. When you add one of them to the Extract tab, the app tells you plainly that this format does not store extractable images, rather than failing or leaving you guessing why nothing came out. It's an honest limitation of the file formats themselves, not a shortcoming the tool hides.
Insertion into a non-native format still works fully, with one sensible consequence: because formats like .xls, .xlsb, .ods, and .csv cannot hold embedded pictures, the result of inserting images into one of them is saved out as a brand-new .xlsx workbook. Your cell data is carried across into that workbook and the images ride along inside it, in a container that can actually store them.
| Format Group | Extensions | Extract Images? | Insert Images? |
|---|---|---|---|
| Native Excel (OOXML) | .xlsx, .xlsm, .xltx, .xltm, .xlam | Yes | Yes (saved in place or as a copy) |
| Legacy Excel | .xls, .xlt | No | Yes (saved as new .xlsx) |
| Binary Excel | .xlsb | No | Yes (saved as new .xlsx) |
| OpenDocument | .ods, .ots | No | Yes (saved as new .xlsx) |
| Delimited text | .csv, .tsv, .txt | No | Yes (saved as new .xlsx) |
Reading a few of the legacy formats depends on an optional helper library: .xls/.xlt use xlrd, .xlsb uses pyxlsb, and .ods/.ots use odfpy. If one of these is missing when you open that format, the app tells you exactly which package it needs rather than failing with an obscure error.
Key Features
Extract Every Embedded Image
Pull every picture out of an .xlsx or .xlsm workbook in a single pass, across all sheets at once or one named sheet, and optionally reach into hidden sheets as well.
Insert by Sequence or by Match
Lay images out down a column, across a row, or in a grid, or match each file's name to a key column so every picture lands in the exact row it belongs to.
Row, Column and Size Filters
Extract only from a defined block of rows and columns, and skip anything below a minimum pixel size, so small logos and icons don't clutter your output.
Fit-to-Cell Automatic Sizing
Inserted images can be scaled automatically to match the destination column's width and row's height, held at a fixed pixel size, or left at their original dimensions.
Auto-Expanding Rows and Columns
Rather than shrinking a picture to fit, optionally grow the row height and column width to accommodate it, growing dimensions only and never shrinking existing ones.
Token-Based Naming
Compose extracted filenames from file, sheet, row, column, column-letter and sequence tokens, with automatic numbering whenever two names would collide.
Format Conversion on Export
Keep each image's native format or convert everything uniformly to PNG, JPEG, BMP, TIFF or WebP as it's extracted, with an optional maximum export size.
Content-Hash Deduplication
Skip saving the same picture twice by comparing actual image content, not just filenames, so a watermark reused across many cells is exported only once.
CSV Manifest and ZIP Bundling
Optionally record every extracted image's file, sheet, row, column and dimensions to a manifest, and bundle each source file's images into their own ZIP.
Two-Way Filename Write-Back
Write the saved filename next to each extracted image, or the source filename next to each inserted image, so the spreadsheet always documents what's where.
Compression Before Insert
Downscale to a maximum dimension and re-encode as JPEG at a chosen quality before insertion, keeping a photo-heavy workbook's file size under control.
Parallel Batch Engine
Add a whole folder of workbooks or images and process them concurrently across up to 128 worker threads, with the interface staying fully responsive throughout.
The Interface at a Glance
The window is a clean, native Windows layout that opens at a compact default size and can be maximized with the standard title-bar button or a double-click on the title bar. Dragging the borders to resize is deliberately disabled, which keeps the layout to two tidy states — compact or maximized — rather than a hundred awkward in-between sizes. A slim menu bar across the top gives you File (with an Exit command), Tools (which opens the folder containing the error log for troubleshooting), and Help (with an About dialog showing the version).
Under the menu are the two tabs. Each tab arranges its file queues on the left and its settings on the right, with the progress area and activity log along the bottom. The file queues themselves are more capable than they look: each has Add Files, Add Folder, Remove, and Clear All buttons, keeps a live count of what's queued, and scans folders on a background thread so that adding hundreds or thousands of files never freezes the window while the scan runs.
Every action button — Start, Pause, Cancel, Browse, Add, and the rest — is drawn with clear, high-contrast colours so nothing is ever an invisible or ambiguous control. The Start button is a solid navy, Cancel is a soft red, and secondary actions are light grey. It's a small thing, but it means the tool always looks like what it is: a straightforward, no-nonsense Windows utility.
How Turbo Excel Image Extractor and Inserter Works
Extracting Images: Step by Step
- Open the Extract Images tab and add one or more spreadsheet files, or point it at an entire folder — the recursive scan runs in the background so queuing a large folder doesn't stall the window.
- Click Load Sheets to read the sheet names from the first file, then pick All Sheets or a single sheet, and decide whether hidden sheets should be included.
- Set any filters you need: a row range, a column range (given as either letters or numbers), and a minimum width and height in pixels to skip small images.
- Choose an output folder, how results should be organized (flat, one subfolder per file, or one subfolder per sheet), the output image format, and a naming pattern built from tokens.
- Enable any extras: skip duplicate images, export a CSV manifest, bundle results into a ZIP, or write each saved filename back into a copy of the source workbook next to where the image was found.
- Click Extract Images. Every file in the queue is processed in parallel, with a live progress bar, a files-per-second speed figure, an estimated time to finish, and a scrolling log of every image saved, skipped, or errored.
Inserting Images: Step by Step
- Open the Insert Images tab. Add the images you want to insert into the first queue, then add the target spreadsheet file or files into the second — again, a whole folder can be added at once.
- Type a target sheet name, or leave it blank to use each file's active sheet.
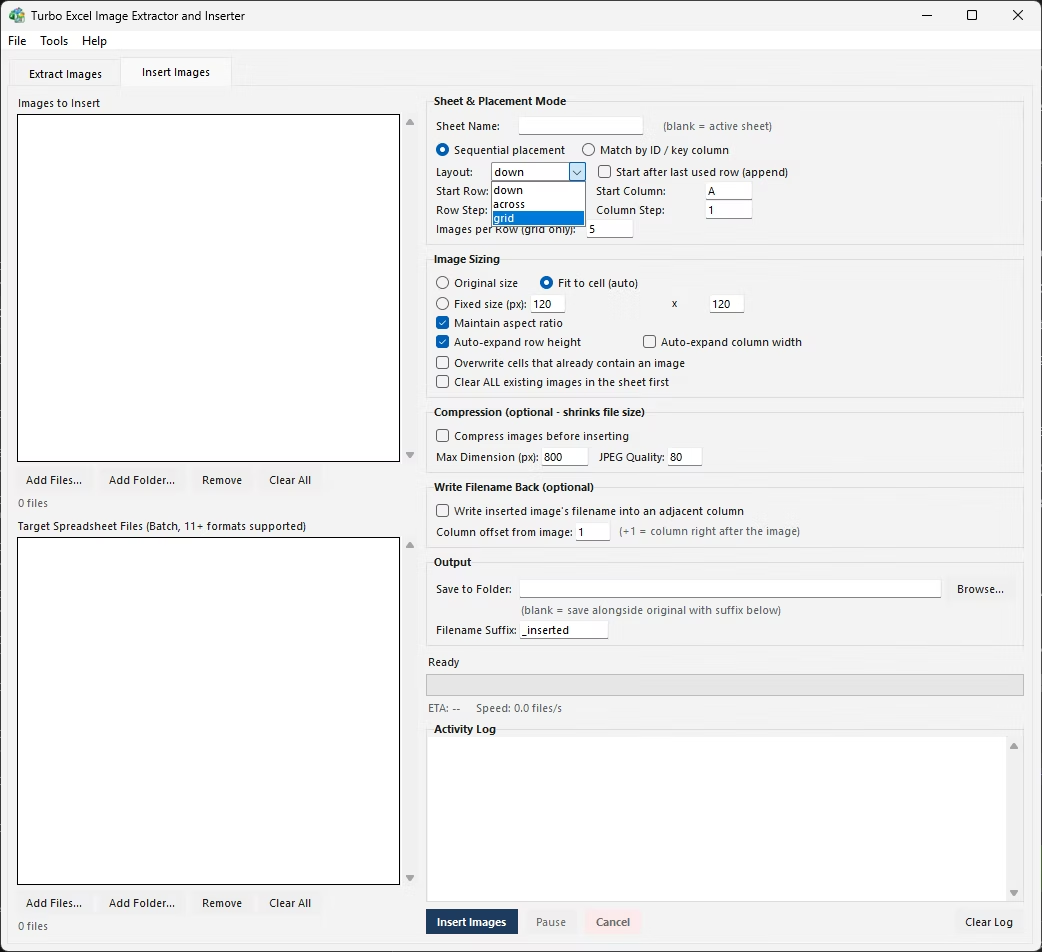
- Pick a placement mode. Sequential lays images out down a column, across a row, or in a grid, from a starting cell you set or automatically after the last used row. Match reads a key column and inserts each image into the row whose value matches that image's filename.
- Choose how images are sized — original, fit to cell, or a fixed size with aspect ratio preserved — and whether rows or columns should auto-expand to fit them.
- Decide how to treat cells that already hold images: skip them, overwrite them, or clear every existing image from the sheet first. Optionally turn on compression and filename write-back.
- Choose where to save — a separate output folder or alongside the originals with a filename suffix — and click Insert Images. The same batch engine, progress display, and logging apply.
Extracting Images: Every Option Explained
Sheet Selection and Hidden Sheets
You can extract from every sheet in a workbook in one run, or focus on a single sheet by loading the sheet list and selecting it. Hidden sheets are excluded by default, which is the safe choice — it stops you from accidentally exporting pictures from a sheet that was hidden for a reason. A single checkbox brings hidden sheets into scope when you genuinely need what's on them. This distinction is handled per sheet at the moment of extraction, so a workbook that mixes visible and hidden sheets behaves exactly as you'd expect.
Row and Column Position Filters
Every embedded image in a workbook is anchored to a cell, and the tool reads that anchor to know where each picture lives. The row range and column range filters use those anchors to extract only the images sitting within a defined block. If a sheet has a gallery of product photos in one region and unrelated logos or decorative graphics elsewhere, you can capture just the gallery by giving it the rows and columns that gallery occupies. The column filter accepts either letters (like C) or numbers (like 3), so you can use whichever you find more natural.
Minimum Size and Maximum Export Size
Two size controls do two different jobs. The minimum width and height filter skips any embedded image smaller than the threshold you set, which quietly excludes small corporate logos, icons, signatures, and other decorative clutter that tends to litter a real photo export. The maximum export width and height resizes on the way out, downscaling any image larger than that ceiling while never upscaling one that's already small. Together they let you say, in effect, "give me only the real photos, and cap them at a reasonable size," in a single run.
The Naming Pattern and Its Tokens
| Token | Inserts |
|---|---|
{file} | The source workbook's filename, without its extension |
{sheet} | The name of the sheet the image was found on |
{row} | The one-based row number the image is anchored to |
{col} | The one-based column number the image is anchored to |
{colletter} | The column as an Excel letter (A, B, ... Z, AA, AB ...) |
{seq} | A zero-padded running count of images saved from that file (0001, 0002 ...) |
The default pattern {file}_{sheet}_R{row}C{col} produces filenames such as PriceList_Sheet1_R14C3.png, which tell you at a glance exactly where in the original workbook each picture lived. You can rearrange the tokens freely or add your own literal text around them. Any character that isn't legal in a Windows filename is replaced automatically, and if two images would end up with the same name, a numeric suffix is appended so nothing is ever silently overwritten during the export.
Output Format and Folder Organization
Extracted images can keep whatever format they were stored in, or be converted uniformly to PNG, JPEG, BMP, TIFF or WebP. Organization is equally flexible: Flat puts everything into one folder, Per File creates a subfolder for each source workbook, and Per Sheet creates a subfolder for every sheet in every workbook. When you're extracting from dozens of files at once, Per File or Per Sheet keeps the results from turning into an unnavigable pile.
Deduplication, Manifest and ZIP
The deduplication option compares each image's actual content — a hash of the pixel data, not the filename — and skips saving any picture identical to one already saved during that run. It's the difference between exporting a workbook that reuses the same stock photo forty times and getting forty copies versus getting one. The optional CSV manifest records, for every image extracted, the source file, sheet, row, column, cell reference, saved filename, and pixel dimensions, giving you an audit trail or a ready-made data source for another system. A separate option zips every image from a given source file into its own archive, which is handy when you need to hand the results off cleanly.
Writing Filenames Back to the Workbook
If you want the original workbook to record what each embedded picture was saved as, enable filename write-back and choose a target column. Crucially, the tool never writes into the same workbook it just read images out of. Instead it makes a fresh copy, named with a suffix such as _with_links, and writes the filenames into that copy. Your original file is left completely untouched, and you get a linked version alongside it — a deliberately conservative approach that avoids any risk to the source data.
Inserting Images: Every Option Explained
Sequential Mode: Down, Across, and Grid
Sequential mode places images in order, and it sorts them naturally by filename first — so img2.jpg comes before img10.jpg instead of after it, the way a person would expect and the way a plain alphabetical sort gets wrong. From a starting row and column you choose, Down lays images out one per row in a single column, stepping by a row increment you control. Across lays them out one per column in a single row. Grid combines both: you set how many images go across before the layout wraps to the next row, which is exactly what a photo contact sheet or a visual index needs. A "start after last used row" option ignores the starting row you typed and begins immediately after whatever data is already on the sheet, so you can append a fresh batch of images to a growing list without working out where the previous batch ended.
Match Mode: Filename-to-Row Matching
Match mode is the heart of the tool for anyone building a photo-backed spreadsheet. It's designed for the common situation where you have a sheet of records — products, employees, assets, listings — and a folder of images each named after the matching identifier, such as SKU-1042.jpg or E00391.png. You tell the app three things: the key column where the identifier lives, the target column where the image should be inserted, and the row your data starts on, with an option to treat the first row as a header and skip it.
The matching itself is forgiving in the ways that matter. Before comparing, the app normalizes each key-column value: it trims surrounding whitespace, matches case-insensitively, and handles the classic spreadsheet quirk where a whole number might be stored as 1042 or as 1042.0 by treating them the same. Each image's filename (minus its extension) is normalized the same way, and when the two match, the image is inserted into that row. Any image whose name doesn't match a value in the key column is skipped and named in the log, so a handful of mismatches in a batch of thousands is reported clearly rather than lost. No image is ever inserted into a guessed-at row.
Sizing: Original, Fit to Cell, or Fixed
Original size inserts each picture at its native pixel dimensions, which is right when the images are already prepared for the sheet. Fit to cell measures the destination column's width and row's height and scales the image to match them — the fastest way to get a uniform grid of tidily sized photos regardless of how much the source images vary in resolution. Fixed size lets you type an exact width and height in pixels, with a "maintain aspect ratio" toggle that computes the missing dimension from the image's own proportions rather than stretching it out of shape. Two further checkboxes let rows or columns auto-expand to accommodate what you insert, which is the option to reach for when you'd rather reshape the sheet's layout than shrink the pictures.
Protecting What's Already in the Sheet
By default, any cell that already has an image anchored to it is left alone; the attempted insertion into an occupied cell is skipped and noted in the log. The tool will not stack a new picture on top of an existing one behind your back. When you do want new images to replace old ones, an overwrite option allows exactly that. And when you want to start clean, a separate "clear all existing images first" option removes every picture already in the sheet before the run begins, so you can redo a photo layout from scratch without disturbing the underlying data.
Compression and Filename Write-Back
Inserting hundreds of high-resolution photos into a workbook can balloon its file size. The optional compression pass resizes each image to a maximum dimension and re-encodes it as JPEG at a quality level you choose before it's embedded, which keeps the finished file reasonable. Separately, filename write-back records each source image's filename in a column offset from where the image was placed — one column to the right, for instance — so the completed spreadsheet documents exactly which file ended up in which row, without you tracking it by hand.
Batch Processing and Performance
Everything the tool does is built around processing many files at once without making you wait or watch. The engine dispatches files across a pool of worker threads — defaulting to 128 — so a batch of spreadsheets is worked on concurrently rather than one at a time. The whole design keeps the interface on its own thread: workers communicate only through thread-safe queues, and the window never blocks, so you can watch the log scroll, adjust settings for your next run, or simply do something else while a long job finishes in the background.
Whole-Folder Queues
Add files one at a time or add an entire folder. The folder scan runs on a background thread, so queuing hundreds of files never locks the interface even for a moment.
Up to 128 Parallel Workers
Files are dispatched across a thread pool that defaults to 128 workers, so extraction and insertion across a whole batch happen at once instead of sequentially.
Live Progress, Speed and ETA
A progress bar tracks files completed against the total, next to a running files-per-second figure and an estimated time remaining, refreshed continuously.
Responsive Pause and Resume
Pause holds every worker in place until you resume, checked frequently so pausing and resuming take effect almost immediately rather than after a long delay.
Fast, Genuine Cancel
Cancel drops every file that hasn't started yet from the queue immediately, so stopping a large job doesn't mean waiting for the whole remaining queue to drain first.
Detailed Activity Log
Every image saved, skipped, or inserted is written to a scrolling, monospaced log in real time, followed by a summary of totals when the run finishes.
Who Uses It and Why
E-Commerce and Retail
A store's catalog usually lives as a spreadsheet of SKUs, titles, and prices, with product photos sitting in a separate folder named after each SKU. Match mode reads the SKU column, finds each photo by its filename, and drops it into the row it belongs to, turning a flat data export into a visual catalog without a single manual paste. Going the other way, a supplier's price sheet crammed with embedded thumbnails can be extracted in bulk, with the manifest and filename write-back keeping every picture traceable to its original row for cross-checking against your own records.
Human Resources and Staff Directories
Assembling or refreshing a staff directory means putting each employee's ID photo next to the right person in a roster. Match mode does this by employee number, and Fit to Cell sizing keeps every portrait uniform regardless of the resolution HR was handed. Auto-expand row height stops tall portrait photos from being squashed, and the skip-occupied-cells default means a re-run after new hires only touches the rows that still need a photo.
Inventory and Asset Management
Asset registers, equipment logs, and warehouse inventories often need a reference photo beside each item. With photos named after barcode or asset-tag values, match mode files each one into the correct row automatically, and the extraction side is equally useful for pulling existing reference images out of an old register you've inherited so they can be cleaned up and re-imported.
Real Estate and Listings
A listings spreadsheet with property photos named by listing ID becomes a photo-backed sheet through match mode, while sequential grid mode is a quick way to build a simple visual board of every property for an internal review, with a set number of thumbnails per row.
Education and Research
Class rosters pair with student photos by ID number in a single match run. Researchers who receive data exports containing embedded charts, scanned figures, or specimen images can extract every picture in bulk, use the row and column filters to isolate just the figures relevant to their analysis, and rely on the manifest to keep each extracted image tied back to its source row and sheet.
Accounting and Finance
Expense trackers and reimbursement sheets that embed scanned receipts as pictures can be extracted in bulk for archiving, with the CSV manifest documenting which receipt belonged to which row and sheet — a solid foundation for an audit trail that would otherwise have to be reconstructed by hand.
Manufacturing, Logistics and Operations
Quality-control sheets, shipment manifests, and parts catalogs benefit exactly as retail catalogs do: match reference photos to part numbers or shipment IDs automatically, or pull embedded inspection photos out of completed QC workbooks for filing, review, and reporting.
Consultants, Freelancers and Administrative Staff
Anyone handed a spreadsheet full of embedded images that they need as ordinary files — or handed a folder of images that must land in the right cells of a spreadsheet — gets a repeatable, batch-capable tool for the job. What used to be an afternoon of mechanical clicking becomes a queue, a couple of settings, and a single click.
Common Jobs, Start to Finish
Pulling a Supplier Catalog's Photos into a Folder
Add the supplier's .xlsx price list to the Extract tab, set the naming pattern to something like {file}_R{row} so each filename records the row it came from, turn on the CSV manifest for a complete record, and run the extraction. You end up with a folder of individually named product photos and a manifest that links each one back to its exact row — everything you need to reconcile the images against your own product data.
Building a Photo-Backed Catalog from SKU Photos
Name each product photo after its SKU (SKU-1042.jpg), add the photo folder and the target spreadsheet to the Insert tab, choose Match mode, set the key column to the SKU column and the target column to wherever the images should appear, and set sizing to Fit to Cell. Run it once: every row with a matching photo gets one, sized consistently, and any unmatched photos are reported in the log so you can chase them down.
Creating a Visual Contact Sheet from a Folder of Photos
Add a plain folder of images and a new or blank target workbook to the Insert tab, choose Sequential mode with a Grid layout, set images-per-row to the number of columns you want, and enable auto-expand row height so each row grows to fit its tallest image. The result is a clean photo index sheet built without a single drag-and-drop.
Re-Running an Insert After Adding New Records
When new rows and new photos are added to an ongoing catalog, leave "overwrite cells that already contain an image" turned off and run Match mode again. Rows that already have a photo are skipped automatically, so only the newly added rows receive images, and the run's log shows precisely how many were inserted versus skipped — turning an incremental update into a safe, one-click operation.
Safety and Reliability
A batch tool that touches your files needs to be trustworthy, and the safeguards here are deliberate rather than incidental. The guiding principle is that the tool never destroys work you didn't explicitly ask it to.
- A native .xlsx or .xlsm file is only ever overwritten in place if you deliberately leave both the output folder and the filename suffix blank, which the tool reads as an intentional in-place save. In every other case a new file or a suffixed copy is created.
- If a generated output filename already exists on disk, the app appends
_1,_2, and so on automatically instead of overwriting a previous run's results. - During insertion, cells that already contain an image are skipped by default, so re-running a job never silently double-stacks pictures unless you explicitly enable overwrite.
- Filename write-back during extraction never modifies the workbook the images were read from — it writes into a fresh copy, protecting the original.
- Every error during a run — an unreadable file, a corrupt image, a failed save — is logged and counted without halting the rest of the batch, so one bad file can't sink an entire job.
- Cancel takes effect almost immediately, dropping unstarted files from the queue rather than making you wait for everything to finish.
- Temporary files created for the compression step are cleaned up automatically once a run completes.
- A persistent error log, openable from the Tools menu, captures the full detail of anything that goes wrong for later troubleshooting.
Privacy and Offline Processing
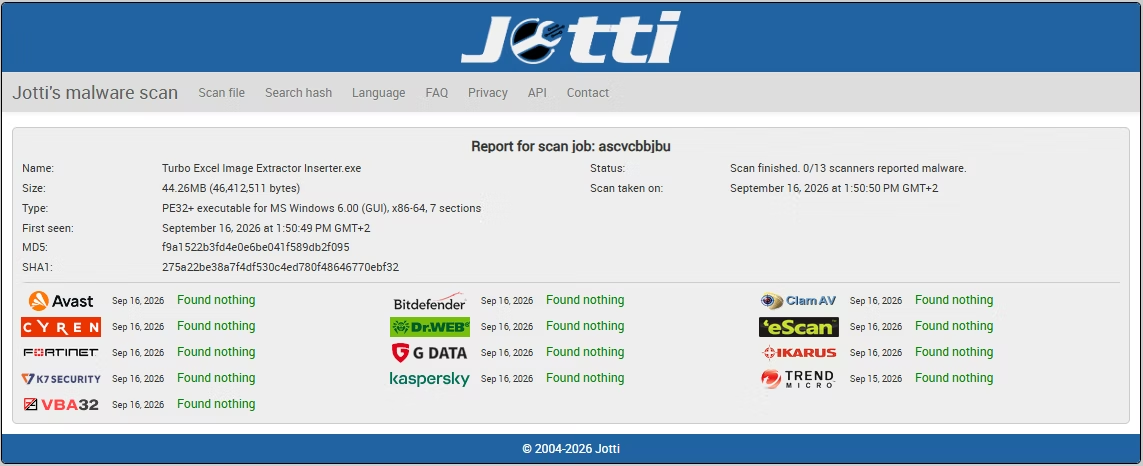
Every extraction, insertion, resize, and compression happens entirely on your own computer. Spreadsheet contents and image files are never uploaded, scanned remotely, or shared. The only moment the app touches the internet is a one-time license check against Gumroad's servers when you first activate it, and that check contains only your purchase email and license key — never a file name, a cell value, or an image. That makes the tool a natural fit for private, corporate, or offline environments where sensitive product, personnel, or financial data simply cannot be allowed to leave the machine. If you're on a locked-down network or working with confidential catalogs, nothing about the way this tool operates puts that data at risk.
Licensing and Activation
Turbo Excel Image Extractor and Inserter is sold as a one-time purchase through Gumroad — there is no subscription and no recurring fee. On first launch you enter the email address you purchased with and your license key. The app verifies them against Gumroad's license server and then stores an encrypted local copy, so subsequent launches work without a fresh online check. If verification ever fails — for instance, because you're temporarily offline — you get a clear message explaining why rather than an app that just refuses to open. The activation window itself is forgiving about formatting, tidying up stray spaces and normalizing the key as you type it.
| Distribution | Gumroad (turbosoft.gumroad.com) |
| License Type | One-time purchase, per-license activation |
| Platform | Windows 10 / Windows 11 (64-bit) |
| Installer | Standard Windows installer |
| Version | 1.1 |
Doing It by Hand vs. Letting the Engine Run
The value of the tool is easiest to see when the manual alternative is laid out beside it. Every row in the table below is a real chore that spreadsheet users face, and the contrast is the reason the tool exists.
| Task | Doing It Manually in Excel | With Turbo Excel Image Extractor and Inserter |
|---|---|---|
| Extracting 200 embedded photos | Right-click each image, Save As Picture, type a name, repeat 200 times | One batch run, auto-named, optionally deduplicated, manifested and zipped |
| Matching photos to 500 SKU rows | Scroll, copy, paste, drag, and resize each photo into the right row by hand | Match mode inserts and sizes every photo automatically by filename |
| Processing 50 separate workbooks | Open each file and repeat the entire process 50 times | Add the whole folder once; files processed in parallel across up to 128 workers |
| Avoiding accidental overwrites | Track what's already been done in your head or on paper | Built-in skip/overwrite controls plus automatic filename versioning |
| Keeping a record of what went where | A separate spreadsheet or notes kept manually, if at all | Optional CSV manifest and two-way filename write-back, generated automatically |
| Stopping a job that's gone wrong | Close Excel and hope nothing was half-saved | Pause or Cancel instantly, with a clean log of exactly what completed |
Getting the Best Results
- Before using Match mode, make sure your image filenames match the key column values (minus the extension). Trailing spaces and letter case are handled for you, but the underlying value still has to correspond.
- Reach for Fit to Cell sizing whenever your source photos vary in resolution — it produces a visually consistent sheet without you resizing anything by hand first.
- Turn on the CSV manifest for any extraction you might need to reference later. Enabling it up front costs nothing; reconstructing which image came from which row afterwards is far harder.
- When re-running an insert on a spreadsheet you've already populated, leave overwrite off so only new or previously unmatched rows are touched.
- For large folders of high-resolution photos being inserted, turn on compression with a sensible maximum dimension — 800 to 1200 pixels is usually plenty for a cell-sized image — to keep the resulting workbook from bloating.
- When a workbook mixes real content photos with small logos or watermarks, use the minimum size filter during extraction to exclude the clutter in a single step.
- Use Per File or Per Sheet organization when extracting from many workbooks at once, so the output stays navigable instead of collapsing into one enormous folder.
Known Limitations
In the interest of being straight with you, here are the boundaries of what the tool can do — most of which come down to what the file formats themselves allow.
- Image extraction works only on native Excel containers (.xlsx, .xlsm, .xltx, .xltm, .xlam). Other supported formats serve as insertion targets but do not yield extractable embedded images.
- Inserting into any non-native format (.xls, .xlt, .xlsb, .ods, .ots, .csv, .tsv, .txt) always produces a new .xlsx output, because those containers cannot hold embedded pictures.
- Reading legacy .xls/.xlt requires the optional xlrd package, .xlsb requires pyxlsb, and .ods/.ots requires odfpy. If one is missing, the app tells you exactly which one it needs.
- Match mode relies on an exact (case-insensitive, whitespace-trimmed) correspondence between an image's filename and a key-column value. Images with unrelated names are simply reported as unmatched rather than being placed on a guess.
- When importing from legacy .xls workbooks, sheet names longer than 31 characters are truncated to match Excel's own sheet-name length limit.
App Info
| Developer | TurboSoft (turbo-soft.com) |
| Platform | Windows 10 / Windows 11 (64-bit) |
| Interface | Native Windows desktop application |
| Version | 1.1 |
| Extract Formats | .xlsx, .xlsm, .xltx, .xltm, .xlam |
| Insert Target Formats | .xlsx, .xlsm, .xltx, .xltm, .xlam, .xls, .xlt, .xlsb, .ods, .ots, .csv, .tsv, .txt |
| Output Image Formats | Keep original, PNG, JPEG, BMP, TIFF, WebP |
| Max Parallel Workers | 128 |
| Internet Requirement | One-time license activation only |
| Licensing | One-time purchase via Gumroad |
Frequently Asked Questions
Common Questions About Turbo Excel Image Extractor and Inserter
How do I extract all the images from an Excel file?
Add your .xlsx or .xlsm file to the Extract tab, choose an output folder, and click Extract Images. The app scans every embedded picture on the sheet or sheets you select and saves each one as its own file, named according to a pattern you control.
Which file formats does it support?
Thirteen spreadsheet formats: .xlsx, .xlsm, .xltx, .xltm, .xlam, .xls, .xlt, .xlsb, .ods, .ots, .csv, .tsv and .txt. All of them can be insertion targets. Extracting embedded images works only on the five native Excel formats, since those are the ones that store pictures in a readable way.
Can it extract images from .xls or .csv files?
You can open .xls, .xlsb, .ods, and .csv/.tsv/.txt files on the Extract tab, but those formats don't store embedded images in a form the app can read, so none will be found. Extraction is limited to native .xlsx/.xlsm/.xltx/.xltm/.xlam workbooks.
Can I insert images into a CSV file?
Yes. The app reads the CSV's cell values into a workbook, inserts your images at the rows and columns you specify, and saves the result as a new .xlsx file, since CSV itself cannot hold embedded pictures.
How does the app match image files to specific rows?
In Match mode you choose a key column — a SKU or ID column, for example. The app compares each cell's value, trimmed and case-insensitively, to each image's filename without its extension. When they correspond, the image is inserted into that row.
What if an image filename doesn't match any row?
That image is skipped and named in the log as having no matching row, so you can see exactly which files didn't find a home. Nothing is inserted into the wrong row on a guess.
Does it handle numbers stored oddly, like 1042 vs 1042.0?
Yes. When matching, whole numbers are normalized so a value Excel stores as 1042.0 still matches an image named 1042, which prevents a common source of missed matches.
Can I insert images in a grid instead of one per row?
Yes. Sequential mode offers a Grid layout where you set how many images go across before it wraps to the next row, alongside simple Down and Across layouts.
In what order are images inserted in sequential mode?
They're sorted naturally by filename first, so img2 comes before img10 rather than after it, matching the order a person would expect.
Does it resize images to fit the cell automatically?
Yes. Fit to Cell measures the destination column's width and row's height and scales each image to match. You can also set a fixed pixel size or keep images at their original dimensions.
Can it expand the row or column to fit the image instead of shrinking it?
Yes. Auto-expand row height and auto-expand column width grow the destination cell to accommodate the image, and they only ever grow a dimension, never shrink one below what's already set.
Will it overwrite images already in the sheet?
By default, no — occupied cells are skipped. You can enable overwrite to replace what's there, or clear all existing images first for a clean re-do of the layout.
Can I compress images before they're inserted?
Yes. An optional step downscales each image to a maximum dimension and re-saves it as JPEG at a quality you choose, keeping the resulting workbook's file size down.
Can I have it write each image's filename into the spreadsheet?
Yes, in both directions. Extraction can write the saved filename next to the image's original position; insertion can write the source filename next to where each image was placed.
How do I control the filenames used when extracting?
A naming pattern accepts the tokens {file}, {sheet}, {row}, {col}, {colletter} and {seq}. Illegal filename characters are replaced automatically, and if two names would collide, a numeric suffix is added.
Can I skip small images or thumbnails when extracting?
Yes. Minimum width and height fields skip any embedded image below the size you set, which is ideal for ignoring small logos and icons while keeping the larger content photos.
Can I limit extraction to part of the sheet?
Yes. Row range and column range filters extract only the images anchored within a defined block, and you can extract from a single sheet or every sheet, including hidden ones if you opt in.
Can it skip duplicate images?
Yes. A dedup option hashes each image's content and skips any picture identical to one already saved during that run, so a reused image isn't exported repeatedly.
What output formats can extracted images be saved in?
Keep each image's original format, or convert everything to PNG, JPEG, BMP, TIFF or WebP, with an optional maximum export width and height to downscale oversized images.
Can it organize extracted images into folders automatically?
Yes. Choose Flat for one folder, Per File for a subfolder per source workbook, or Per Sheet for a subfolder per sheet within every workbook.
Does it produce a manifest of what was extracted?
Yes. An optional CSV manifest lists the source file, sheet, row, column, cell reference, saved filename and pixel dimensions for every image extracted.
Can it zip up the extracted images automatically?
Yes. An optional setting bundles every image extracted from a given source file into its own ZIP archive in the output folder.
Can I process many workbooks at once?
Yes. Both tabs accept a whole batch of files — added individually or as an entire folder — and process them in parallel using up to 128 worker threads.
Can I pause or cancel a batch partway through?
Yes. Pause holds the queue in place, and Cancel stops the run quickly by dropping unstarted files. A progress bar, live speed, and an ETA are shown throughout.
Will running a batch freeze my computer?
No. Processing runs on background threads while the interface stays responsive, so you can watch progress, change settings, pause, or cancel at any time.
Will it overwrite my original spreadsheet files?
Only if you leave both the output folder and the filename suffix blank on a native .xlsx file, which is treated as an intentional in-place save. Otherwise a new file is written, and a previous run's output is never overwritten.
Does it work with Excel templates or add-ins?
Yes. Template files (.xltx/.xltm) and add-ins (.xlam) are read and written natively, including extraction of any images embedded in them, the same as .xlsx and .xlsm.
Does it support OpenDocument spreadsheets (.ods)?
Yes, for reading cell data and inserting images (via the optional odfpy library). Extraction isn't available from ODS files, since that format doesn't store images in a readable way.
Does the app run offline?
Yes. Every extraction and insertion runs entirely on your PC. The only network use is a one-time license check when you first activate the app.
How is the app licensed?
Through a one-time Gumroad purchase — enter your purchase email and license key once to activate. There's no subscription, and later launches verify locally.
Which Windows versions are supported?
The app is built for 64-bit Windows and takes advantage of multi-core processors to power its parallel batch engine.
What happens if a file fails to open or an image fails to insert?
The error is written to the activity log and counted, and the batch carries on with the remaining files. A full error log can be opened from the Tools menu for troubleshooting.
Can I insert images without matching them to specific rows?
Yes. Sequential mode places images one after another — down a column, across a row, or in a grid — from a starting cell you choose, or automatically after the sheet's last used row.