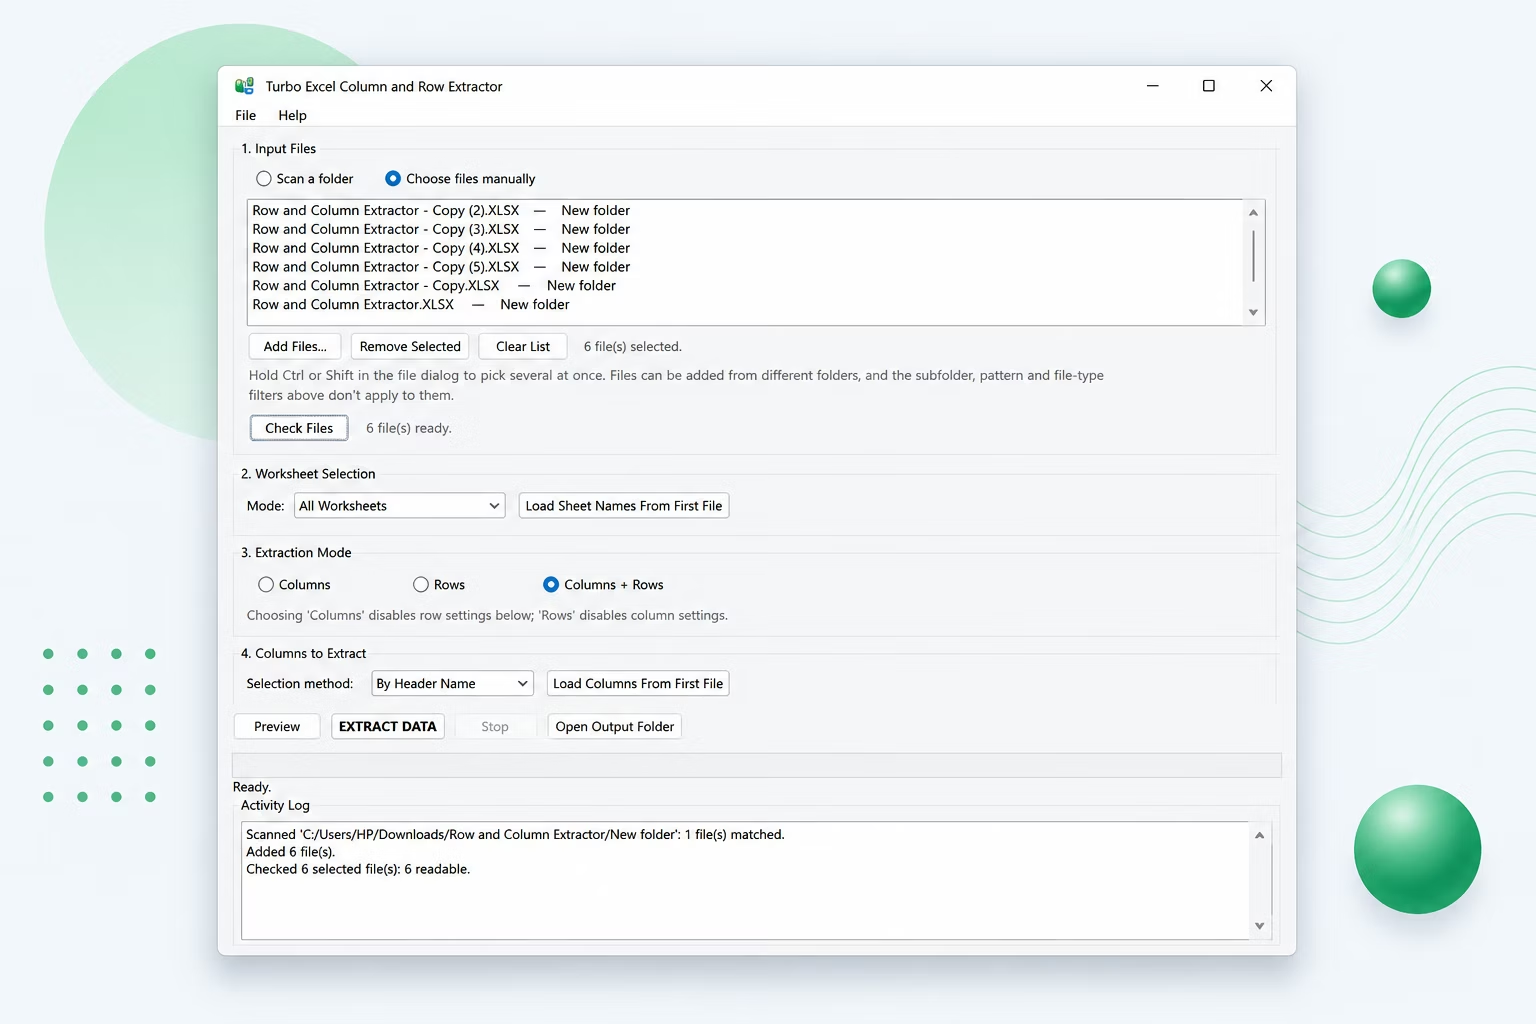
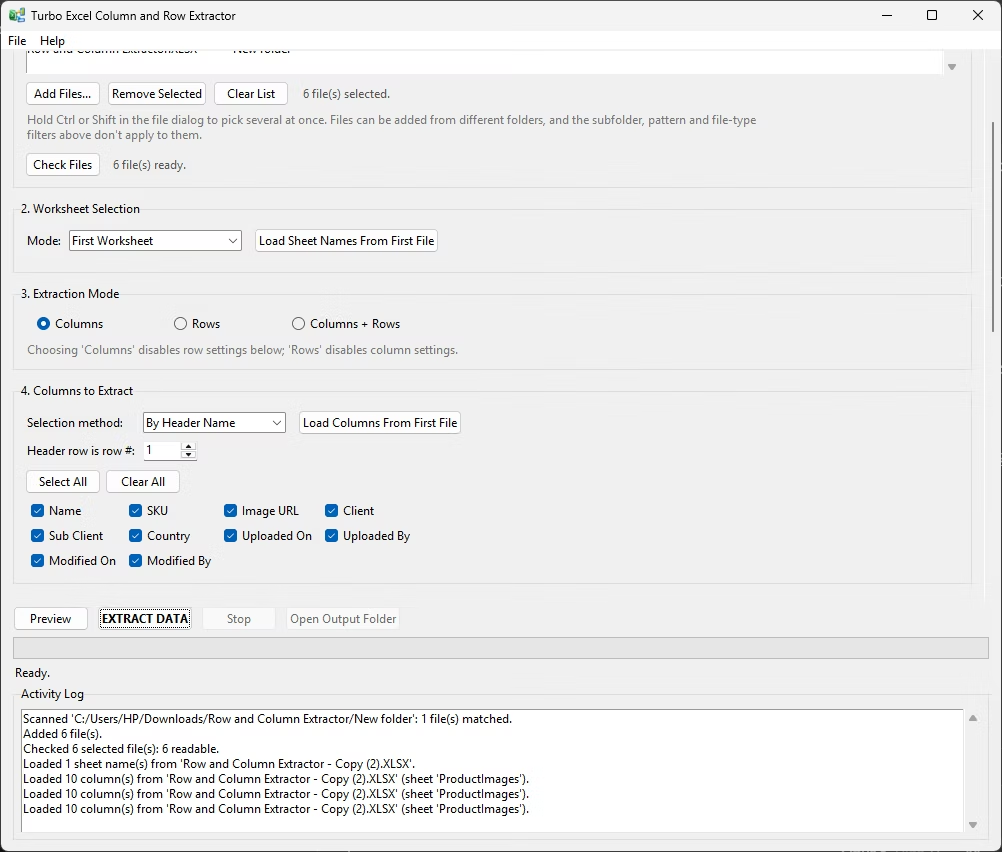
What the App Does
Almost every office ends up with the same problem eventually. Data arrives as separate files — one workbook per branch, per month, per client, per supplier, per machine, per survey batch — and each of those workbooks holds far more than anybody needs. Somebody then has to open each file, find the four columns that matter, copy them, paste them into a master sheet, and repeat that until the folder is empty. With twenty files it is tedious. With four hundred files it is a week of work and a guaranteed source of mistakes.
Turbo Excel Column and Row Extractor removes that entire loop. You describe the extraction once — which folder, which sheets, which columns, which rows, which conditions — and the app applies that description to every file it finds. It is an Excel column extractor and a row extractor in the same window, and you can use either half on its own or both together.
In practice there are three shapes of job it handles, and they cover almost everything people need:
- Narrow many files down to a few columns. Keep every row, but discard the columns you do not care about. This is the classic answer to how to copy columns from multiple Excel files — select the headers you want and let the app read the rest.
- Pull out only the rows that matter. Keep every column, but return only the first fifty rows, or the last twenty, or every row where the status column says "Open". This is the answer to how to copy rows from multiple Excel files when the files are large but the interesting part is small.
- Do both at once. Take four columns, but only for rows where the region is South and the amount is greater than 10,000. The result is a compact table assembled from hundreds of sources.
The output is a clean data table, not a copy of your files. The app writes a plain, data-only workbook or CSV containing exactly the cells you asked for, plus optional tracking columns. It is designed to feed pivot tables, BI tools, imports and reports — not to reproduce the formatting of the originals.
Supported Input File Types
The scanner recognises four input types, and each one has its own checkbox so you can include or exclude it per job. Select All and Clear All buttons sit next to the checkboxes for when you want to switch the whole set quickly.
| Type | What it is | Notes |
|---|---|---|
| .xlsx | The standard modern Excel workbook. | Read through openpyxl. Multi-sheet workbooks are fully supported, and every sheet is addressable. |
| .xlsm | A macro-enabled Excel workbook. | Handled exactly like .xlsx. Macros are never executed — only the cell data is read, which also makes it a safer way to open files from outside sources. |
| .xls | The legacy Excel 97–2003 binary format. | Read through the xlrd engine, which ships with the app. Off by default in the file-type checkboxes, so tick it when your folder contains older files. |
| .csv | Plain comma-separated text. | Treated as a single-sheet file. The worksheet setting is ignored for CSV input because there is only one table to read. |
You can mix all four types in the same folder and the same run. A folder holding last year's .xls exports, this year's .xlsx workbooks and a handful of .csv dumps from a reporting system can be extracted in one pass, as long as the columns you are asking for exist in each of them.
Supported Output Formats
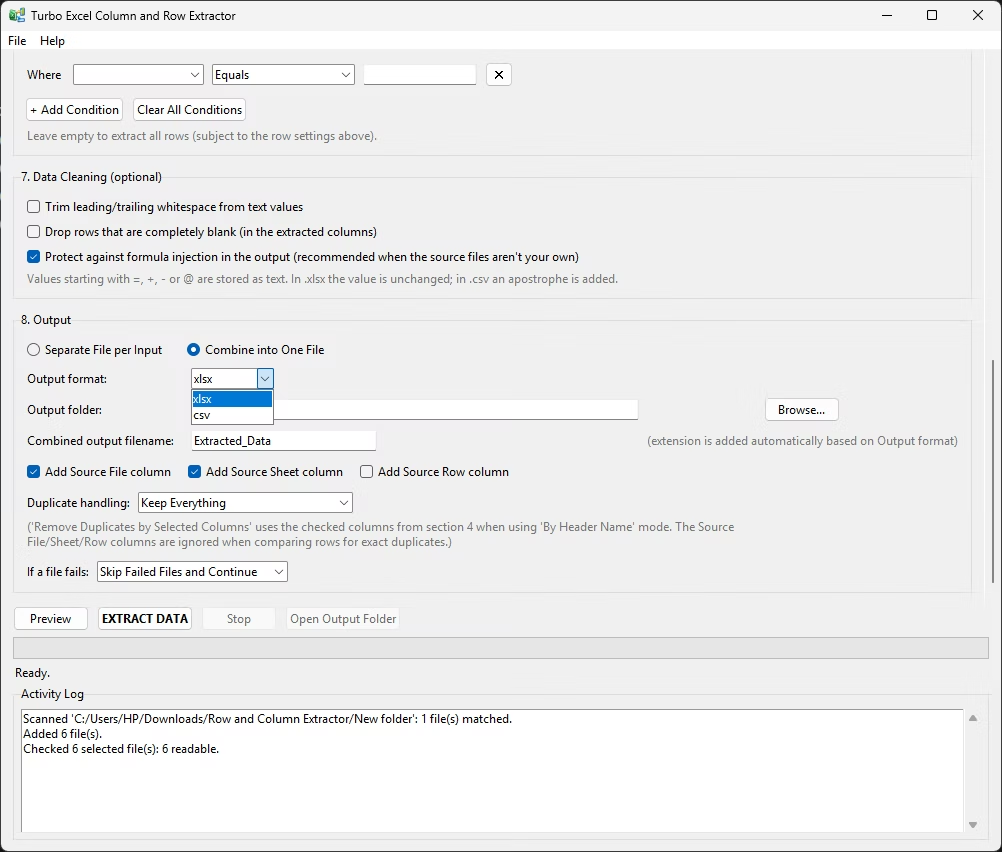
Output is written as either a modern Excel workbook or a CSV file, and the choice is a single dropdown. The extension is appended for you, so you type a name like Consolidated_Sales and the app produces Consolidated_Sales.xlsx or Consolidated_Sales.csv depending on the format you picked.
When to choose XLSX
Choose XLSX when a person is going to open the result. It keeps a single tidy sheet with a header row, opens straight into Excel, and works well as the source for a pivot table. It is the default for a reason: most consolidation jobs end with somebody looking at the file.
When to choose CSV
Choose CSV when a machine is going to read the result. It imports cleanly into databases, Power BI, Python, R and almost every ETL tool, has no row ceiling of its own, and stays fast to write even when the combined output runs to millions of rows.
Key Features
▶ Batch Column Extraction
Choose a set of columns once and pull them out of every workbook in a folder. Column selection works either by header name — checkboxes loaded from a real sample file, so you are ticking names you can see rather than guessing — or by column letters using a spec such as A,C,F:H. This is the core of the app as an Excel column extractor, and it is what makes it practical to copy columns from 100s of Excel files in a single run.
▶ Batch Row Extraction
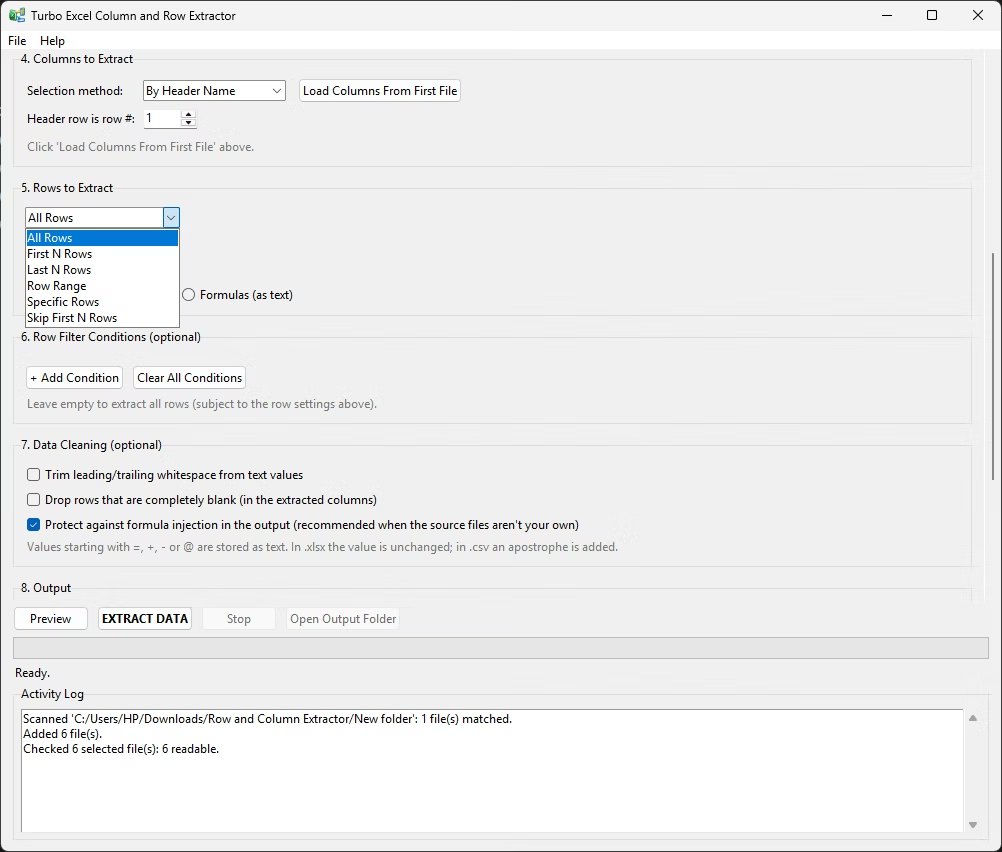
Six positional row modes cover the usual requests: All Rows, First N Rows, Last N Rows, Row Range, Specific Rows, and Skip First N Rows. Combine them with filter conditions and you can copy rows from 100s of Excel files based on what the rows actually contain, not just where they sit.
Three Extraction Modes
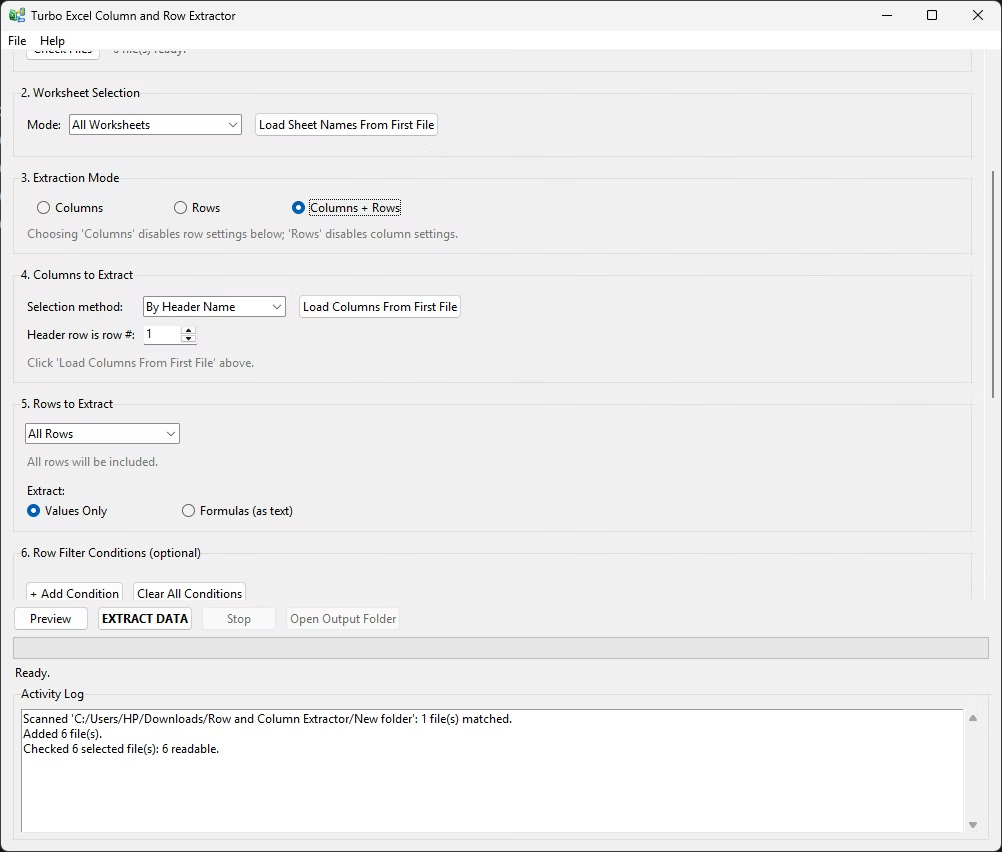
Pick Columns to filter columns only, Rows to filter rows only, or Columns + Rows to do both. Whichever you choose, the settings that no longer apply are greyed out automatically, so there is never any doubt about which rules are actually in force.
Recursive Sub-Folder Scanning
Turn on Include subfolders and the scanner walks the entire directory tree beneath the folder you chose. Archives organised by year, then by month, then by branch are handled in one pass with no manual folder-by-folder selection.
Filename Pattern Filtering
A wildcard pattern such as Sales_*.xlsx or *_2026.csv narrows the scan to the files you want, even when the folder holds a mixture. Combined with the file-type checkboxes, this gives you precise control over exactly what enters the batch.
Scan Files Preflight
A Scan Files button reports how many files currently match your folder, pattern and type settings before you commit to anything. It is the fastest way to confirm that a pattern is doing what you think it is doing.
Four Worksheet Modes
Read All Worksheets, just the First Worksheet, the Active Worksheet as it was last saved, or a checked list of Selected Worksheets by name. Sheet names can be loaded from a sample file so you tick real names rather than typing them.
Configurable Header Row
Not every file starts with headers on row 1. A Header row is row # spinner tells the app where the real header line sits, so reports with a title block, a logo row or a date stamp above the table are read correctly.
AND / OR Filter Conditions
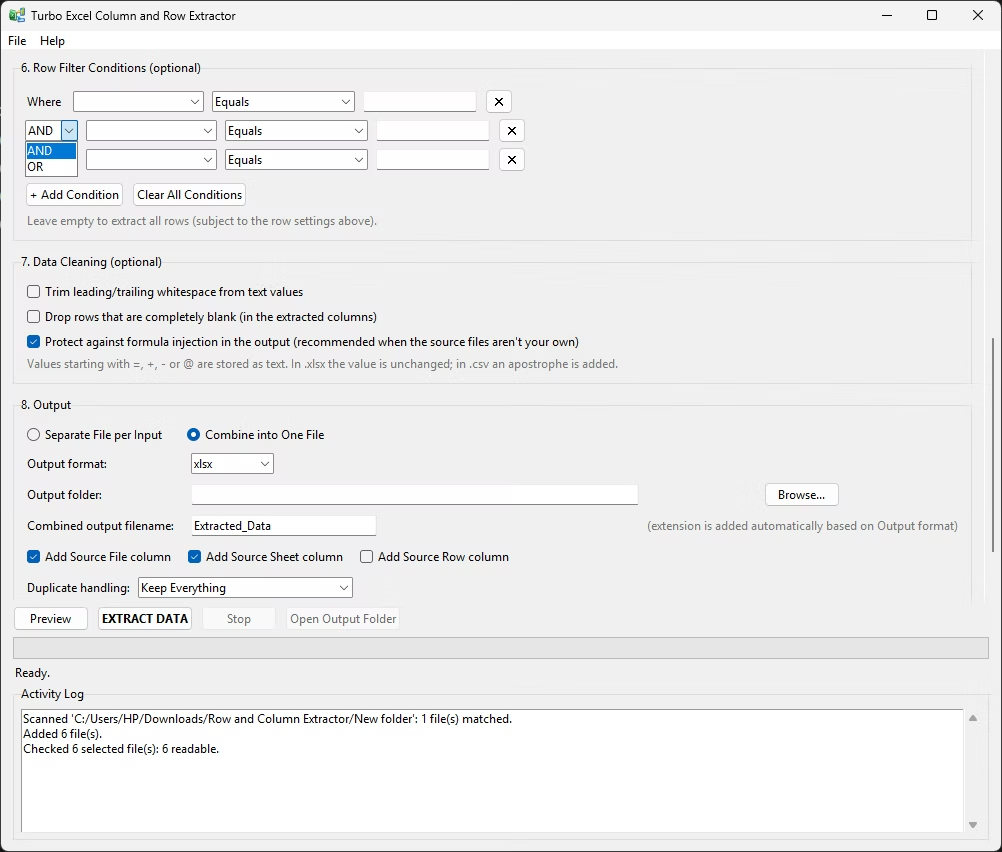
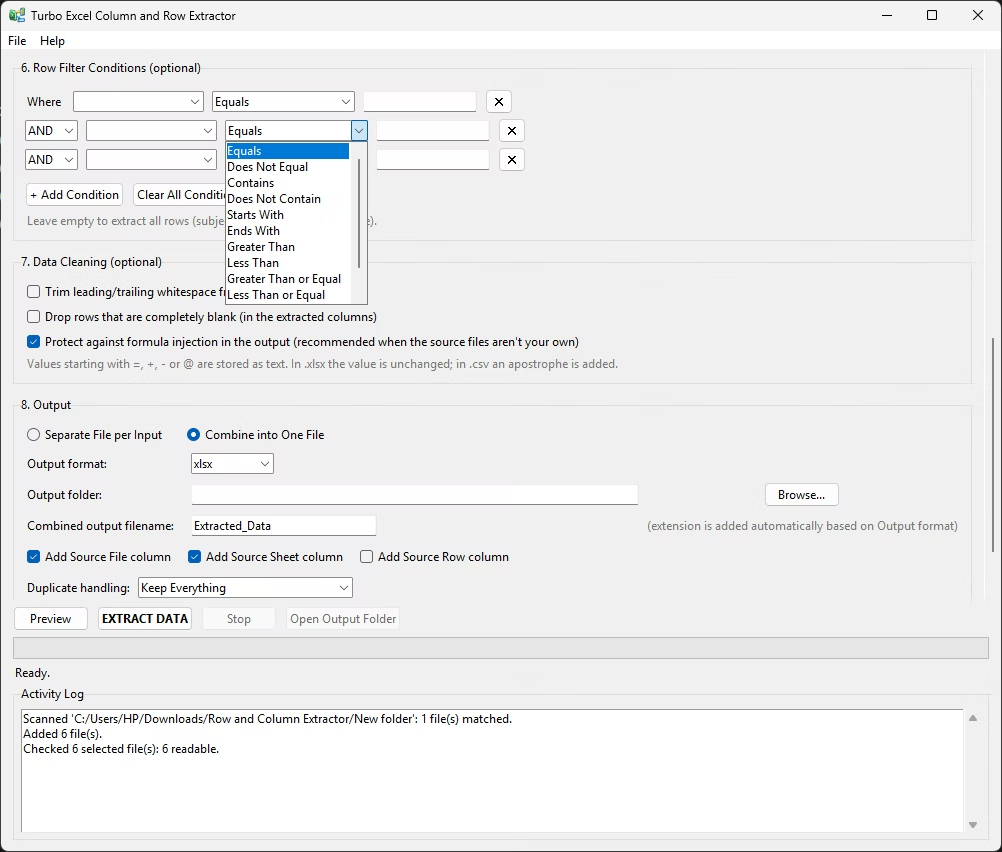
Build row filters against any column using twelve operators, from Equals and Contains through to Greater Than or Equal and Is Blank. Each additional condition is joined with AND or OR, and a Clear All Conditions button resets the whole set in one click.
Filter on Columns You Do Not Keep
Conditions are evaluated while every original column is still in memory, and column narrowing happens afterwards. That means you can filter on Status without including Status in the output — a small detail that saves a lot of tidying up later.
Source File, Sheet and Row Tracking
Optional Source File, Source Sheet and Source Row columns are inserted at the front of the output so every extracted record can be traced back to the exact workbook, tab and line it came from. Source File and Source Sheet are on by default.
Combine or Split Output
Choose Combine into One File to merge every match into a single consolidated workbook, or Separate File per Input to produce one trimmed output per source file, named after the original with an _extracted suffix.
Duplicate Removal
Keep everything, drop exact duplicate rows, or drop duplicates based on chosen key columns — so the same employee ID, invoice number or SKU appearing in several files collapses to a single record in the consolidated output.
Whitespace Trimming
An optional cleaning pass strips leading and trailing spaces from text values. Genuinely blank cells are left alone rather than being converted into the literal text "nan", which matters when the output feeds a lookup or a database import.
Blank Row Removal
Drop rows that end up completely empty across the columns you extracted. Spacer rows, padding at the bottom of a sheet and print-layout gaps disappear from the result instead of cluttering the consolidated table.
Live Preview
The Preview button runs your current settings against the first matching file and shows up to 25 result rows in a window, along with a count of how many rows matched in total. You see the shape of the output before spending time on the full batch.
128 Parallel Workers
Batch processing runs across a fixed pool of 128 worker threads. File reading and writing is I/O bound, so a high worker count produces a real reduction in wall-clock time on large batches. There is no slider to tune — it is set the right way by default.
Progress, Speed and ETA
A determinate progress bar, a live files-per-second figure, a running success and failure count, and an estimated time remaining are all reported while the batch runs, so a long job never feels like a frozen window.
Clean Stop
The Stop button cancels a run gracefully. Files already in flight are allowed to finish and no new files are started, so you never end up with a half-written output file or a corrupted workbook.
Activity Log
A scrolling log records every scan, every load, every preview and the result of the run. It is the first place to look when a batch produced fewer rows than you expected, and it can be read back after the job finishes.
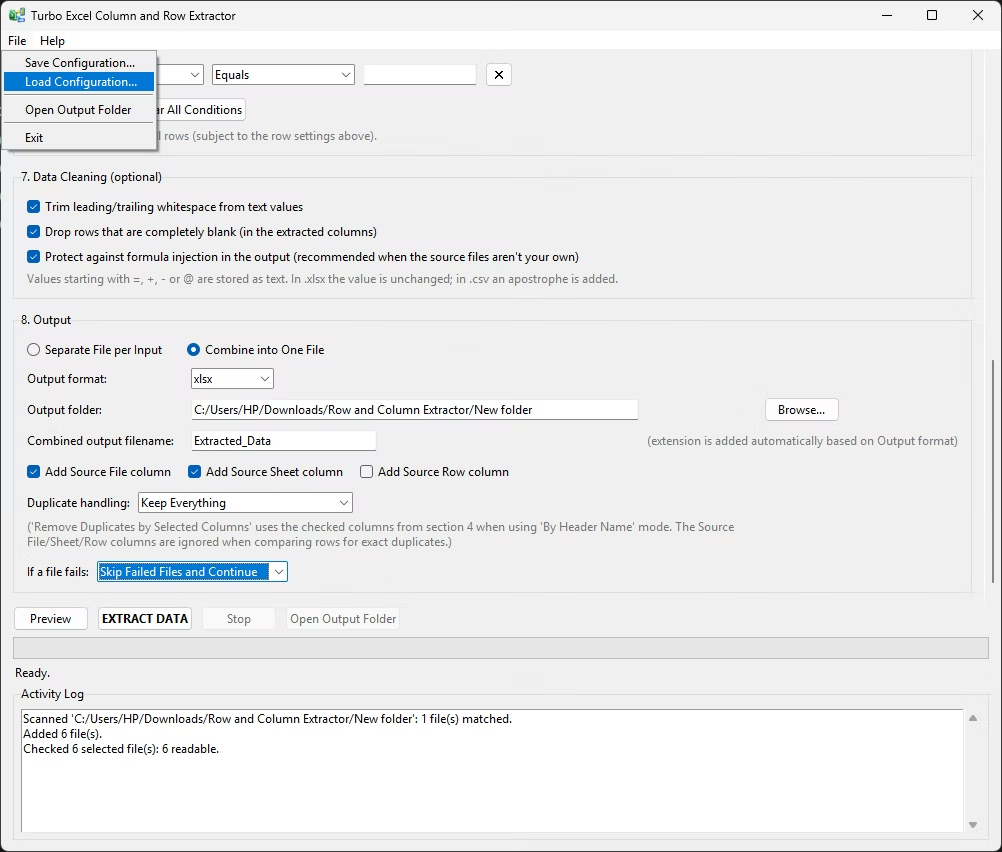
Save and Load Configurations
Every setting on the window can be written to a .json file from the File menu and reloaded later. Monthly consolidations become a matter of loading last month's configuration, changing the folder, and pressing the button.
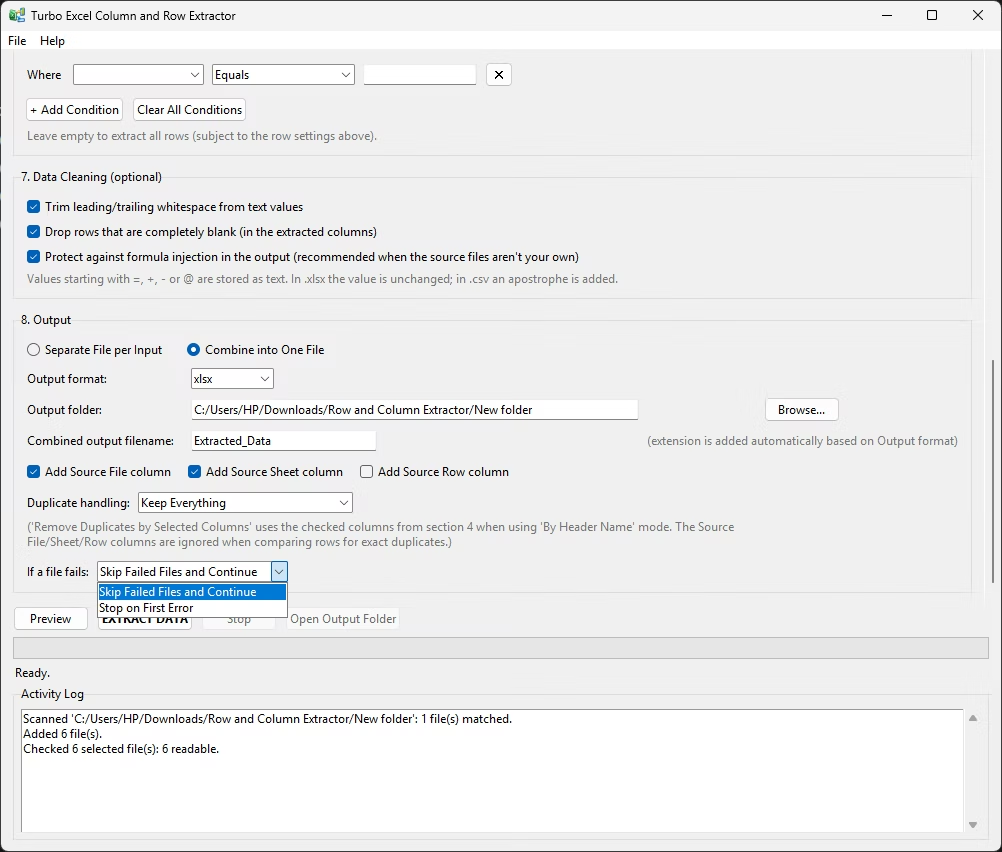
Choice of Failure Behaviour
Decide whether a corrupt, locked or password-protected file should be skipped so the batch continues, or should stop the whole run for investigation. The default skips and keeps going, which is usually what you want on a large folder.
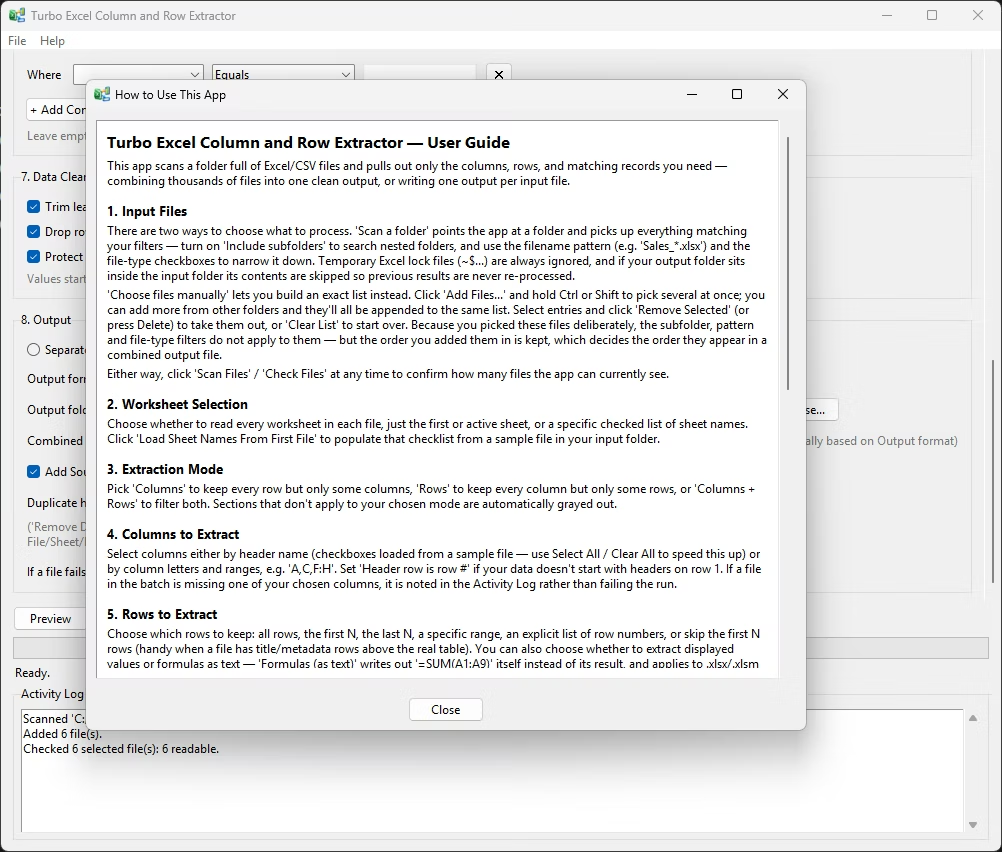
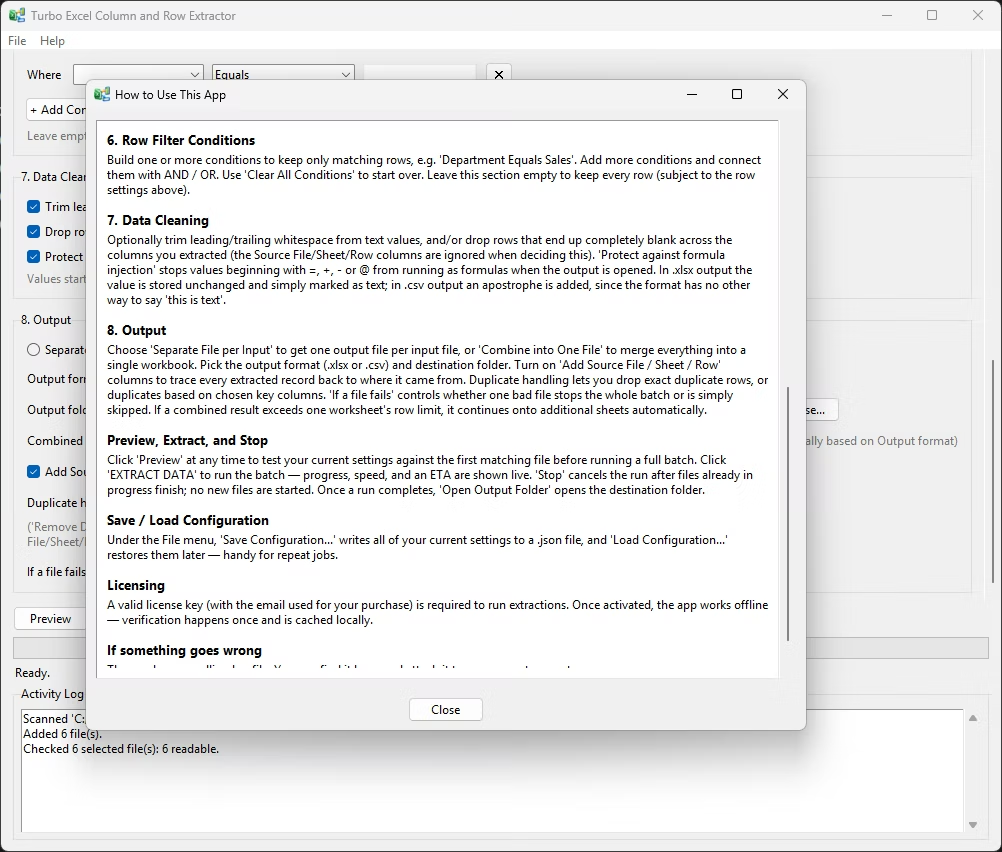
Built-In User Guide
A How to Use This App item under the Help menu opens an in-app guide that walks through all eight sections of the window in order. There is no need to keep a manual open in a browser alongside the app.
Native Windows Interface
The window uses the native Windows visual style rather than a custom skin, with standard controls, a proper menu bar, a scrollable settings area and correct taskbar icon grouping. It looks and behaves like a Windows application because it is one.
Fully Offline Processing
Files are read from and written to your own disk. Nothing is uploaded, nothing is scanned remotely and no data leaves the machine. The only network request the app ever makes is the one-time license activation.
One-Time License
A single Gumroad purchase activates the app. Verification happens once and is cached locally, so the tool keeps working afterwards on machines with no internet connection at all.
How Turbo Excel Column and Row Extractor Works
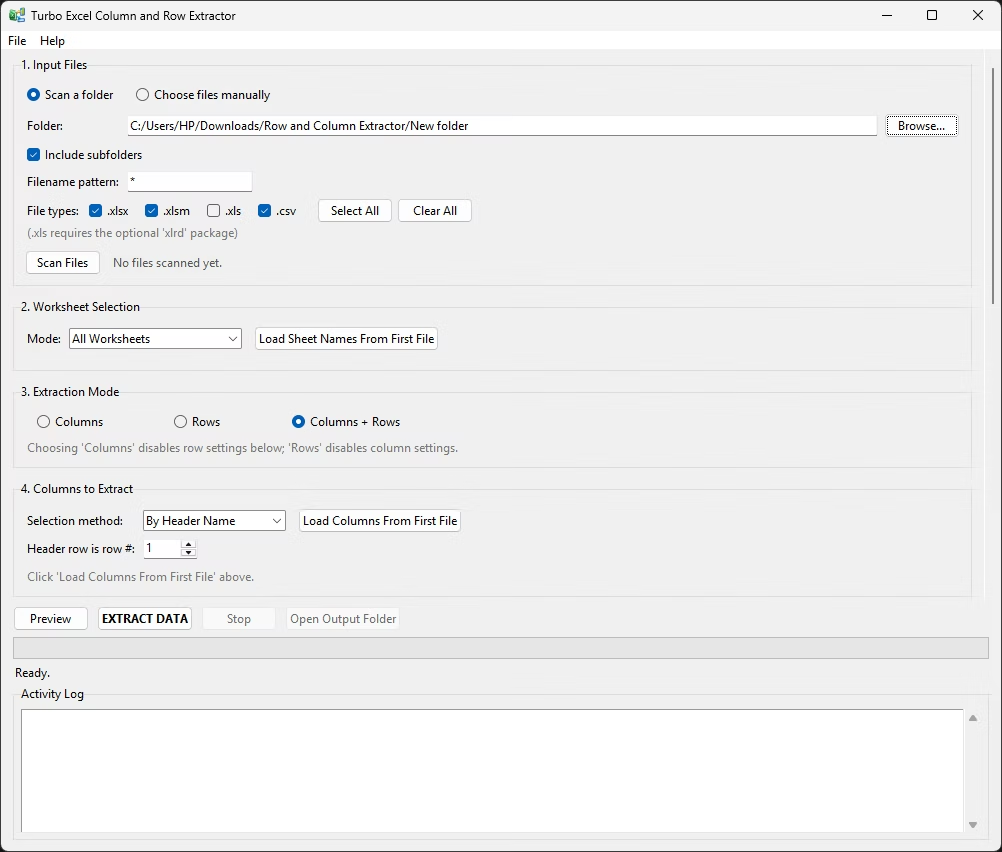
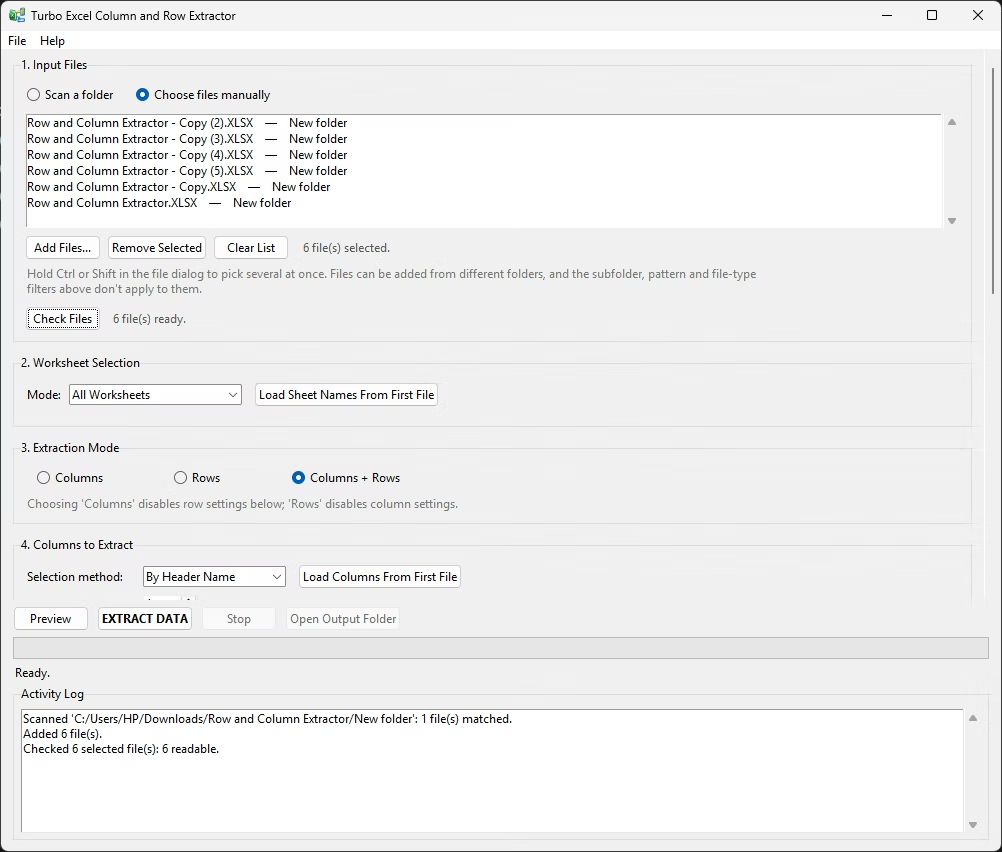
The app opens on a single scrollable window divided into eight numbered sections, arranged in the order you would naturally think about the job. You work down the window from top to bottom: where the files are, which sheets to read, what kind of extraction you want, which columns, which rows, which conditions, what cleaning to apply, and where the output should go. Below the sections sits an action bar with Preview, EXTRACT DATA, Stop and Open Output Folder, then a progress area and an activity log. There is no project to create, no wizard to click through and no account to register.
1. Input Folder
Browse to the folder holding your files. Turn Include subfolders on to walk the whole tree, set a filename pattern to narrow the match, and tick the file types to include. Scan Files reports the current match count so you know exactly what the batch will touch.
2. Worksheet Selection
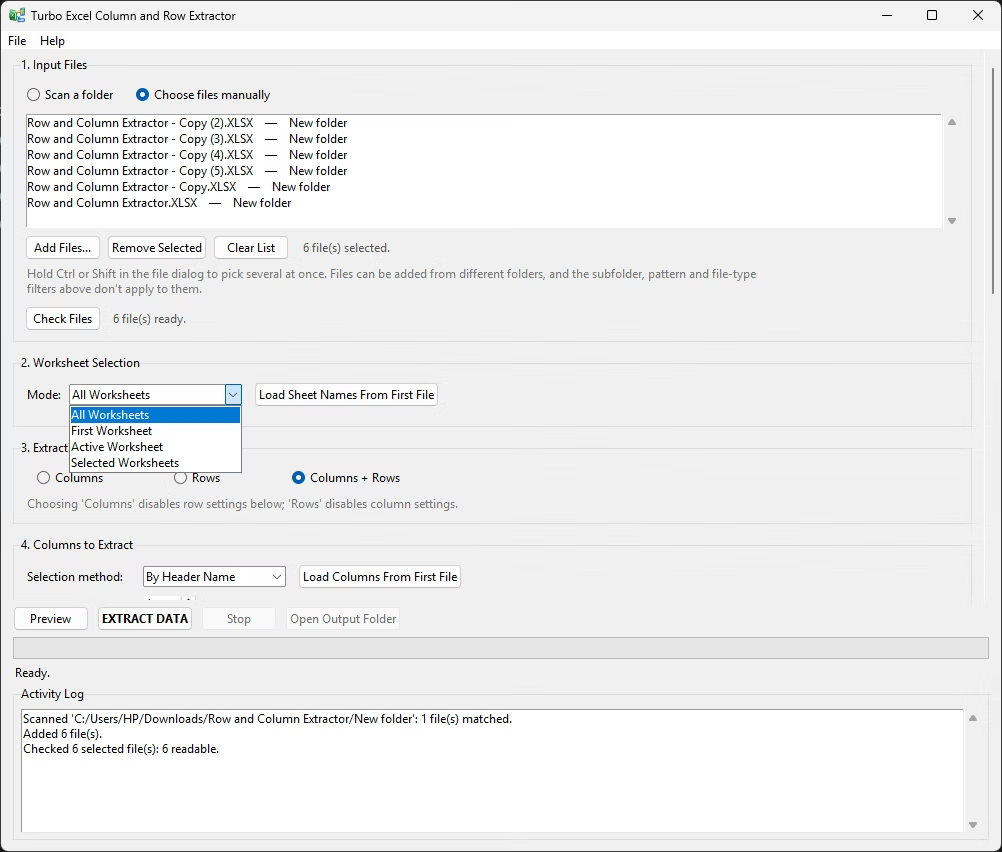
Decide whether to read all worksheets, the first sheet, the active sheet, or a named subset. Load Sheet Names From First File populates a checklist from a real file so you tick actual tab names. CSV files ignore this section, since they have only one table.
3. Extraction Mode
Choose Columns, Rows, or Columns + Rows. The app immediately greys out whichever sections no longer apply, so choosing Rows disables the column picker and choosing Columns disables the row settings. The window always reflects the rules that are genuinely active.
4. Columns to Extract
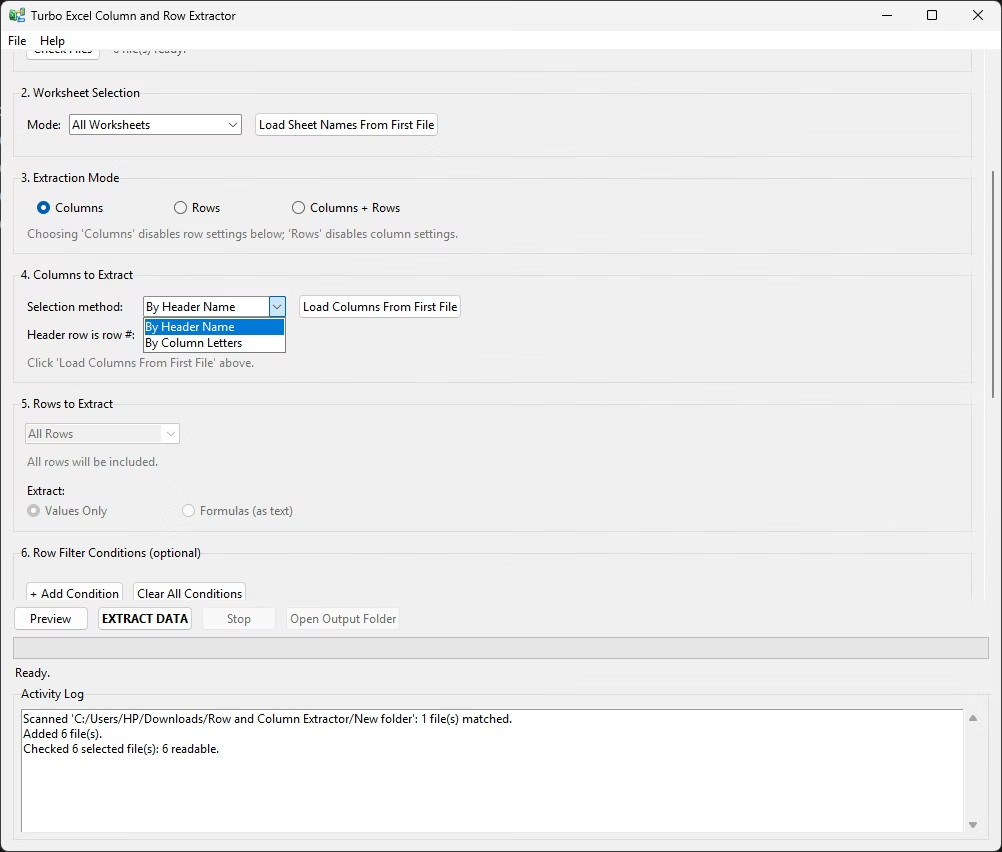
Pick columns by header name from a checkbox grid, or by column letters using a spec like A,C,F:H. Select All and Clear All handle wide tables quickly. Set the header row number here if your data does not begin on row 1.
5. Rows to Extract
Choose a row mode and fill in its parameter — a count, a range, or a list of row numbers. This section also holds the Values Only or Formulas as text choice that controls what is read out of each cell.
6. Row Filter Conditions
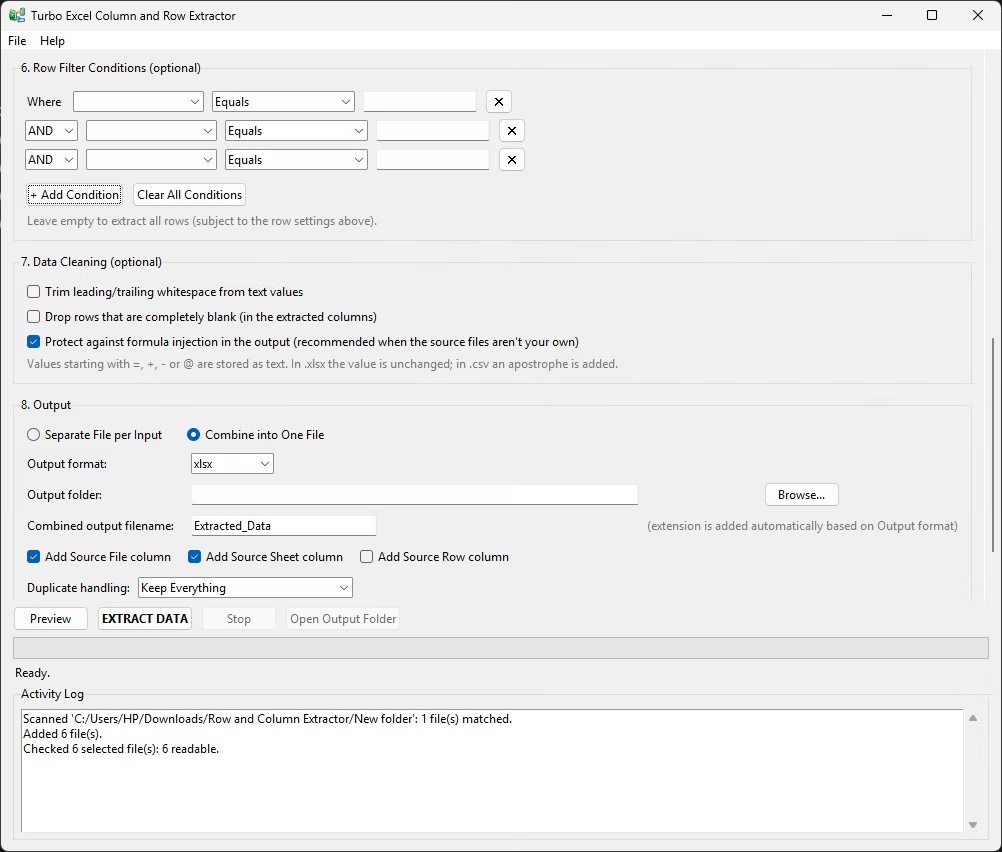
Optional. Add one or more conditions such as Region Equals South, joined with AND or OR. Each condition row has a column dropdown, an operator dropdown, a value box and a remove button. Leave the section empty to keep every row.
7. Data Cleaning
Optional. Two checkboxes: trim leading and trailing whitespace from text values, and drop rows that are completely blank across the extracted columns. Both are off by default so nothing is altered unless you ask for it.
8. Output
Choose combined or per-file output, the format, the destination folder and the combined filename. Switch the source tracking columns on or off, set duplicate handling, and decide what should happen if a file fails to read.
What happens when you press EXTRACT DATA
Understanding the order of operations makes the settings much easier to reason about, and it explains a few behaviours that would otherwise look surprising. For each file the app finds, it does the following:
- Resolve the sheets. The worksheet mode is applied to that specific file, so a workbook with four tabs and a workbook with one tab are both handled correctly under the same setting.
- Read the sheet into memory using the header row you specified, with every value read as text so that IDs with leading zeros, mixed-type columns and long numbers survive intact.
- Record the original row number for every row, before any filtering happens. This is what allows the Source Row column to stay accurate no matter how much you filter afterwards.
- Apply the positional row rule — first N, last N, a range, specific rows or skip first N — while all original columns are still present.
- Apply the filter conditions, again with every original column still available. This is why a condition can reference a column you are not keeping.
- Narrow to the chosen columns. Only now does the app discard the columns you did not select.
- Insert the tracking columns — Source File, Source Sheet and Source Row — at the front of the table, in that order, for whichever ones you enabled.
- Run the cleaning pass, trimming whitespace and dropping blank rows if you asked for it.
- Write or hold the result. In per-file mode the trimmed table is written immediately. In combined mode it is held until every file is done, then concatenated, de-duplicated and written once.
Why duplicate removal runs at the end in combined mode: duplicates usually only become visible once the files are merged. The same customer record appearing in the January file and the February file is not a duplicate within either file — it is a duplicate in the consolidated result. Removing duplicates after concatenation is what catches it.
How to Copy Columns From Multiple Excel Files
This is the question the app was built to answer. If you have been doing it by hand — open a workbook, select a column, copy, switch to the master sheet, paste, close, repeat — the process below replaces all of it with a single configured run. Here is how to copy columns from multiple Excel files from start to finish.
- Put the files somewhere sensible. They do not have to be in one flat folder, because the scanner can recurse, but they do need to sit under a common parent. If the files are scattered across a network share, point the app at the top-level folder and let it walk down.
- Select the folder in section 1. Click Browse and pick the parent folder. Leave Include subfolders ticked if the files are nested. If the folder also contains files you do not want, add a filename pattern such as
Sales_*.xlsx. Tick the file types present in the folder, then click Scan Files. The label next to the button reports the match count — check it looks right before going further. - Decide which worksheets to read in section 2. If every file has its data on the first tab, choose First Worksheet. If each workbook holds several tabs that all need extracting, choose All Worksheets. If only specific tab names matter, choose Selected Worksheets, click Load Sheet Names From First File, and tick the ones you want.
- Set the extraction mode to Columns in section 3. The row settings grey out immediately, which confirms that every data row will be kept and only your column choice will be applied.
- Load the column list in section 4. Click Load Columns From First File. The app reads the header row of the first matching file and turns every header into a checkbox, laid out four across. Click Clear All, then tick just the columns you need. If your headers are not on row 1 — because the file starts with a report title and a date — set Header row is row # first, then load the columns again.
- Or select by column letters instead. Switch the selection method to By Column Letters and type a spec such as
A,C,F:H. This is the better option when the header text varies slightly between files but the layout is identical, because letters refer to position rather than to a name that has to match. - Configure the output in section 8. Choose Combine into One File to get a single consolidated workbook. Pick
xlsxorcsv, browse to an output folder, and give the combined file a name. Leave Add Source File column and Add Source Sheet column ticked so you can tell which workbook each row came from. - Preview. Click Preview. The app runs your settings against the first matching file and shows the resulting table. Confirm the columns are the ones you wanted and that the values look sensible. If the preview is empty or wrong, the settings are wrong — fix them here rather than after a long run.
- Extract. Click EXTRACT DATA. The progress bar fills, the speed and ETA update live, and the activity log records the result. When it finishes, Open Output Folder becomes available and takes you straight to the file.
Header name or column letter — which should you use?
Both approaches produce the same kind of result, but they fail in different ways, and picking the right one for your folder saves trouble.
| Situation | Better choice | Why |
|---|---|---|
| Files come from the same template, headers spelled identically | Header name | Readable, self-documenting, and unaffected by someone inserting a column in the middle of the sheet. |
| Column order is fixed but header text varies (“Amount” vs “Amount (USD)”) | Column letters | Position is stable even when the wording is not, so nothing is silently skipped because a name did not match. |
| Files have no header row at all | Column letters | There is no name to match against, so position is the only reliable reference. |
| You need a wide contiguous block, for example B through to M | Column letters | A range like B:M is far quicker to type than ticking twelve boxes. |
| Different files have the same columns in different orders | Header name | Names follow the data. Letters would pull the wrong column out of the odd file. |
How to Copy Rows From Multiple Excel Files
Row extraction is the mirror image of column extraction, and the app treats it with the same weight. The question of how to copy rows from multiple Excel files usually breaks down into two quite different problems: rows identified by position, and rows identified by content. The app handles both, and it handles them together when you need it.
Copying rows by position
Positional extraction is the right approach when the structure of every file is predictable. Set the extraction mode to Rows in section 3, then choose a row mode in section 5:
| Row mode | What it returns | Typical use |
|---|---|---|
| All Rows | Every data row below the header. | The default. Use it when your filtering will come from conditions rather than position. |
| First N Rows | The first N rows of each sheet. | Sampling a large archive, or grabbing the top entries from files that are already sorted by rank or date. |
| Last N Rows | The final N rows of each sheet. | Pulling the most recent entries from append-only logs, where new records are added at the bottom. |
| Row Range | Rows from a start position to an end position, inclusive. | Fixed-layout reports where the section you want always occupies the same block of lines. |
| Specific Rows | Only the row numbers you list, for example 1,5,10,25. | Extracting particular summary or total lines that always land in the same places. |
| Skip First N Rows | Everything except the first N rows. | Files with title blocks, notes or merged banner rows sitting above the real table. |
Row numbers here refer to data rows below the header, in the order they appear in the sheet. If you need to know the true spreadsheet line number for each extracted record, switch on the Add Source Row column in section 8 — it reports the original position, calculated before any filtering.
Copying rows by content
Far more often, the rows you want are defined by what they contain. That is what section 6 is for. Click + Add Condition and you get a rule builder: a column, an operator, and a value. Add another condition and a logic dropdown appears in front of it so you can join the two with AND or OR.
A few examples of what that looks like in practice:
StatusEqualsOpen— every unresolved record across every file.Invoice TotalGreater Than10000ANDRegionEqualsSouth— large southern invoices only.EmailContains@example.comOREmailContains@example.org— contacts from either domain.NotesIs Not Blank — only rows where somebody actually wrote something.Customer IDStarts WithACME-— one client's records pulled out of a shared archive.
Text comparisons are case-insensitive and ignore surrounding spaces, so Sales, sales and Sales all match the same condition. That is deliberate: real spreadsheets are inconsistent, and a filter that only matched exact casing would quietly drop rows you meant to keep. The four numeric operators convert the column to numbers first and simply do not match rows where the value is not numeric, which means a stray text note in a numeric column cannot break the comparison.
Putting position and content together
The two systems stack. The positional rule runs first, then the conditions run on whatever survived. So Skip First N Rows set to 3, combined with a condition of Amount Greater Than 500, means: ignore the three-line title block at the top of every file, then keep only the rows above 500. This combination is what makes messy real-world exports workable, because it lets you deal with layout junk and content filtering as two separate concerns instead of one tangled rule.
Copy Columns From 100s of Excel Files in One Run
There is a real difference between a tool that can handle twenty files and one that can handle two thousand. The moment you need to copy columns from 100s of Excel files, three things start to matter that simply do not matter at small scale: throughput, traceability, and the ability to recover when a few files are broken. The app is built around all three.
Throughput
Files are processed concurrently across 128 worker threads rather than one after another. Reading a workbook is largely a matter of waiting on the disk, so running many reads at once produces a real reduction in total time — the difference between a batch that finishes over lunch and one that runs all afternoon.
Traceability
When a consolidated sheet holds sixty thousand rows drawn from four hundred workbooks, "which file did this come from?" stops being a curiosity and becomes essential. The Source File and Source Sheet columns answer it for every single row, at no extra effort.
Resilience
In a folder of hundreds of files, a handful will always be broken, locked by another user, or password-protected. The default failure mode skips them, counts them, and carries on — so one bad file never costs you the other three hundred and ninety-nine.
A concrete example
Consider a finance team that receives a monthly workbook from each of 240 retail locations. Every workbook holds around 4,000 transaction rows across 30 columns, but head office only needs six of those columns for its reporting cube. Done manually at three minutes per file — open, find the columns, copy, paste, verify, close — that is twelve hours of work, and the error rate on the two-hundredth file is not the same as on the first.
Configured once in this app, the same job is a folder path, six ticked checkboxes and one button press. The output is a single workbook of roughly 960,000 rows and eight columns — the six requested plus Source File and Source Sheet — and it is reproducible next month by loading the saved configuration and changing nothing but the folder.
A note on very large combined outputs: an XLSX worksheet holds a maximum of 1,048,576 rows, which is a limit of the file format itself rather than of this app. If your consolidated result is likely to approach that figure, choose CSV as the output format — it has no such ceiling, writes faster, and imports into databases and BI tools more cleanly anyway.
Copy Rows From 100s of Excel Files in One Run
The need to copy rows from 100s of Excel files tends to arrive as a question rather than as a task. Somebody asks which orders are still open, which sites reported a fault last quarter, or which of the survey responses mentioned a particular product. The data exists, but it is spread across hundreds of workbooks, and answering the question by hand is not realistic.
Treated as a batch job, that question becomes a filter. Set the extraction mode to Rows or Columns + Rows, add the condition that describes what you are looking for, and run the folder. What comes back is a single table containing every matching row from every file, each one labelled with its origin. The search that would have taken a day takes a few minutes, and it can be re-run tomorrow when the answer needs updating.
Why this scales better than a search
Windows search and similar tools can tell you which files contain a term. That is a genuinely different thing from telling you which rows contain it, and it leaves you with a shorter list of files to open by hand rather than with an answer. Conditional row extraction skips that middle step entirely: instead of a list of two hundred candidate workbooks, you get the eleven thousand matching records, already assembled into one table, already carrying the file and sheet they came from.
It also composes in a way that manual searching does not. Once the extraction is configured, tightening the question is a matter of adding one more condition and pressing the button again. Widening it is a matter of switching an AND to an OR. Each iteration costs a few minutes rather than another full day of opening files, which changes what it is reasonable to ask of the data.
Keeping large row extractions manageable
- Filter early and specifically. A tight condition produces a smaller output that is faster to write and far easier to work with afterwards. It is usually better to run twice with a precise filter than once with a loose one.
- Switch on Source Row when you may need to go back to the original file and look at the record in context. Source File tells you which workbook; Source Row tells you exactly which line in it.
- Use CSV output for very large results and import it wherever the analysis is actually happening.
- De-duplicate on a key column such as an order ID or a record number if the same row legitimately appears in more than one source file.
- Save the configuration as soon as a run produces what you wanted, so that the same question can be answered again next month without rebuilding the filter from memory.
Input Folder and File Discovery
Everything starts with deciding which files are in the batch. Section 1 gives you four independent controls for that, and they combine, so a file has to satisfy all of them to be picked up.
The folder itself
Click Browse and choose a starting folder. Local drives, external drives and mapped network shares all work. On a network share, expect the scan to be slower than on a local disk simply because each file read has further to travel.
Include subfolders
On by default. When enabled, the scanner walks the entire tree below the folder you chose, at any depth. Turn it off to restrict the batch to files sitting directly in the selected folder and nowhere else.
Filename pattern
A standard wildcard pattern, defaulting to * for everything. * matches any sequence of characters and ? matches exactly one, so Q?_2026.xlsx matches Q1_2026.xlsx through Q4_2026.xlsx but not Q10_2026.xlsx.
File type checkboxes
Four boxes for .xlsx, .xlsm, .xls and .csv. The first, second and fourth are ticked by default; .xls is off because most modern folders do not contain it. Select All and Clear All are next to them.
Useful filename patterns
| Pattern | Matches |
|---|---|
* | Every file of a ticked type. The default. |
Sales_* | Any file whose name begins with Sales_. |
*_2026.xlsx | Only 2026 XLSX files, whatever comes before the year. |
*North* | Any file with North anywhere in the name. |
Report_??.csv | Report_01.csv through Report_99.csv, but not Report_100.csv. |
2026-0?-*.xlsx | Workbooks dated in the first nine months of 2026, given an ISO-style naming convention. |
Get into the habit of pressing Scan Files after changing any of these four controls. It costs a second and tells you immediately whether the pattern you typed does what you assumed. A count of zero, or a count far higher than expected, is much better discovered now than after configuring the other seven sections.
Worksheet Selection
Excel files rarely hold just one sheet, and which sheets you read has a direct effect on what comes out. Section 2 offers four modes, each resolved separately for every file in the batch, so workbooks with different tab counts are all handled correctly under one setting.
All Worksheets
Reads every sheet in every workbook and stacks the results. The right choice when a file holds one tab per week or per product and all of them contain the same kind of table. Switch on the Source Sheet column so you can tell the tabs apart in the output.
First Worksheet
Reads only the leftmost tab. The most common setting in practice, because most generated exports put their data on the first sheet and leave any notes or lookup tables behind it.
Active Worksheet
Reads whichever sheet was selected when the workbook was last saved. Useful for files people have worked in by hand, where the tab they left open is the one that matters.
Selected Worksheets
Reads only the tab names you tick. Click Load Sheet Names From First File to build the checklist from a real workbook. Any file that does not contain a ticked name simply contributes nothing, without raising an error.
CSV files ignore this section entirely. A CSV is a single table with no concept of tabs, so it is always read in full regardless of the worksheet mode. If you are mixing CSV and Excel files in one batch, the setting simply applies to the Excel files and is skipped for the rest.
Extraction Modes Explained
Section 3 is a single choice with three options, and it determines which of the sections below it actually apply. Getting this right first makes everything after it simpler, because the window will visibly disable whatever is no longer relevant.
| Mode | Columns | Rows | Use it when |
|---|---|---|---|
| Columns | Filtered by your selection | All kept | You want fewer columns but every record. The standard answer to how to copy columns from multiple Excel files. |
| Rows | All kept | Filtered by your rules | You want fewer records but the full width of the table. The standard answer to how to copy rows from multiple Excel files. |
| Columns + Rows | Filtered | Filtered | You want a specific slice of the data in both directions. The default, and the most flexible. |
The greying-out behaviour is worth relying on rather than working around. If you select Rows and notice that the column checkboxes are still ticked, they are not being applied — the mode wins. This prevents the most common confusion in tools of this kind, where a leftover setting from an earlier job silently changes the result of the current one.
One consequence worth knowing: filter conditions in section 6 apply in every mode, including Columns-only mode. They are treated as part of what the extraction means rather than as part of the row selection, so a condition will still narrow your results even when the positional row settings are disabled.
Choosing Columns
Section 4 offers two selection methods, a header row setting, and the tools to work with wide tables quickly.
By header name
Click Load Columns From First File and the app reads the header row of the first matching file, then renders every header as a checkbox in a four-column grid. All boxes start ticked, so the fastest route to a small selection is usually Clear All followed by ticking the handful you want. The names come from your actual data, which means there is no typing and no risk of a spelling mismatch.
Matching is by exact header text. A column called Order Date in one file and Order date in another will not both be captured by a single tick, because they are genuinely different strings. If your files vary in that way, either standardise the headers first or switch to column letters.
By column letters
Switch the selection method to By Column Letters and a text box appears. Type spreadsheet-style references separated by commas, and use a colon for a range:
| Spec | Selects |
|---|---|
A,C,E | The first, third and fifth columns. |
A:D | The first four columns as a contiguous block. |
A,C,F:H | Columns A and C, plus the block F through H. |
B:D,M,AA:AC | Mixed ranges and singles, including two-letter references beyond column Z. |
Letters refer to position in the sheet, which makes this method immune to header wording but sensitive to layout changes. If somebody inserts a column at the front of one file, every letter after it shifts. Header names have the opposite trade-off. Neither is universally better — pick the one that matches how your files actually vary.
The header row setting
The Header row is row # spinner tells the app which line holds the column names. It defaults to 1. Set it to 4 and the app treats row 4 as the header and everything below it as data, which is exactly what you need for exports that open with a report title, a company name, a date stamp and a blank line before the real table begins.
Change this setting before loading the column list. The checkboxes are built from whichever row the setting points at, so loading first and adjusting afterwards leaves you ticking the wrong values — usually the contents of a data row rather than a set of headers.
Choosing Rows
Section 5 holds the positional row rule and the value mode. The dropdown at the top selects the rule, and the controls beneath it change to match whichever one you picked, so you only ever see the parameters that are relevant.
All Rows
Every data row below the header. This is the default and, combined with filter conditions, is what most jobs end up using.
First N Rows
A spinner sets N, defaulting to 100. Returns the first N data rows of each sheet. Good for sampling a large archive before committing to a full extraction.
Last N Rows
Returns the final N rows of each sheet. The natural choice for logs and append-only exports where the newest records sit at the bottom of the file.
Row Range
Two spinners set a start and an end, inclusive of both. Row 1 is the first data row below the header, not the header itself.
Specific Rows
A text box takes a comma-separated list such as 1,5,10,25. Only those positions are returned, and numbers beyond the end of a sheet are ignored rather than causing an error.
Skip First N Rows
Discards the first N data rows and keeps the rest. Use it for files where a few junk lines sit between the header and the real records.
Values Only or Formulas as text
Two radio buttons at the bottom of section 5 control what is read out of each cell. Values Only is the default and is the right choice for essentially every consolidation job: it reads the value the cell displays, so a cell containing =B2*C2 comes through as the number it evaluates to. That is what you want when the output feeds a report, a pivot table or an import.
Formulas (as text) exists for the rarer case where the formula itself is the thing you are auditing rather than its result. It reads cached values through the underlying engine rather than re-evaluating formulas, so treat it as a diagnostic option rather than a replacement for opening the workbook in Excel.
Row Filter Conditions
Section 6 is optional and empty by default, which means every row passes. Click + Add Condition to build a rule. The first condition is prefixed with the word Where; every one after it gets an AND / OR dropdown so you can control how it joins to the rules before it. A small × button removes any individual condition, and Clear All Conditions empties the section entirely.
The twelve operators
| Operator | Behaviour | Example |
|---|---|---|
| Equals | Exact match, case-insensitive, surrounding spaces ignored. | Region Equals South |
| Does Not Equal | Everything except an exact match, under the same rules. | Status Does Not Equal Closed |
| Contains | The value appears anywhere in the cell. Case-insensitive, treated as plain text rather than a pattern. | Product Contains Widget |
| Does Not Contain | The value appears nowhere in the cell. | Notes Does Not Contain draft |
| Starts With | The cell begins with the value. | Code Starts With ACME- |
| Ends With | The cell ends with the value. | File Ends With _final |
| Greater Than | Numeric comparison. Non-numeric cells never match. | Amount Greater Than 10000 |
| Less Than | Numeric comparison. | Stock Less Than 5 |
| Greater Than or Equal | Numeric comparison, inclusive. | Score Greater Than or Equal 60 |
| Less Than or Equal | Numeric comparison, inclusive. | Days Less Than or Equal 30 |
| Is Blank | The cell is empty, or contains only spaces. No value needed. | Approved By Is Blank |
| Is Not Blank | The cell contains something other than spaces. No value needed. | Comment Is Not Blank |
How AND and OR combine
Conditions are evaluated in the order they appear on screen, each one joining to the accumulated result of everything above it. There is no bracketing, so the practical rule is to keep condition sets simple and readable. If you find yourself wanting parentheses, it is usually cleaner to run two extractions with different filters than to try to express a complex nested rule in a flat list.
You can filter on a column you are not keeping. Conditions are evaluated before the column narrowing step, while every original column is still available. So you can filter on Status, Region or Approval Flag without those columns appearing in your output. The condition dropdowns are populated from the full header list loaded in section 4, not from your ticked selection.
Data Cleaning
Section 7 holds two optional checkboxes. Both are off by default, on the principle that the app should not alter your data unless you explicitly ask it to. When you do want them, they solve two problems that show up constantly in consolidated data.
Trim leading and trailing whitespace
Strips spaces from the start and end of text values. Stray spaces are close to invisible in a spreadsheet but they break exact-match lookups, split what should be one category into two in a pivot table, and cause duplicate detection to miss obvious duplicates. Genuinely blank cells are left as blanks rather than being converted into the text "nan", which keeps the output safe for imports.
Drop completely blank rows
Removes rows that are empty across all the columns you extracted. Note the interaction with column selection: if a row has data only in columns you did not select, it becomes blank after narrowing, and this option will drop it. That is usually what you want, but it is worth understanding when a row count comes out lower than expected.
These are deliberately narrow, predictable operations. If you need heavier work — deduplicating fuzzy text, splitting columns, standardising dates, removing special characters, normalising case across dozens of rules — that is a different job, and Turbo Excel Cleaner is the tool built for it. Extract first with this app, then clean the consolidated result.
Output Options
Section 8 decides what the run produces. The first choice is the most consequential one, and the rest follow from it.
Combine into One File
Every extracted row from every file and every sheet is concatenated into one table and written as a single output file. This is the default, and it is what people usually mean by consolidating a folder. Duplicate handling and the combined filename setting only apply in this mode, because they only make sense once everything is in one place.
Separate File per Input
Each source file produces its own trimmed output, named after the original with an _extracted suffix — so Branch_04.xlsx becomes Branch_04_extracted.xlsx. Use this when downstream systems expect one file per source, or when you are slimming an archive down rather than merging it.
| Setting | What it controls |
|---|---|
| Output format | xlsx or csv. The extension is added automatically, so you never type it. |
| Output folder | Where results are written. Created automatically if it does not exist. Keep it separate from the input folder so outputs are never picked up as inputs on a later run. |
| Combined output filename | The base name for the merged file, defaulting to Extracted_Data. Ignored in per-file mode. |
| Duplicate handling | Keep everything, remove exact duplicates, or remove duplicates by chosen key columns. |
| If a file fails | Skip it and continue, or stop the whole run at the first error. |
Always choose an output folder that sits outside the folder being scanned. If the output lands inside the input tree and you re-run the job with sub-folder scanning enabled, the app will find its own previous output and extract from it as well.
Source Tracking Columns
Three checkboxes add provenance columns to the front of the output. They are one of the most useful things about batch extraction, and they cost nothing to enable.
| Column | Contains | Default |
|---|---|---|
| Source File | The file name the row came from, such as Branch_04_March.xlsx. | On |
| Source Sheet | The worksheet name within that file. Shows CSV for CSV inputs. | On |
| Source Row | The original row number in the source sheet, calculated before any filtering. | Off |
They are inserted in that order at the left of the table, ahead of your extracted data, so the output reads naturally from origin to content. If you enable all three you get a complete address for every record: which file, which tab, which line.
Beyond traceability, these columns are genuinely useful as analysis dimensions. Source File is often a stand-in for branch, month, client or region, depending on how your files are named — which means a consolidated extract can be pivoted by source without anyone having added a category column to the original data. Source Sheet does the same job for workbooks organised one tab per period.
Source Row is worth turning on more often than its default suggests. The moment somebody queries a figure in your consolidated report, the question is always "where did this come from?" With all three columns present, the answer takes seconds: open that file, go to that sheet, jump to that line.
Duplicate Handling
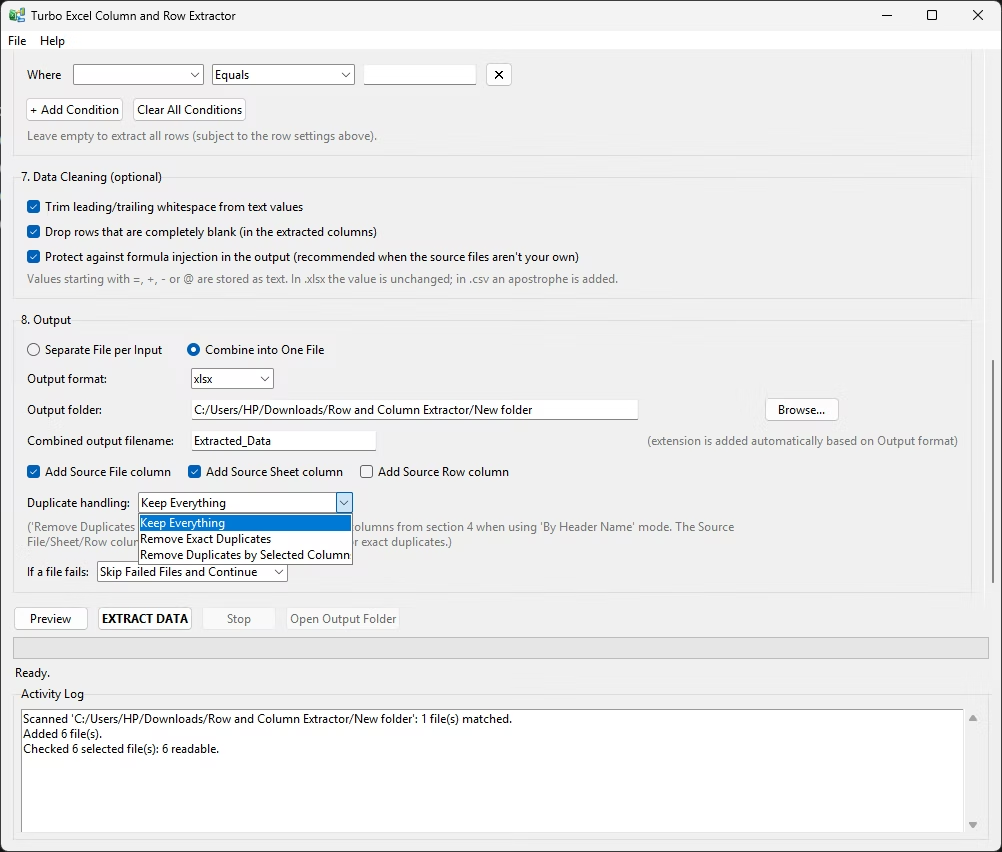
Merging many files reliably produces duplicates. The same customer appears in two regional lists, a record is carried forward from one month's file into the next, or an export was run twice. The duplicate dropdown in section 8 offers three ways to deal with it, applied to the combined result after every file has been read.
Keep Everything
The default. Nothing is removed. Correct when duplicates are meaningful — repeated transactions, recurring readings, or any case where two identical rows genuinely represent two separate events.
Remove Exact Duplicates
Drops rows where every value across every extracted column is identical to a row already kept. Conservative and safe: two rows have to be indistinguishable to be collapsed.
Remove Duplicates by Selected Columns
Drops rows sharing the same values in your chosen key columns, keeping the first occurrence. This is how you get one row per employee ID, per invoice number or per SKU, even when the other columns differ between the copies.
Two things to watch with key-column de-duplication. First, the key columns are taken from the columns you ticked in section 4 when using header-name selection — so tick only what you want treated as the key, or the de-duplication will be broader than you intended. Second, if the Source File column is enabled it is part of the row, which means rows from different files are never exactly identical. If you are de-duplicating across files with Remove Exact Duplicates and nothing is being removed, the tracking columns are usually the reason.
There is also a sequencing detail worth knowing: whitespace trimming happens before duplicates are assessed. Two rows that differ only by a trailing space will therefore be recognised as duplicates when trimming is on, and treated as distinct when it is off. If de-duplication is missing obvious matches, switching on whitespace trimming is the first thing to try.
Preview Before You Run
The Preview button in the action bar runs your current settings against the first matching file only and shows you the result. It is the single most useful habit to build when working with this app, and it takes a couple of seconds.
The preview window shows up to 25 rows of output, exactly as the real run would produce them, including the source tracking columns and any cleaning you enabled. Above the table sits a status line naming the file used and reporting how many rows matched in total — so even though you only see 25, you learn whether the filter caught eleven rows or eleven thousand.
Three outcomes are all informative:
- A table that looks right. Your settings are correct. Run the batch.
- A table with the wrong columns or odd values. Usually the header row setting, or column letters pointing at the wrong positions. Fix it and preview again.
- No rows at all. Either your conditions match nothing in that particular file, or a condition references a column that does not exist under that name. The activity log will say which file was used, so you can open it and check.
Preview only ever reads one file, so it stays fast regardless of how large the batch is. Running it on a folder of two thousand workbooks costs the same as running it on a folder of five — which is precisely why it is worth doing before every long job.
Progress, Speed and Stopping
Batch work happens on a background thread, so the window stays responsive throughout. You can scroll the settings, read the log and resize the window while a batch of several thousand files is running.
Progress bar and counters
A determinate bar fills as files complete, with a text readout of how many files are done out of the total and a running split of successes and failures. Because processing is parallel, files complete in whatever order they finish rather than alphabetically.
Speed and ETA
Files per second and an estimated time remaining are recalculated continuously from actual throughput. The first few seconds of a run give a rough estimate; it settles quickly once enough files have completed to average over.
The Stop button
Cancels cleanly. Files already being processed are allowed to finish, and no new ones are started. You never get a partially written output file, and nothing on disk is left in an inconsistent state.
Open Output Folder
Enabled once a run completes, opening the destination folder in Windows Explorer with a single click. The same command is available from the File menu at any time.
One behaviour worth anticipating: in Combine into One File mode, the combined workbook is written after every file has been read, so the final few seconds of a large job are spent building and saving one big output. The progress bar will sit at full while that happens. It has not stalled — it is writing.
Saving and Loading Configurations
Under the File menu, Save Configuration... writes every setting on the window to a .json file, and Load Configuration... restores them. It sounds like a minor convenience and turns out to be one of the most valuable features in the app for anybody doing recurring work.
A monthly consolidation configured once becomes a thirty-second task from then on: open the app, load monthly_sales_extract.json, point section 1 at this month's folder, press EXTRACT DATA. Nothing is rebuilt from memory, so the extraction is identical every month and produces output with an identical shape — which matters enormously when the result feeds a downstream report or import that expects specific columns in a specific order.
Saved configurations are also the practical way to share an extraction with a colleague. The file is plain JSON, small enough to email, and loading it reproduces the exact set of columns, conditions, cleaning options and output settings on their machine. It is a far more reliable handover than a written list of instructions, and it removes the class of problem where two people run "the same" extraction and get different results.
Give configuration files descriptive names and keep them alongside your input folders. config.json tells you nothing in six months; open_tickets_by_region_2026.json tells you everything.
Who Uses It and Why
The pattern that makes this app worth having is always the same: data arrives as many files, but the question you need to answer needs one table. Here is how that shows up across different kinds of work.
Finance and accounting
Consolidating monthly workbooks from branches, subsidiaries or cost centres into a single ledger extract. Pulling account codes, dates and amounts out of hundreds of submissions while leaving behind the notes, formatting and working columns nobody downstream needs.
Sales operations
Building a combined pipeline view from per-rep or per-region spreadsheets. Filtering to deals above a threshold, or to a particular stage, across the whole team's files without asking anybody to reformat their sheet.
HR and payroll
Extracting employee identifiers, departments and dates from files supplied by different sites, then de-duplicating on employee ID so people appearing in more than one file collapse to a single record.
Supply chain and inventory
Pulling SKU, quantity and location columns from supplier workbooks that all follow slightly different templates, and filtering to items below a reorder threshold across every warehouse at once.
Research and academia
Combining per-subject or per-session data files into one analysis-ready table, keeping only the measured variables, and using Source File as the participant or session identifier for the whole dataset.
Data engineering
Preparing a clean CSV for a database load from an archive of inconsistent spreadsheets. Skipping title rows, standardising to a fixed column set, and dropping blanks before anything reaches the import step.
Auditing and compliance
Searching an archive for every record matching a condition and producing a single evidence table with full provenance, so each row can be traced back to its source workbook, sheet and line.
Marketing and CRM
Merging contact lists from events, campaigns and imports, keeping just the fields the CRM accepts, and de-duplicating on email address so the same person is not imported four times.
Facilities and field operations
Collecting readings, inspection results or fault reports submitted as one workbook per site, filtered to the entries that need action, with the site name carried through automatically from the file name.
Anyone inheriting an archive
The most common case of all. Somebody leaves, and their folder of four hundred spreadsheets becomes your problem. Extraction turns it from an archaeology project into a table you can actually read.
Real Workflows, Start to Finish
Four complete jobs, with the exact settings that produce them. Each one is a template you can adapt.
Consolidate 300 monthly branch workbooks into one sheet
Section 1: the parent folder, subfolders on, pattern *.xlsx. Section 2: First Worksheet. Section 3: Columns. Section 4: load columns, Clear All, tick Date, Branch, Account, Amount. Section 7: trim whitespace on. Section 8: Combine into One File, xlsx, Source File and Source Sheet on, Keep Everything. Result: one workbook with six columns and every transaction from all 300 branches, each row labelled with its origin.
Pull every open ticket from a year of weekly logs
Section 1: the log archive, subfolders on. Section 2: All Worksheets, since each workbook holds one tab per week. Section 3: Columns + Rows. Section 4: tick Ticket ID, Opened, Owner, Summary. Section 6: Status Equals Open. Section 8: Combine into One File, all three tracking columns on, Remove Duplicates by Selected Columns keyed on Ticket ID. Result: one row per genuinely open ticket, with the week and file it was last seen in.
Strip 500 reports down to a fixed column set, one file each
Section 1: the reports folder. Section 3: Columns. Section 4: By Column Letters, spec A,B,E:G, header row set to 4 because every report opens with a three-line title block. Section 7: drop blank rows on. Section 8: Separate File per Input, csv. Result: 500 slim CSV files, each named after its original with an _extracted suffix, ready for a bulk import.
Find every high-value southern order across a mixed archive
Section 1: the archive root, subfolders on, all four file types ticked because the folder holds a decade of .xls, .xlsx and .csv files. Section 2: All Worksheets. Section 3: Columns + Rows. Section 5: All Rows. Section 6: Region Equals South, AND Order Total Greater Than 10000. Section 8: Combine into One File, csv, all tracking columns on. Result: one table of every matching order in the archive, each traceable to its exact source line.
Save each of these as a configuration once it works. The second time you need the same answer — and there is always a second time — the job is reduced to loading a file and changing a folder path.
Performance and the 128-Worker Engine
Batch processing runs across a fixed pool of 128 worker threads. There is no slider, and that is a deliberate design decision rather than a missing feature.
Reading a workbook is dominated by waiting — waiting for the disk, waiting for the file system, waiting for a network share to respond. While one worker waits, another can be doing useful work. Running many reads concurrently therefore produces a genuine reduction in wall-clock time, and the effect is most pronounced on exactly the batches where it matters: folders with hundreds or thousands of files.
Exposing that number as a setting would mean asking every user to tune something that has one sensible answer for almost every job. Worse, a badly chosen value produces slow runs that look like a fault in the app. Fixing it at 128 removes a decision that adds no value.
What actually determines your speed
| Factor | Effect |
|---|---|
| Storage type | The single biggest factor. An NVMe SSD will process a large batch several times faster than a mechanical drive, and local storage beats a network share by a wide margin. |
| File size | A folder of 2,000 small files usually completes faster than 200 very large ones. Total data read matters more than file count. |
| Sheets per workbook | All Worksheets on a file with 20 tabs means 20 reads for that file. Restricting to First Worksheet is a large saving when the other tabs are irrelevant. |
| Available RAM | Matters most in Combine mode, where results are held in memory until the end. More RAM means comfortably larger consolidated outputs. |
| Output format | CSV writes noticeably faster than XLSX for very large results, because there is no workbook structure to construct. |
| Legacy .xls files | The older binary format is slower to parse than modern XLSX. A batch that is mostly .xls will run slower than an equivalent batch of .xlsx. |
If a batch is slower than you expect, the productive question is almost never "can I add more threads?" It is usually one of: are the files on a network share, am I reading every sheet when I only need one, and is my output format right for the size of the result?
Error Handling
In any large folder, some files will not read. They may be corrupt, open in Excel on another machine, password-protected, or saved with an extension that does not match their actual contents. The If a file fails dropdown decides what happens then.
Skip Failed Files and Continue
The default. A failed file is recorded, counted in the failure total, and the batch carries on. On a folder of hundreds of files this is almost always the right behaviour: you get the 396 files that worked, plus a clear count of the four that did not.
Stop on First Error
Halts the run as soon as any file fails. Choose this when the extraction must be complete to be meaningful — a reconciliation where missing a file would produce a quietly wrong total, rather than an obviously incomplete one.
Either way, the failure count is displayed live during the run and the activity log keeps the record. If a batch reports failures, the log is the place to find out which files and why. Common causes, in rough order of frequency: the file is currently open elsewhere, the file is password-protected, the file is a .xls saved with an .xlsx extension, or the file is genuinely damaged.
It is worth noting what does not count as a failure. A file that reads successfully but produces no matching rows is a success with zero rows, not an error — which is correct, because "no rows in this file matched your filter" is a normal outcome, not a fault.
Manual Copy-Paste vs. a Batch Engine
It is worth being honest about when a tool like this is not needed. If you have five files and a one-off request, opening them and copying the columns by hand is perfectly reasonable and will take less time than configuring anything. The calculation changes when the work repeats or the folder grows.
| Aspect | Manual copy-paste | Batch extraction |
|---|---|---|
| Time for 300 files | Hours to days, entirely dependent on attention span | Minutes, mostly spent configuring the first time |
| Consistency | Drifts as fatigue sets in — a wrong column here, a skipped file there | Identical rules applied to every file, every run |
| Traceability | Lost unless someone adds a source column by hand | Automatic, per row, at no extra effort |
| Repeatability | The whole job again next month | Load a saved configuration and press one button |
| Error recovery | Start again, or try to find where it went wrong | Change a setting, re-run, get a fresh clean output |
| Nested folders | Manual navigation, easy to miss a folder | Recursive scan, nothing skipped |
| Handling broken files | Stops you and needs a decision each time | Skipped and counted, batch continues |
| Setup cost | None | A few minutes the first time, near zero afterwards |
The honest summary: below roughly ten files, manual work wins. Between ten and fifty it is close, and the deciding factor is whether you will ever do it again. Above fifty files, or for anything recurring, batch extraction is not just faster but meaningfully more accurate — because a rule applied by software does not get tired on the two-hundredth file.
Security and Privacy
Spreadsheets tend to hold exactly the material an organisation is most careful about: payroll, customer records, financial detail, medical or research data. That shaped how this app handles your files.
- All processing is local. Files are read from your disk and written back to your disk. Nothing is uploaded, and there is no cloud component to the extraction at all.
- No telemetry on your data. The app does not transmit file names, column names, cell values, row counts or folder paths anywhere.
- One network request, ever. The only time the app contacts the internet is the one-time license activation, which carries your license key and purchase email and nothing else.
- Works offline afterwards. Once activated, verification is cached locally, so the app runs on machines with no internet connection and in restricted or air-gapped environments.
- Source files are never modified. The app only ever reads input files. Results go to the output folder you nominate, so the originals stay exactly as they were.
- Macros are never executed. Macro-enabled
.xlsmfiles have their cell data read without their code running, which makes bulk-reading files from outside sources safer than opening them in Excel.
In practice this means the app is usable in environments where a web-based converter or an online merge tool would be prohibited outright. Data that cannot leave the building does not have to.
Minimum System Requirements
| Operating system | 64-bit Windows 10 or Windows 11 |
| Processor | 64-bit x86 processor, dual core |
| Memory | 4 GB RAM |
| Disk space | 300 MB for the application, plus room for your output files |
| Display | 1280 × 720 or higher |
| Internet | Required once for license activation only |
| Excel | Not required — the app reads and writes files directly |
Recommended System Requirements
| Operating system | 64-bit Windows 11 |
| Processor | Modern quad-core or better |
| Memory | 16 GB RAM or more for very large combined outputs |
| Storage | NVMe SSD, with input files stored locally rather than on a network share |
| Display | 1920 × 1080 so all eight sections are comfortable to work with |
The recommendations matter most for one specific case: combining hundreds of large files into a single output, where every extracted row is held in memory until the final write. For per-file output, or for moderate batches, the minimum specification is genuinely sufficient.
App Info
| Application | Turbo Excel Column and Row Extractor |
| Publisher | TurboSoft |
| Category | Excel column extractor / batch data extraction |
| Platform | Windows 10 and Windows 11, 64-bit |
| Input types | .xlsx, .xlsm, .xls, .csv |
| Output types | .xlsx, .csv |
| Worker threads | 128, fixed |
| Licensing | One-time purchase through Gumroad |
| Trial | None — a valid license key is required to run extractions |
| Internet required | Once, for activation |
| Installer | Standalone Windows executable |
Installation and Licensing
- Purchase the license. Use the Buy Now button on this page. The purchase goes through Gumroad and your license key is issued immediately, along with a receipt sent to the email address you used.
- Download and install. Run the installer on any 64-bit Windows 10 or Windows 11 machine. Excel does not need to be installed — the app reads and writes spreadsheet files directly.
- Activate on first launch. The activation dialog appears automatically the first time you open the app. Enter the email address you purchased with and your license key, then click Activate.
- Work offline from then on. Verification is cached locally after a successful activation, so the app continues to run with no internet connection at all.
There is no trial or demo mode. A valid license is required before any extraction will run, which is why the activation dialog appears on first launch and again if you attempt to extract while unlicensed. There is no separate menu item for it — it appears when it is needed. If you need to re-enter a key later, attempting an extraction will bring the dialog back up.
If activation fails, the two things to check first are that the email exactly matches the one used for the purchase, and that the key has been pasted in full with no trailing space. Full step-by-step guidance is on the how to activate TurboSoft apps page, and if you are still stuck, support can help directly.
Notes and Current Limitations
Being clear about what the app does not do is as useful as listing what it does. These are the current boundaries in version 1.
Formatting is not preserved
Output is always a clean, data-only workbook. Fonts, fills, borders, conditional formatting, number formats, merged cells and column widths from the source files are not carried through. This is intentional for consolidation work, where the result usually feeds a pivot table or an import rather than being read as a formatted document.
Formulas are read, not re-evaluated
Values Only reads the value the cell displays, which is what almost every consolidation job needs. Formulas as text reads cached values through the underlying engine rather than recalculating them, so it is a diagnostic option rather than a formula auditor.
Password-protected files are skipped
Encrypted workbooks cannot be read without their password, so they are counted as failures. Remove protection before the run, or expect them in the failure count.
Charts, images and pivot tables are not extracted
The app extracts cell data. Embedded objects are outside its scope. For pulling images out of workbooks, Turbo Excel Image Extractor and Inserter is the right tool.
No bracketed condition logic
Conditions combine in the order shown with AND and OR, but there is no grouping syntax. Complex nested logic is usually better expressed as two separate extraction runs.
XLSX row ceiling
A single XLSX worksheet holds at most 1,048,576 rows. This is a limit of the file format, not the app. Choose CSV output for larger consolidated results.
Troubleshooting
| Symptom | Likely cause and fix |
|---|---|
| Scan Files reports zero files | The filename pattern or the file-type checkboxes are excluding everything. Reset the pattern to *, tick all four types, and scan again to confirm the folder itself is right. |
| Columns loaded look like data, not headers | The header row setting does not match your files. Set Header row is row # to the correct line, then click Load Columns From First File again. |
| Output has more columns than expected | Column selection is either untouched (all boxes ticked by default) or the extraction mode is set to Rows, which keeps every column. Check section 3 first, then section 4. |
| Output is empty | A condition matches nothing, or references a column name that does not exist in your files. Use Preview and check the activity log for which file it tested. |
| Some files produced no rows | Normal when filtering. Those files simply contain no matching records. Confirm by checking whether the total row count looks plausible for the filter you applied. |
| A few files failed | Usually open in Excel elsewhere, password-protected, or damaged. The activity log names them. Close them, remove protection, or accept the skip. |
| Duplicates were not removed | The Source File column makes rows from different files distinct, so exact-duplicate matching finds nothing. Switch to key-column de-duplication, or turn the tracking columns off for that run. |
| Progress sits at 100% without finishing | In Combine mode the app is building and writing the merged output after all reads complete. Large results take time to write. Let it finish. |
| Numbers arrive as text in the output | Values are read as text to protect IDs with leading zeros and long reference numbers. Convert the relevant columns after import if you need them typed as numbers. |
| .xls files are being ignored | The .xls checkbox is off by default. Tick it in section 1 and rescan. |
| The run picked up its own output | The output folder sits inside the input folder and sub-folder scanning is on. Move the output somewhere outside the scanned tree. |
| Activation is refused | Check the email matches the purchase exactly and that the key was pasted in full with no trailing space. See the activation guide if it persists. |
Getting the Best Results
- Always preview before a long run. It reads one file and takes seconds, and it catches the great majority of configuration mistakes before they cost you a full batch.
- Scan after every filter change. The match count is the quickest confirmation that your folder, pattern and type settings mean what you think they mean.
- Keep output outside the input tree. This single habit prevents the app from finding its own results on a later run.
- Set the header row before loading columns. The checkbox list is built from whichever row the setting points at, so the order matters.
- Leave the tracking columns on. They cost two columns and answer every "where did this come from?" question you will be asked afterwards.
- Prefer First Worksheet when it is sufficient. Reading every tab of every workbook is significantly slower and often adds nothing.
- Use CSV for very large consolidated outputs and XLSX when a person is going to open the file directly.
- Turn on whitespace trimming before de-duplicating. Trailing spaces are the most common reason duplicates are not detected.
- Test on a copied subfolder first when you are working with an unfamiliar archive. Ten files will tell you whether the settings are right.
- Save the configuration the moment a run works. Recurring jobs then take thirty seconds instead of ten minutes.
- Filter on columns you do not keep when the filter column is only needed for the decision, not for the output.
- Close the source files in Excel first. Files open elsewhere are the most common cause of read failures in a batch.
Glossary of Terms
- Excel column extractor
- A tool that pulls selected columns out of one or more spreadsheets and writes them to a new file. This app is a batch column extractor, meaning it applies one column selection to an entire folder of workbooks rather than to a single file.
- Batch extraction
- Applying the same extraction rules to many files automatically, rather than repeating the work by hand for each one. The defining feature is that configuration happens once and execution happens many times.
- Header row
- The line in a sheet that holds column names rather than data. Usually row 1, but frequently lower in generated reports that open with a title block. The app lets you specify which row it is.
- Column letters
- Spreadsheet-style position references — A, B, C, and onward to AA, AB and beyond. Used as an alternative to header names when position is more reliable than wording.
- Positional row selection
- Choosing rows by where they sit in the sheet: the first N, the last N, a range, or a specific list of line numbers. Contrasts with conditional selection.
- Conditional row selection
- Choosing rows by what they contain, using rules such as Amount Greater Than 1000. In this app, conditions are built in section 6 and combined with AND or OR.
- AND / OR logic
- How multiple conditions combine. AND requires both to be true; OR requires either. Conditions are evaluated in the order they appear, without bracketing.
- Source tracking
- Adding columns that record which file, sheet and row each extracted record came from, so a consolidated table remains traceable back to its origins.
- Combine mode
- Writing all extracted rows from all files into a single output file. The alternative is per-file mode, which produces one output per input.
- De-duplication
- Removing repeated records from the combined result, either by exact match across all columns or by matching on chosen key columns such as an ID.
- Key column
- The column whose value identifies a record uniquely — an employee ID, an invoice number, an email address. Used as the basis for de-duplication.
- Recursive scanning
- Walking every sub-folder beneath a chosen folder, at any depth, so that nested archives are processed without manual navigation.
- Filename pattern
- A wildcard expression such as
Sales_*.xlsxthat limits which files enter the batch, where*matches any sequence of characters and?matches exactly one. - Worker thread
- One of the parallel units of work the app uses to process several files at the same time. This app uses a fixed pool of 128, which suits the I/O-bound nature of reading spreadsheets.
- Values Only
- Reading the value a cell displays rather than the formula behind it. The default, and the correct choice for almost all consolidation work.
- Activity log
- The scrolling record at the bottom of the window that reports scans, loads, previews and run results. The first place to look when a batch does not do what you expected.
How It Compares to Our Other Data Tools
TurboSoft's data tools each solve a different problem, and they are designed to be used together. This one is about pulling a subset out of many files.
| Tool | Its job | Reach for it when |
|---|---|---|
| Turbo Excel Column and Row Extractor | Extract chosen columns and rows from many files into one output. | You need a subset of many workbooks consolidated into a single table. |
| Turbo Excel Cleaner | Clean and standardise messy spreadsheet data. | The data you have is already in one place but needs tidying. |
| Turbo Excel Lookup | Match and enrich records across files. | You need to join two datasets on a shared key. |
| Turbo CSV Splitter | Split large CSV files into smaller pieces. | You have the opposite problem — one file that is too big. |
| Turbo Large Data Splitter | Split very large datasets across many formats. | You need to break up a large dataset for distribution or processing. |
| Turbo Excel Image Extractor and Inserter | Pull images out of workbooks, or put them in. | The thing you need is pictures rather than cell data. |
A common pairing: use the extractor to consolidate a folder into one table, then run the cleaner over the result to standardise the values before it goes anywhere else. Extraction narrows; cleaning normalises. Doing them in that order means the cleaner works on one file instead of four hundred.
Frequently Asked Questions
What is an Excel column extractor?
An Excel column extractor is a tool that pulls selected columns out of spreadsheets and writes them to a new file. Turbo Excel Column and Row Extractor is a batch Excel column extractor, which means it applies one column selection across an entire folder of workbooks rather than to a single file at a time. You choose the columns once, and the app takes those same columns out of every file it finds.
How do I copy columns from multiple Excel files?
Point the app at the folder holding your files, set the extraction mode to Columns, click Load Columns From First File and tick the headers you want, then choose Combine into One File in the output section and press EXTRACT DATA. That is the whole process. If you prefer to select by position rather than by name, switch the selection method to By Column Letters and type a spec such as A,C,F:H instead.
How do I copy rows from multiple Excel files?
Set the extraction mode to Rows, then choose how you want the rows identified. For rows in fixed positions, use one of the six row modes: All Rows, First N Rows, Last N Rows, Row Range, Specific Rows or Skip First N Rows. For rows identified by their content, add filter conditions in section 6, such as Status Equals Open, joined with AND or OR. Both approaches can be combined in the same run.
Can it really copy columns from 100s of Excel files at once?
Yes. That is the case the app was designed for. Files are processed across 128 parallel worker threads, sub-folders are scanned recursively, and each extracted row can carry Source File and Source Sheet columns so the consolidated output stays traceable. Folders of several hundred to several thousand workbooks are a normal workload rather than an edge case.
Can it copy rows from 100s of Excel files based on a condition?
Yes. Build a condition such as Region Equals South or Amount Greater Than 10000 in section 6, and the app applies it to every row of every file in the batch. What comes back is a single table containing every matching row from across the whole folder, each one labelled with the file and sheet it came from.
Do I need Microsoft Excel installed?
No. The app reads and writes spreadsheet files directly, so it works on machines that have never had Excel installed. That also means it can run on servers and locked-down workstations where installing Office is not an option.
Which file types can it read?
Four: .xlsx, .xlsm, .xls and .csv. Each has its own checkbox so you can include or exclude it per job. The legacy .xls format is unticked by default because most modern folders do not contain it, so tick it if your archive includes older files.
Which file types can it write?
Two: .xlsx and .csv. Choose XLSX when a person will open the result, and CSV when a machine will read it or when the combined output is very large. The file extension is appended automatically based on your format choice.
Can it handle a folder with a mix of file types?
Yes. A single run can read .xls, .xlsx, .xlsm and .csv files together, as long as the columns you asked for exist in each of them. Tick all four file types in section 1 and the scanner picks up whatever it finds.
Does it read all worksheets or just the first one?
That is your choice. Four worksheet modes are available: All Worksheets, First Worksheet, Active Worksheet, and Selected Worksheets picked from a checklist. The mode is resolved separately for each file, so workbooks with different numbers of tabs are all handled correctly under one setting.
What if my headers are not on row 1?
Use the 'Header row is row #' spinner in section 4 to tell the app which line holds the column names. Reports that open with a title, a company name and a date stamp before the real table are very common, and this setting handles them. Set it before clicking Load Columns From First File, because the checkbox list is built from whichever row the setting points at.
Can I select columns by letter instead of by name?
Yes. Switch the selection method to By Column Letters and enter a spec such as A,C,F:H. Ranges use a colon, single columns are separated by commas, and two-letter references beyond column Z work as expected. This is the better choice when column positions are stable but the header wording varies between files.
What happens if a column name differs slightly between files?
Header matching is by exact text, so 'Order Date' and 'Order date' are treated as different columns. If your files vary that way, either standardise the headers first or switch to column-letter selection, which refers to position rather than to wording.
Can I filter on a column I do not want in the output?
Yes, and this is one of the more useful behaviours in the app. Conditions are evaluated before the column narrowing step, while every original column is still available. So you can filter on Status or Region without those columns appearing in your final output.
How many filter operators are there?
Twelve: Equals, Does Not Equal, Contains, Does Not Contain, Starts With, Ends With, Greater Than, Less Than, Greater Than or Equal, Less Than or Equal, Is Blank and Is Not Blank. The four numeric operators convert the column to numbers first and simply do not match non-numeric values.
Are text comparisons case-sensitive?
No. Text matching ignores case and surrounding spaces, so Sales, sales and ' Sales ' all satisfy the same condition. This is deliberate, because real spreadsheets are inconsistent and a strictly case-sensitive filter would quietly drop rows you meant to keep.
Can I combine multiple conditions?
Yes. Add as many conditions as you need and join each one to the previous with AND or OR. They are evaluated in the order they appear on screen. There is no bracketing syntax, so for genuinely complex nested logic it is usually cleaner to run two extractions than to try to express it as one flat list.
How do I know which file each row came from?
Switch on the Source File, Source Sheet and Source Row columns in section 8. They are inserted at the front of the output and give every extracted record a complete address: which workbook, which tab, which line. Source File and Source Sheet are enabled by default.
Is the Source Row number the real spreadsheet row?
Yes. It is recorded before any filtering happens, so it reflects the original position in the source sheet no matter how much the row set is narrowed afterwards. That is what makes it useful for going back and checking a record in context.
How does duplicate removal work?
Three options. Keep Everything makes no changes. Remove Exact Duplicates drops rows that are identical across every extracted column. Remove Duplicates by Selected Columns drops rows sharing the same values in your chosen key columns, keeping the first occurrence. De-duplication is applied to the combined result after all files have been read.
Why is duplicate removal not finding anything?
Most often because the Source File column is switched on. It makes rows from different files distinct, so no two rows are ever exactly identical. Either switch to key-column de-duplication, or turn the tracking columns off for that particular run. Trailing whitespace is the other common cause, which whitespace trimming resolves.
Does it modify my original files?
No. The app only ever reads input files. All results are written to the output folder you nominate, and the source files are left exactly as they were. Choose an output folder outside the folder being scanned so that results are never picked up as inputs on a later run.
What happens if a file is corrupt or locked?
That depends on the 'If a file fails' setting. The default skips the file, counts it as a failure and carries on with the rest of the batch, which is almost always what you want on a large folder. The alternative stops the whole run at the first error, for jobs where a partial result would be misleading.
Can it read password-protected workbooks?
No. Encrypted files cannot be read without their password and will be counted as failures. Remove the protection before running the batch if those files need to be included.
How fast is it?
Batches run across 128 parallel worker threads, so throughput depends far more on your storage than on the app. An NVMe SSD with local files will process a large batch several times faster than a mechanical drive or a network share. Reading only the first worksheet instead of all of them also makes a substantial difference.
Can I change the number of worker threads?
No, and that is deliberate. Reading spreadsheets is I/O bound, so 128 workers is the right answer for effectively every job. Exposing it as a setting would ask users to tune something with no better value available, and a badly chosen number would look like a fault in the app.
Is there a limit on how many files I can process?
No hard limit is imposed by the app. Practical limits come from your machine's memory when using Combine into One File, since results are held until the final write. For very large consolidations, choosing CSV output and filtering tightly keeps things comfortable.
Is there a row limit on the output?
For CSV, no. For XLSX, a single worksheet holds a maximum of 1,048,576 rows, which is a limit of the Excel file format itself rather than of this app. If your consolidated result is likely to approach that figure, choose CSV.
Does it preserve formatting, fonts and colours?
No. Output is always a clean, data-only workbook. Fonts, fills, borders, number formats, merged cells and conditional formatting are not carried through. This is intentional for consolidation work, where the result normally feeds a pivot table, a report or an import rather than being read as a formatted document.
What does 'Values Only' mean?
It means the app reads the value a cell displays rather than the formula behind it, so a cell containing a formula comes through as the number it evaluates to. This is the default and is correct for essentially every consolidation job. The alternative, Formulas as text, is a diagnostic option for auditing rather than a formula evaluator.
Can I preview the result before running a full batch?
Yes, and it is worth doing every time. The Preview button runs your current settings against the first matching file and shows up to 25 result rows, along with a count of how many rows matched in total. It reads one file only, so it stays fast no matter how large the batch is.
Can I stop a batch that is already running?
Yes. The Stop button cancels cleanly: files already being processed are allowed to finish and no new ones are started. You will not be left with a half-written output file or a damaged workbook.
Can I save my settings for next time?
Yes. Save Configuration under the File menu writes every setting to a .json file, and Load Configuration restores them. Recurring jobs become a matter of loading last month's configuration, changing the folder, and pressing the button. The file is plain JSON, so it can be shared with colleagues too.
Does it work offline?
Yes. All processing happens on your own machine and nothing is ever uploaded. The only network request the app makes is the one-time license activation, after which verification is cached locally and the app runs with no internet connection at all.
Is my data sent anywhere?
No. File names, column names, cell values, row counts and folder paths are never transmitted. Every read and write happens on your own disk, which makes the app suitable for confidential material and for restricted or air-gapped environments.
Is there a free trial?
No. There is no trial or demo mode, so a valid license key is required before any extraction will run. The activation dialog appears automatically on first launch and again if you attempt an extraction while unlicensed.
How is it licensed?
Through a one-time Gumroad purchase, with no subscription and no recurring fee. Activate once with the email you purchased with and your license key, and the app keeps working locally from then on.
Which versions of Windows are supported?
64-bit Windows 10 and Windows 11. The app uses the native Windows visual style, integrates properly with the taskbar, and takes advantage of multi-core processors for batch throughput.
Can it extract images or charts from workbooks?
No. This app extracts cell data. For pulling images out of Excel files or inserting them, Turbo Excel Image Extractor and Inserter is the tool built for that job.
What is the difference between this and Turbo Excel Cleaner?
The extractor narrows: it takes chosen columns and rows out of many files and consolidates them into one table. The cleaner normalises: it standardises and tidies data that is already assembled. They pair well in that order, because cleaning one consolidated file is far less work than cleaning four hundred separate ones.